
Our Daring Bakers Host for December 2011 was Jessica of My Recipe Project and she showed us how fun it is to create Sour Dough bread in our own kitchens! She provided us with Sour Dough recipes from Bread Matters by AndrewWhitley as well as delicious recipes to use our Sour Dough bread in from Tonia George’s Things on Toast and Canteen’s Great British Food!
Sourdough is made without adding any yeast or leavening to the bread. You let the natural yeasts in flour develop over several days. I’d never made sour dough before, so it was fun feeding the starter a little every morning and watching it slowly come to life.

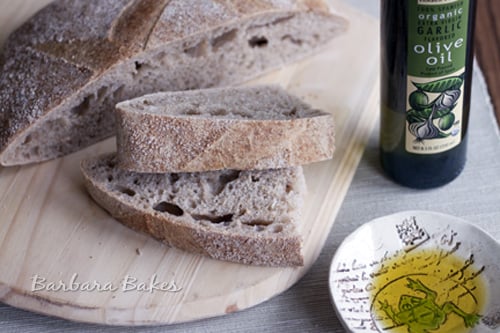
The dough is very wet and doesn’t produce a tall loaf like you buy at the market, but what it lacked in looks it made up for in taste. It has a fabulous flavor with a crisp, chewy crust and moist tender crumb. It smelled irresistible while it was baking. We couldn’t resist cutting it and eating half of it while it was still hot.

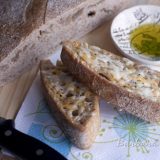
We also had to make a recipe that showcases the bread, and I chose to make HoneyB’s Cheesy Garlic Bread. My sweet blogging friend Shelby, The Life & Loves of Grumpy’s Honeybunch, is celebrating her 4 year blogiversary with a small bites party and a giveaway and I’m helping her celebrate. Shelby and I meet through Daring Bakers and have been blogging buddies almost from the beginning. She is a kind, caring person, with loads of great recipes, like her wonderful Cheesy Garlic Bread.
Information on how you can help Shelby celebrate and enter her giveaway are listed below. You’ll also want to be sure and visit the Daring Kitchen to see all the fabulous bread the Daring Bakers baked up this month. Thanks Jessica for hosting this month’s challenge. (I also want to thank Kelley, Mountain Mama Cooks, for giving me the cute frog bowl and the fabulous Trader Joe’s Garlic Olive Oil. I drizzled it on the bread instead of butter and garlic and it’s amazing!)
French Country Sour Dough Bread
Ingredients
Wheat Starter – Day 1:
- 4 ½ tablespoons 70 ml (40 gm/1 ½ oz) stoneground breadmaking whole-wheat or graham flour
- 3 tablespoons 45 ml water
- Total scant ½ cup 115 ml (3 oz/85 gm)
Wheat Starter – Day 2:
- 4 ½ tablespoons 70 ml (40 gm/1 ½ oz) stoneground breadmaking whole-wheat or graham flour
- 3 tablespoons 45 ml water
- scant ½ cup 115 ml (3 oz/85 gm) starter from Day 1
- Total scant cup 230 ml (6 oz/170 gm)
Wheat Starter – Day 3:
- 4 ½ tablespoons 70 ml (40 gm/1 ½ oz) stoneground breadmaking whole-wheat or graham flour
- 4 teaspoons 20 ml water
- scant 1 cup 230 ml (6 oz/170 gm) starter from Day 2
- Total 1? cup 320 ml (230 gm/8-1/10 oz)
Wheat Starter – Day 4:
- ¾ cup plus 1½ tablespoons 205 ml (120 gm/4 ¼ oz) unbleached all-purpose flour
- ½ cup less 4 teaspoons 100 ml water
- 1 ? cup 320 ml (230 gm/8 oz) starter from Day 3
- Total scant 2? cup 625 ml (440 gm/15½ oz)
French Country Bread
- 1 cup less 1 tablespoon 225 ml (160 gm/5 ? oz) wheat Leaven Starter
- 6 tablespoons less 1 teaspoon 85 ml (50 gm/1¾ oz) stoneground bread making whole-wheat or graham flour
- 1 cup plus 2 teaspoons 250 ml (150 gm/5 ? oz) unbleached all purpose flour
- ½ cup 120 ml water
- Production Leaven Total 2¾ cups plus 4 teaspoons 680 ml (480 gm /1 lb 1 oz)
- French Country Bread
- ¾ cup less 1 teaspoon 175 ml (100 gm/3 ½ oz) stoneground breadmaking whole-wheat or graham flour, plus more for dusting
- 2 cups plus 2 tablespoons 510 ml (300gm/10 ½ oz) unbleached all-purpose flour
- 1¼ teaspoons 7½ ml (7 gm/¼ oz) sea salt or ? teaspoon (3? ml) (3 gm/? oz) table salt
- 1 ¼ cups 300 ml water
- 1 ¾ cups 425 ml (300 gm/10 ½ oz) production leaven–this should leave some (1 cup) for your next loaf.
- Total 6 cups less 2 tablespoons 1415 ml 1007 gm/35 ½ oz/2 lb 3½ oz
HoneyB’s Cheesy Garlic Bread
- 1 loaf Italian bread
- 4 Tablespoons butter softened
- ½ Tablespoon refrigerated minced garlic
- ½ cup freshly grated Parmesan cheese I use a micro plane zester. If you don’t use this, you may want to adjust the amount of cheese.
- ½ cup shredded mozzarella cheese
- oregano
Instructions
Wheat Starter – Day 1:
- In a Tupperware or plastic container, mix the flour and water into a paste. Set the lid on top gently, cover with a plastic bag, to prevent messes in case it grows more than expected! 3. Set somewhere warm (around 86 F if possible). I sometimes put mine on a windowsill near a radiator, but even if it’s not that warm, you’ll still get a starter going–it might just take longer.
Wheat Starter – Day 2:
- Stir the flour and water into the mixture from Day 1, cover, and return to its warm place.
Wheat Starter – Day 3:
- Stir the flour and water into the mixture from Day 2, cover, and return to its warm place.
- Wheat Starter – Day 4
- Stir the flour and water into the mixture from Day 3, cover, and return to its warm place. At this point it should be bubbling and smell yeasty. If not, repeat this process for a further day or so until it is!
French Country Bread Stage 1:
- Refreshing the leavenMix everything into a sloppy dough. It may be fairly stiff at this stage. Cover and set aside for 4 hours, until bubbling and expanded slightly.
- French Country Bread Stage 2: Making the final dough
- Mix the dough with all the ingredients except the production leaven. It will be a soft dough. Knead on an UNFLOURED surface for about 8-10 minutes, getting the tips of your fingers wet if you need to. You can use dough scrapers to stretch and fold the dough at this stage, or air knead if you prefer. Basically, you want to stretch the dough and fold it over itself repeatedly until you have a smoother, more elastic dough.
- Smooth your dough into a circle, then scoop your production leaven into the center. You want to fold the edges of the dough up to incorporate the leaven, but this might be a messy process. Knead for a couple minutes until the leaven is fully incorporated in the dough.
- Spread some water on a clean bit of your work surface and lay the dough on top. Cover with an upturned bowl, lining the rim of the bowl with a bit of water. Leave for an hour, so that the gluten can develop and the yeasts can begin to aerate the dough. Once your dough has rested, you can begin to stretch and fold it. Using wet hands and a dough scraper, stretch the dough away from you as far as you can without breaking it and fold it back in on itself. Repeat this in each direction, to the right, towards you, and to the left. This will help create a more "vertical" dough, ready for proofing.
- Heavily flour a banneton/proofing basket with whole wheat flour and rest your dough, seam side up, in the basket. Put the basket in a large plastic bag, inflate it, and seal it. Set aside somewhere warm for 3-5 hours, or until it has expanded a fair bit. It is ready to bake when the dough responds to a gently poke by slowly pressing back to shape.
- Preheat the oven to hot 425°F/220°C/gas mark 7. Line a baking sheet with parchment, then carefully invert the dough onto the sheet. I like to put the baking sheet on top of the basket, then gently flip it over so as to disturb the dough as little as possible. Make 2-3 cuts on top of the loaf and bake for 40-50 minutes, reducing the temperature to moderately hot 400°F/200°C/gas mark 6 after 10 minutes. Cool on a cooling rack.
- HoneyB’s Cheesy Garlic Bread
- Slice loaf of bread in half lengthwise. Mix garlic into softened butter. Spread evenly on both sides of bread slices. Sprinkle with Parmesan cheese, then sprinkle with mozzarella and oregano. Bake in 350 degree oven for about 10 minutes. Turn to broil and broil until cheese just begins to brown. Cool slightly, slice & enjoy!

jacquie
who inspires me?? all different kinds – the single mom working 2 jobs to keep her kids fed and clothed, the elderly dealing as best they can the limitations that age has placed on them, volunteers that make homeles shelters, soup kitchens etc possible, people that just get up and slog through their dead end jobs because that is what is necessary, the vet who works long, long hours and doesn’t charge much simply because it is his “calling”, etc. all different “types” of people for different reasons…..
Katrina
I didn’t know that sourdough doesn’t have yeast. I always thought it had both. Makes sense that the starter is the “yeast”. Mmm! Nothing like a slice of sourdough sometimes!
Betty @ scrambled henfruit
What a gorgeous loaf of bread, and it looks delicious as well. I need to start making more of my own. Who inspires me? My mom, of course. 🙂
Stphanie
My favorite bloggers inspire me everyday.
Bunny
Your bread looks fantastic, making my belly growl!! LOL
Lorraine @ Not Quite Nigella
I really wanted to do this challenge but alas totally ran out of time. Yours looks wonderful mum! And you are the sweetest mum ever! 😀 xxx
Becky at Vintage Mixer
I spot the frog bowl 🙂 I’m a sucker for good bread and yours is always the best!
Barbara
wow..looks so good and I love to bake breads..Barbara Bakes really inspires me since my name is Barbara and I too love to bake…Blessings in the New Year and thanks for the wonderful recipes..
kelley
I love the bowl for dipping, what a great idea! You are so beautiful inside and out, Barbara, I’m so glad we’ve gotten to know each other over the year! So glad you liked the bowl and oil. xx
claudia lamascolo
Bread is my weakness and sour dough is the best!
angela@spinachtiger
Barbara you give it just the right touch with that olive oil and cheese. I consider a good sour dough bread last meal good. And, I feel like I could almost smell this. Good thing you’re not next door.
Coleens Recipes
You just can NOT beat cheesey garlic bread.
Janette
I love sourdough bread but I confess. I get intimidated when it comes to making any type of bread, most especially when it has yeast in it. If I can work up the courage, I may have to try this though.
Amy @ uTryIt
What a beautiful loaf of sour dough. I tried to make it once but not so successful. Yours looks fabulous! 🙂
My Grandmother inspires me the most. Both in the kitchen and in real life. 🙂 Thanks for this wonderful giveaway.
amy [at] utry [dot] it
JennyBakes
Barbara, you always do a nice job on challenges, but this bread looks fantastic. So many delicious holes!
Blond Duck
I’ve always wanted to try sourdough!
Jenni
Great job! Your sourdough loaf looks great! And I bet it was delicious hot out of the oven with some olive oil!
Daisy@Nevertoosweet
Sour dough is my favourite type of bread!!! But it seems so complicated to make it at home >_< but will give this a go when i have the time 🙂 happy holidays Barbara!
Frieda
Yes, your bread looks delicious! Congrats on a successful sourdough bread! I am sure you will find many uses for your sourdough starter.
Rosa
A delicious looking bread! Perfect when dipped into olive ol.
Cheers,
Rosa