
Learn how to make pie crust with this in-depth, step-by-step tutorial. Make the flakiest crust with a combination of butter for flavor and shortening for flakiness. This crust is perfect for all of your favorite pie recipes all year long.
For me, the key to the perfect pie crust is all about flavor and texture. This recipe makes an incredibly flakey, buttery pie crust. Both real butter and shortening mean that your crust is super flaky with tons of buttery flavor.
I used to struggle to make beautiful pie crusts. My dough always fell apart when I tried to move it from the counter to the pie plate. Or the crust would shrink when I baked it. I was usually disappointed with the flavor and they weren’t as flaky as I liked. Once I learned how to make better pie crusts, I had to write this tutorial on how to make easy pie crusts that come out perfectly every time.
Update: The holidays are right around the corner, which means it’s time to break out your favorite pie recipes. We’ve updated our pie crust tutorial with all of our best tips, tricks, and new photos so every pie on your holiday table can be a show-stopper this year.

How to Make Pie Crust
The first step to making homemade pie crust is to chill all of your ingredients. Make sure that the butter and shortening are both fresh from the fridge before you start mixing. And because you want to work quickly to keep the butter from warming and softening, it’s best to have all of your ingredients out and within reach.
When you have your “mise en place” established and you’re ready to get mixing, here are the steps to making the best pie crust:
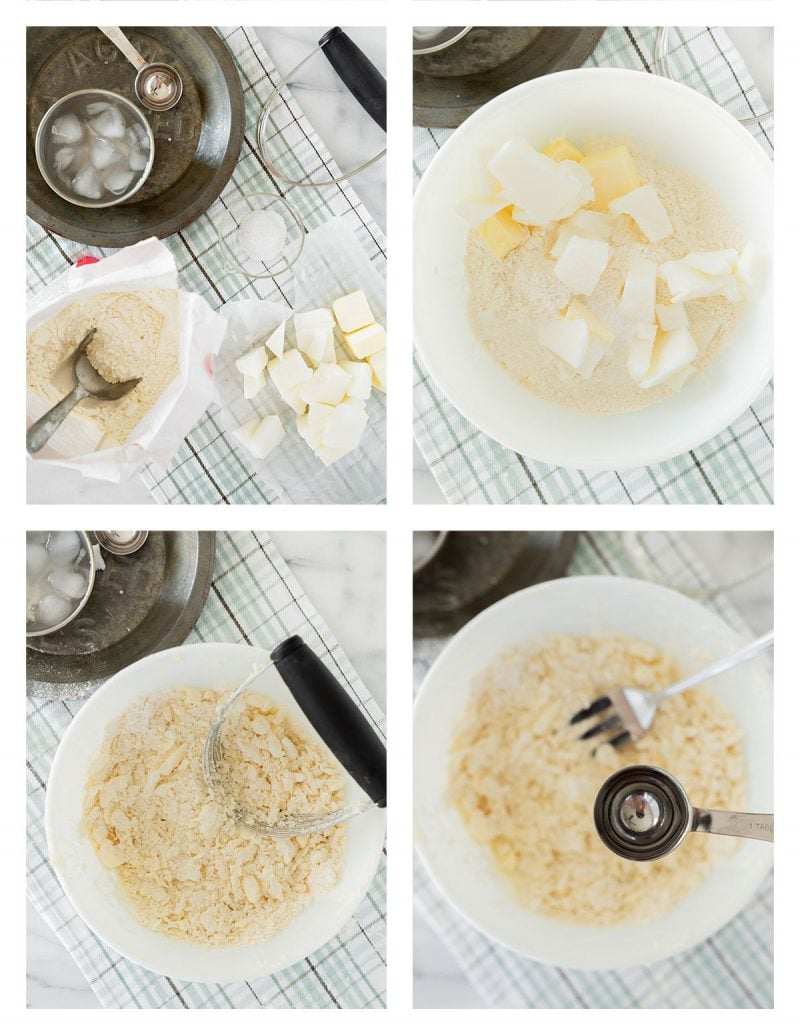
- Cut the cold butter and shortening into small pieces. This makes it easier to incorporate into the dry ingredients quickly without warming the fat too much.
- Use a pastry cutter to cut the butter and shortening pieces into the flour. Stop when you have pea-sized pieces of butter coated evenly in flour.
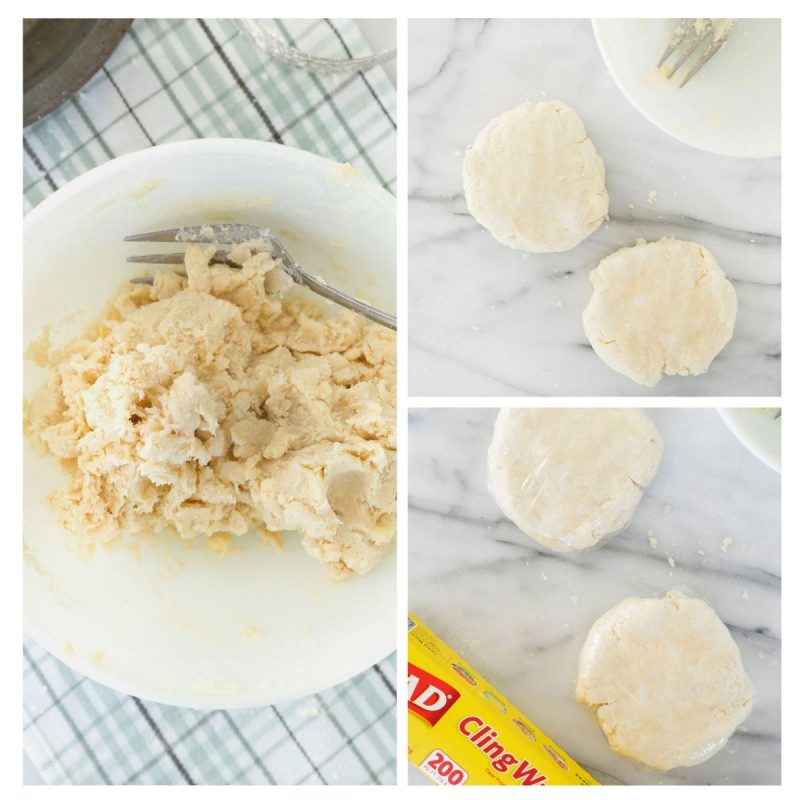
- Fold in ice water, one tablespoon at a time, using a fork. The mixture will still be pretty dry. If it’s difficult to get your dough to come together, rinse your hands in ice-cold water and dry them. Using your fingers press the dough mixture into a ball.
- Use your hands to gather the dough together into a rough ball. You don’t want to handle it too much because your hands will warm the dough.
- Place the dough in the center of a sheet of plastic wrap.
- Use the plastic wrap to knead the dough together so it forms a round, flat disc.
- Cover the dough with the plastic wrap and chill in the fridge for at least 30 minutes.
Rolling and Shaping Pie Crust
After your crust rests and chills in the refrigerator for at least half an hour, it’s ready to be rolled, shaped, and baked. Here’s how to shape a classic bottom crust for a pumpkin pie or similar recipe:
- Remove the dough from the plastic wrap and place it between two (I usually use four–two on top and two on the bottom) sheets of plastic wrap.
- Roll the pie crust into a circle about ⅛-inch thick, keeping the plastic wrap between your crust and rolling pin. If the plastic wrap gets tucked under the dough, just straighten it. If your dough slides around on the countertop, placing a Silpat or large cutting board underneath can help keep it in place.
- Roll the crust out large enough so that you have plenty of crust to come up the sides of your pie plate. I like to put the dish in the middle to measure it as I work.
- Peel off the top sheet of plastic. Grab hold of the bottom sheet of plastic and the dough and quickly but gently flip it over into your pie plate.
- Don’t stretch the dough when fitting it in the pie plate, or it will shrink as it bakes. After you’ve fit the crust in the pan, press it gently against the sides and bottom to ensure that no air is trapped between the dough and the pan. Peel the bottom sheet of plastic off after your dough is securely in the pie plate.
- Finish the edges. If you’re using a fluted tart pan, you can simply trim the excess crust so it’s flush with the top of the pan. Martha Stewart has a fun gallery of great decorative pie crust ideas to finish your edges.
- Prick the crust all over with a fork. This helps steam escape during baking so the crust doesn’t rise and then fall.
- Chill the pie crust in the pan for at least another 30 minutes before baking or filling with your favorite pie filling. If you’re chilling the pie for longer than 30 minutes, cover it with plastic wrap to prevent it from drying out.
Ingredients for The Flakiest Crust
If you want great flaky layers and real butter taste, ingredients matter just as much as technique. In all of my recipe tests, I’ve found that the only way to achieve crisp flakes and rich flavor is by using both butter and shortening.
The shortening creates perfect flakes while the butter adds rich, classic pie crust flavor.
The other pie crust ingredients are pantry staples: all-purpose flour, salt, and ice water.
Why Use Cold Butter and Shortening?
The reason to use cold ingredients for flaky pie crust is that as the crust cooks, the heat from the oven explodes solid fat particles. These miniature explosions of solid butter and shortening release steam. In turn, the steam creates individual crisp layers of crust.
If you were to use soft or melted butter, on the other hand, a lot of that moisture has already escaped from the butter before cooking. Instead of crisp, light layers, your pie crust is more likely to be oily and soggy.
For this reason, it’s important to use ice water and to avoid warming the dough too much by handling it or overmixing it.

Can I use a Food Processor?
You can use a food processor to cut the butter and shortening into the flour. However, it’s easy to overprocess the crust this way. Unless you are very quick with the pulse feature on your food processor, I recommend making your crust by hand using the steps in this recipe.
Decorating Homemade Pie Crust
This crust recipe is designed for optimal flakiness and flavor. All the flakes mean that this isn’t the best recipe for braiding or other fancy decorations.
However, you can use small cookie cutters on the leftover crust and lay them on top of your pie for elegant decorations that have plenty of lift and buttery richness. That’s how I decorated this festive Cranberry Pecan Pie, for example.

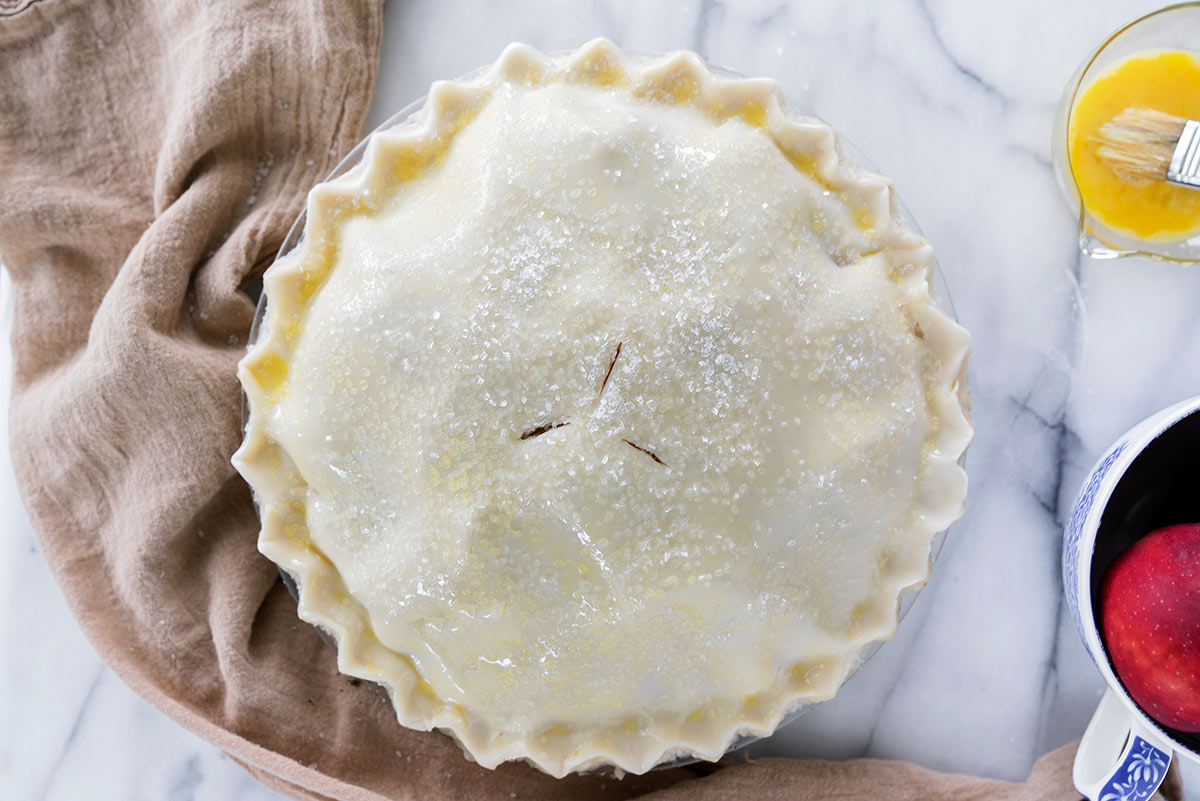
Making a Double Crust
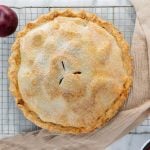
For apple pies and other double-crust recipes, you can simply double the pie crust recipe as written. After placing the dough in the pie plate and chilling, fill it with your filling. Next, transfer the second rolled-out (chilled) pie crust on top of the filling using the same plastic wrap technique detailed above.
Seal the bottom and top crusts together by pinching them all the way around. If you find some edges are just not sticking, dab them with a little beaten egg to seal them.
Be sure to cut some vent holes on the top before baking. And for a golden, textured finish, brush the top crust with a beaten egg and sprinkle with sanding sugar.
Finally, refrigerate the filled pie for 30 minutes and bake as instructed.
What if My Dough Tears?
No worries! If your crust rips while you’re working with it, simply take an extra piece of dough from the edges to mend the torn area by pressing it into place.

Recipes for the Best Pie Crust
Once you’ve mastered how to make pie crust, all of your pies, large and small, will be delightfully flavorful and flaky. Here are some of my favorite ways to use pie crust all year long:
- Chicken Pot Pie, because this all-purpose pie crust recipe isn’t sweet, it’s perfect for savory baking too!
- Strawberry Rhubarb Pie has a flaky pie crust and a crumbly streusel topping for the best of both worlds.
- Classic Pecan Pie is a must-have Thanksgiving menu item with a buttery, sticky pecan filling.
Pie Crust Tutorial
Equipment
Ingredients
- 2 ½ cups flour
- 1 teaspoon salt
- ¼ cup unsalted butter chilled
- ⅔ cup shortening chilled (I use butter-flavored shortening)
- 5 to 7 tablespoons ice water
Instructions
- Combine the flour and salt in a bowl.
- Cut the butter and shortening into small cubes. Add the butter and shortening to the flour and cut it in with your hands or a pastry cutter until it resembles a very coarse meal.
- Gradually add water, 1 tablespoon at a time, mixing with a fork. Stop adding water and mixing when the dough comes together into a ball.
- Divide the dough in half, form each half into a round disc, and wrap in plastic. Chill for 30 minutes in the fridge.
- Shape and bake the unfilled pie crust for 15–20 minutes at 450ºF.

My Inner Chick
—Barbara,
I added this to my faves. Thank you. I need it bady. x
Lyndsey
Barbara, thanks for the tutorial…and Libby’s tips are good to know too. The photos are great. I’ve been watching my mother and grandmother making pie crust all through my childhood. It is a wonder how they could do it more by feel than by a recipe. They alway used a pastry cloth to roll it out on, and a cloth covered rolling pin…both well floured!
Lauren from Lauren's Latest
Love the tutorial, Barbara! You make it look so easy! 🙂 It’s not too intimidating when you see the step by step. I may just have to taste test some pie crusts! Aww shucks….
Angie's Recipes
That’s a perfect tart crust and thanks, Barbara, for such detailed and helpful tutorial.
Becki @Becki's Whole LIfe
This is a great tutorial as I always struggle with pie crusts ripping on me. I agree though, the shortening is the key to being nice and flakey. I’m sure a pie is in my future as we are rolling into fall so I will have to keep this post handy:-)
Rocky Mountain Woman
So, I have a confession to make about pie crust – it scares the crap out of me! I try to avoid it, but well there’s Thanksgiving and Christmas and other times when my son just looks at me and says, “Hey Mom, will you make a pie?”.
Thanks for the tutorial, it’s perfect timing with the Holiday Season bearing down on us. Maybe I’ll give it a whirl this weekend and make everyone in my family very happy!
xxoo,
RMW
Melanie
Great tutorial. I really enjoyed this one!! I will try your pie crust for my first apple pie this fall. I am not set or stuck on one particular recipe. I agree butter tastes good, but I’ve also made some pretty tasty crusts w/ all shortening and also w/ leaf lard at a pie class I went to once. I love your glass quiche dish, it is very pretty!
Kitchen Belleicious
Kudos! That is one of the best pie tutorials I have seen on the web! I love it and you make it sound so simple. perfectly flaky and just beautiful!
Rosa
Your pie crust looks amazing and so flaky! That is something I am great at making… A good tutorial.
Cheers,
Rosa
Judith Franing
How do you keep your cream pie crusts from getting soggy?
I’ve brushed with egg white , cream, dusted with sugar before baking. Still my crusts turn soggy after a few hours.
Thanks
Barbara
Hi Judith – Thanks for the question. I’ve seen others add a little chocolate layer to keep the crust from getting soggy. I’ve had pretty good luck with this recipe not getting soggy with cream pies. Just be sure and keep the dough cold, cook it hot and long enough to get crispy. Then make sure that your cream filling is not too liquidy (is that a word?) If you have a filling that you love but it sogs out the crust perhaps you can change the recipe. Either add a little gelatin or whip the cream more stiffly perhaps? My Entremet post uses gelatin to thicken the layers https://www.barbarabakes.com/2011/01/strawberry-cheesecake-entremet/.
Paula
A wonderful tutorial. I haven’t tried baking a pie crust using both butter and shortening so I’m going to give your recipe a go.
Kimberly
Just fyi, freezing the butter or shortening and then grating it on a cheese grater works GREAT! Once I tried it, I’ve never gone back. I keep a couple of sticks of each in my freezer all the time for pie crust. Happy pie making!
Barbara
Hi Kimberly – thanks for tip. Sounds like you’re really organized!
Frieda
Grating butter is a GREAT tip! Not only for pie crusts, but for making flaky layered biscuits… 🙂
Kathleen
This is a fantastic post! Love the butter-shortening ratio!
Alison @ Ingredients, Inc
love this tutorial!
Jenn
I saw this post and have three words for you:
CHICKEN POT PIE.
https://www.barbarabakes.com/2008/10/pumpkin-pot-pie/
Barbara
Thanks Jenn! We do love that chicken pot pie. I posted the Chicken Pot Pie recipe in my first year of blogging and now I would never title a Chicken Pot Pie recipe Pumpkin Pot Pie, even if it’s shaped like a pumpkin. lol
Libby
Over the past few years I’ve gotten pretty adept at my crusts and thankfully no longer have to do the roll between plastic thing. The thing I have discovered is that you need the perfect abundance of bench flour, and flour on the pin. Flour the pin more than the top of the pastry. Just grab a small handful and rub it on. Flouring your pin enough allows you to avoid sticking. The semi generous amount of bench flour allows you to properly rotate the dough in quarter turns on the bench to get even rolling and an even pastry. The rotation allows the pastry to help “ride” on the bench flour and not get stuck in one place. I’m sure all of us had had to peel pastry off the counter at one time or another.
Another tip to keep your dough cool – when first get your dough out of the fridge and unwrap the dough circle. try pounding gently right across the circle with the pin at first instead of actually rolling. Pound across the dough circle evenly, rotate, do a little more gentle pounding. Do maybe 4 rotate and pound. This will give a nice start to your circular shape. The less actual “rolling” you do, the less friction on the dough and less chance of your fat getting warm.
I’ve often been asked about the ice water amount – which is it, 5 Tbsp or 7 Tbsp? Well, you never know, as flour will hydrate differently on different days according to the weather. My general method is “enough water so no more flour dust of fine flour crumbs” on the bottom of the bowl. For me, it’s better to have just a touch more than too little. The extra moisture will even itself out with the help of generous bench flour.
Resting is also important. After putting the pastry into the pan and hanging it over the edges, I let things sit for 10 minutes or so before trimming and crimping. That is if my room is not too warm. This will allow the gluten to relax. Just some extra insurance to help against shrinkage.
Trust me – I’ve been through it all with silicon mats, plastic wrap, waxed paper, plastic bags — you name it. For me the key is getting to know the feel of proper hydration and using enough flour. I can roll dough on just about any surface except concrete now.
I wish you all great success with your pies. It’s apple season 😉
Barbara
Hi Libby – thanks for sharing your tips. I agree pie making is an art and the more you do it the better you’ll get.
Candy
Great tutorial! I used to be afraid of pie crust too, but now it is one of my favorite things to make. I agree that the best crust is achieved with shortening and butter.
gloria
Look amazing and perfect I love the crust! gloria
Claire @ Claire K Creations
I agree, a pie crust has to be flaky and crunchy. Yours looks great. Thanks for the tips. I never knew that about the fat particles.
Betty @ scrambled henfruit
Thanks for the tutorial- pie crust is intimidating to me. I’m going to try the plastic wrap tip. 🙂