

Today is World Bread Day. A day to bake, talk about and celebrate bread. The fabulous bread baker Natashya, Living in the Kitchen with Puppies, invited me to participate this year, so how could I resist. I love the smell of bread baking in the oven and the taste for a delicious slice of hot bread slathered with butter and jam.

I’ve made lots of loaves of no knead artisan bread this year and dozens of my favorite dinner rolls, but one bread that I’ve never made before is bagels. My boys love to grab a bagel as a snack after school before football practice and I’ve been wanting to make them for some time, so World Bread Day seemed like the perfect opportunity.
There have been lots of great bagel posts lately. My sweet friend Tiffany, Food Finery, posted her delicious bagel recipe and Nicole, Baking Bites, also posted her gorgeous bagels and great tips on how to shape them. But my boys always want me to buy cinnamon raisin bagels, so I ended up on Smitten Kitchen reading a fun post about when Deb baked Cinnamon Raisin Bagels with Ree.

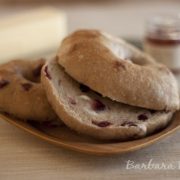
In the end, I ended up making Cinnamon Cranberry Bagels because no one told me we were out of raisins, which was great for me because I love Craisins in almost anything. My boys also loved the bagels, especially the ones with the cinnamon sugar top.
I was so pleased with how they turned out on my first try. They had a great chewy texture, but were more tender than the bagels that I buy from Einsteins. The recipe wasn’t difficult at all, a little time consuming, but most of the time is spent waiting. This is definitely a recipe I would make again. I think making my own bagels will save me tons of money.

Deb adapted her recipe from Peter Reinhart’s The Bread Baker’s Apprentice. I’ve posted the recipe below with my changes indicated in italics. Most of the changes I made were to accommodate my higher altitude and dry climate.
Cinnamon Cranberry Bagels
Ingredients
Sponge
- 1 teaspoon instant yeast
- 4 cups unbleached high-gluten or bread flour
- 2 ½ cups water room temperature
Dough
- 1 teaspoon instant yeast I used ½ teaspoon to adjust for high altitude baking
- 3 ¾ cups unbleached high-gluten or bread flour I only needed 3 cups
- 1 tablespoon ground cinnamon
- 5 tablespoons sugar
- 2 ¾ teaspoons salt
- 2 teaspoons malt powder or 1 tablespoon dark or light malt syrup honey, or brown sugar
- 2 cups Craisins
To Finish
- 1 tablespoon baking soda I forgot to add the soda
- Cornmeal or semolina flour for dusting
- Melted butter for brushing optional
- Cinnamon sugar for sprinkling optional
Instructions
- Day one: To make the sponge, stir the yeast into the flour in a 4-quart mixing bowl. Add the water, whisking or stirring only until it forms a smooth, sticky batter (like pancake batter). Cover the bowl with plastic wrap and leave at room temperature for approximately 2 hours, or until the mixture becomes very foamy and bubbly. It should swell to nearly double in size and collapse when the bowl is tapped on the countertop. (Mine was doubled in 1 ½ hours)
- To make the dough, in the same mixing bowl (or in the bowl of an electric mixer), add the additional yeast to the sponge and stir. Then add 3 cups of the flour, cinnamon, sugar, salt and malt. Stir (or mix on low speed with the dough hook) until the ingredients form a ball, slowly working in the remaining ¾ cup flour to stiffen the dough. In the last two minutes of mixing, add the Craisins.
- Transfer the dough to the counter and knead for at least 10 minutes (or for 6 minutes by machine). The dough should be firm, stiffer than French bread dough, but still pliable and smooth. There should be no raw flour–all ingredients should be hydrated. The dough should 77 to 71°F. If the dough seems too dry and rips, add a few drops of water and continue kneading. If the dough seems tacky or sticky, add more flour to achieve the stiffness required. The kneaded dough should feel satiny and pliable but not be tacky.
- Immediately divide the dough into 16 (3.375 ounce) pieces. Form pieces into rolls. Cover the rolls with a damp towel and allow them to rest for approximately 20 minutes.
- Line 2 sheet pans with baking parchment and mist lightly with spray oil. Poke a hole in a ball of bagel dough and gently rotate your thumb around the inside of the hole to widen it to approximately 2 inches in diameter. The dough should be as evenly stretched as possible (try to avoid thick and thin spots.)
- Place each of the shaped pieces two inches apart on the pans. Mist the bagels very lightly with the spray oil and slip each pan into a food-grade plastic bag, or cover loosely with plastic wrap. Let the pans sit at room temperature for about 20 minutes.
- Check to see if the bagels are ready to be retarded in the refrigerator by using the float test. Fill a small bowl with cool or room-temperature water. The bagels are ready to be retarded when they float within 10 seconds of being dropped into the water. Take one bagel and test it. If it floats, immediately return the tester bagel to the pan, pat it dry, cover the pan, and place it in the refrigerator overnight (it can stay in the refrigerator for up to 2 days). If the bagel does not float. Return it to the pan and continue to proof the dough at room temperature, checking back every 10 to 20 minutes or so until a tester floats. The time needed to accomplish the float will vary, depending on the ambient temperature and the stiffness of the dough.
- Day Two: (or several hours later if that's all your schedule allows), preheat the oven to 500°F with the two racks set in the middle of the oven. Bring a large pot of water to a boil (the wider the pot the better), and add the baking soda. Have a slotted spoon or skimmer nearby. (I forgot to add the baking soda to the water. Fortunately, I didn't have any problem.)
- Remove the bagels from the refrigerator and gently drop them into the water, boiling only as many as comfortably fit (they should float within 10 seconds). After 1 minute, flip them over and boil for another minute. If you like very chewy bagels, you can extend the boiling to 2 minutes per side. While the bagels are boiling, sprinkle the same parchment-lined sheet pans with cornmeal or semolina flour. (If you decide to replace the paper, be sure to spray the new paper lightly with spray oil to prevent the bagels from sticking to the surface.)
- When all the bagels have been boiled, place the pans on two middle shelves in the oven. Bake for approximately five minutes, then rotate the pans, switching shelves and giving the pans a 180-degree rotation. (If you are baking only one pan, keep it on the center shelf but still rotate 180 degrees.) After the rotation, lower the oven setting to 450°F and continue baking for about 5 minutes, or until the bagels turn light golden brown. You may bake them darker if you prefer. (I baked mine for about 15 minutes.)
- Remove the pans from the oven and let the bagels cool on a rack for 15 minutes or longer before serving. Optionally, when they come out of the oven and are still hot, you can brush the tops with the melted butter and dip them in cinnamon sugar to create a cinnamon-sugar crust, if desired. (I did half with with a cinnamon sugar crust and half without - of course my boys ate the ones with first.)

Ellen S.
I make my own bagels also, either sesame coated or cranberry-orange-walnut. I have a couple of questions for you – first, my COW bagels tend to be a little over-moist, because, I think, the cranberries swell up absorbing more water, which gets transferred to the rest of the bagel during cooking and the whole bagel ends up sort of “flat”, compared to the plain or sesame ones. Any ideas on counteracting this issue?
And second, I was wondering what the purposes of the sponge and float test, and what “retarding” is? I just make my dough in the bread machine, shape, rise, boil and bake, and other than the earlier issue I noted, they seem fine (and a lot less complicated to do).
I just happened upon Craisins the last time I purchased cranberries for my bagels, and I think they are great also!
Thanks,
Ellen
Barbara Schieving
Hi Ellen – I wonder if it’s the sugar in the cranberries causing the problem http://redstaryeast.com/yeast-baking-lessons/common-baking-ingredients/sweeteners/. Here’s a good article on starting with a sponge https://www.washingtonpost.com/lifestyle/food/better-bread-starts-with-a-sponge/2013/02/04/86ad2460-69a4-11e2-af53-7b2b2a7510a8_story.html?utm_term=.2570c133f565 But if you’re happy with the flavor and texture of your bagels. I’d stick with what’s working for you.
Lisa J
Your bagels look absolutely delicious! I’ve never tried making my own, but whenever I see someone making a recipe as scrumptious looking as this one…I start thinking I should!
Amanda
What a great combination of flavors for your first shot Barbara!
RJ Flamingo
These are beautiful – so much nicer than my first attempts at cinnamon raisin bagels! I’ll have to try this recipe, for sure.
Eliana
I like the idea of these with cranberries instead of raisins. They look super super delicious.
zorra
Gorgeous bagels. It’s interesting to read that you also have to adapt recipes due to the geographical position. I have mostly to reduce water as here it’s very humid. Thank you for participating in World Bread Day.
kristy
Barbara, what a great recipe for the celebration! yay… Happy World Bread Day to you too!
Cheers, Kristy
Mags
You know I’m a homemade bagel freak. I love these…. especially the addition of the cranberries..
Sue
I have loved bagels since I was a little girl, but have yet to attempt them. Your bagels look fantastic! Love the flavors too. I need to make some!
FOODESSA
I love the way a talented baker like yourself takes a recipe and makes it her own ;o) Those bagels are waiting to meet my apple compote ;o)
Flavourful wishes,
Claudia
Tracy
There’s nothing better than homemade bagels. I love cranberry bagels too; these look delicious!
blackbookkitchendiaries
i love how festive the bagels look ..so very pretty. thank you for sharing.
Evan @swEEts
I need to tell Mountain Man about these.. its about time we gave bagels another go!
lucy
lovely recipe!mi piacciono molto queste ciambelllotte, veramente gradevoli.
shaz
They sound so good Barbara! I’ve never made bagels before either but the method sounds doable, and I like the sound of the sugar crust on top. I once ate a blueberry bagel with a sugar crust, it was divine, been thinking about making my own ever since. Your post had nudged me that one step close 🙂
girlichef
Bagels are still something that make me a little apprehensive (making them…not eating them). Yours are absolutely wonderful, though! I would love to toast these up and eat them for breakfast. Right now!
sameena
Hi Barbara,
Love it…I should subcribe via email is it..i dont see a google connect..:)
Dr.Sameena@
http://www.myeasytocookrecipes.blogspot.com
Susan Kennedy
How did I miss world bread day?! Mind you I am pretty sure on the 16th I baked bread as well as eating it… 😀
theUngourmet
I’ve never tried making my own bagels. You did such a nice job with these, they looks beautiful! It would be great to make extras and freeze them for later.
Mary
Okay, I’m on a HUGE cranberry kick right now! These look fantastic and have been bookmarked! YUM!
Mary xo
Delightful Bitefuls