WANT TO SAVE THIS RECIPE?
Enter your email below and we will send it straight to your inbox. Plus you will get great new recipes from us every week!
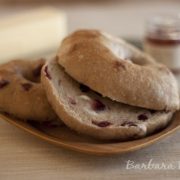
Cinnamon Cranberry Bagels
These Cranberry Bagels combine the perfect chewy texture of authentic New York-style bagels with the sweet-tart burst of dried cranberries in every bite. The two-day process might seem intimidating, but the results are worth the wait!
Servings: 16 bagels
Calories: 297kcal
Ingredients
Sponge
- 1 teaspoon instant yeast
- 4 cups unbleached high-gluten or bread flour
- 2 ½ cups water room temperature
Dough
- 1 teaspoon instant yeast
- 3 - 3 ¾ cups unbleached high-gluten or bread flour
- 1 tablespoon ground cinnamon
- 5 tablespoons sugar
- 2 ¾ teaspoons salt
- 2 teaspoons malt powder or 1 tablespoon dark or light malt syrup (Honey or brown sugar can be substituted.)
- 2 cups Craisins
To Finish
- 1 tablespoon baking soda
- Cornmeal or semolina flour for dusting
- Melted butter for brushing optional
- Cinnamon sugar for sprinkling optional
Instructions
Day One: Make the Sponge
- Stir the yeast into the flour in a 4-quart mixing bowl. Add the water, whisking or stirring only until it forms a smooth, sticky batter like pancake batter.
- Cover the bowl with plastic wrap and leave at room temperature for approximately 2 hours, or until the mixture becomes very foamy and bubbly. It should swell to nearly double in size and collapse when the bowl is tapped on the countertop. (Mine was doubled in 1 ½ hours.)
Day One: Make the Dough
- In the same mixing bowl or in the bowl of an electric mixer, add the additional yeast to the sponge and stir. Then add 3 cups of the flour, cinnamon, sugar, salt and malt (or substitute).
- Stir or mix on low speed with the dough hook until the ingredients form a ball, slowly working in the remaining ¾ cup flour to stiffen the dough. In the last two minutes of mixing, add the Craisins.
- Transfer the dough to the counter and knead for at least 10 minutes (or for 6 minutes by machine). The dough should be firm, stiffer than French bread dough, but still pliable and smooth. There should be no raw flour – all ingredients should be hydrated. The dough should 77 to 71°F. If the dough seems too dry and rips, add a few drops of water and continue kneading. If the dough seems tacky or sticky, add more flour to achieve the stiffness required. The kneaded dough should feel satiny and pliable but not be tacky.
- Immediately divide the dough into 16 (3.375 ounce) pieces. Form pieces into rolls. Cover the rolls with a damp towel and allow them to rest for approximately 20 minutes.
- Line two sheet pans with parchment paper and mist lightly with spray oil.
- Poke a hole in a ball of bagel dough and gently rotate your thumb around the inside of the hole to widen it to approximately 2 inches in diameter. The dough should be as evenly stretched as possible — try to avoid thick and thin spots.
- Place each of the shaped pieces 2 inches apart on the pans. Mist the bagels very lightly with the spray oil and cover loosely with plastic wrap. Let the pans sit at room temperature for about 20 minutes.
Day One: The Float Test
- Check to see if the bagels are ready to be retarded in the refrigerator by using the float test. Fill a small bowl with cool or room-temperature water. The bagels are ready to be retarded when they float within 10 seconds of being dropped into the water. Take one bagel and test it. If it floats, immediately return the tester bagel to the pan, pat it dry, cover the pan, and place it in the refrigerator overnight.
- If the bagel does not float, return it to the pan and continue to proof the dough at room temperature, checking back every 10 to 20 minutes until a tester floats. return the tester bagel to the pan, pat it dry, cover the pan, and place it in the refrigerator overnight.
- Note: The time needed to accomplish the float will vary, depending on the ambient temperature and the stiffness of the dough. The dough can stay in the refrigerator for up to 2 days so these are a good make-ahead option!
Day Two: Finish the Bagels
- Preheat the oven to 500°F with the two racks set in the middle of the oven. Bring a large pot of water to a boil — the wider the pot the better. Add the baking soda to the water. Have a slotted spoon or skimmer nearby.
- Remove the bagels from the refrigerator and gently drop them into the water, boiling only as many as comfortably fit. They should float within 10 seconds.
- After 1 minute, flip them over and boil for another minute. If you like very chewy bagels, you can extend the boiling to 2 minutes per side.
- While the bagels are boiling, sprinkle the same parchment-lined sheet pans with cornmeal or semolina flour. (If you decide to replace the paper, be sure to spray the new paper lightly with spray oil to prevent the bagels from sticking to the surface.)
- When all the bagels have been boiled, place the pans on two middle shelves in the oven. Bake for approximately 5 minutes, then rotate the pans, switching shelves and giving the pans a 180-degree rotation. (If you are baking only one pan, keep it on the center shelf but still rotate 180 degrees.)
- After the rotation, lower the oven setting to 450°F and continue baking for about 5 minutes, or until the bagels turn light golden brown. You may bake them darker if you prefer. (I baked mine for about 15 minutes and you can see how dark they got in the picture.)
- Remove the pans from the oven and let the bagels cool on a rack for at least 15 minutes before serving. Optionally, when they come out of the oven and are still hot, you can brush the tops with the melted butter and dip them in cinnamon sugar to create a cinnamon-sugar crust, if desired.
Notes
Sponge Benefits: The overnight sponge develops complex flavors and improves texture through pre-fermentation that breaks down starches and creates natural enzymes. This step separates good bagels from great ones.
Boiling Purpose: The brief boiling creates the characteristic chewy crust that defines a true bagel and isn't optional. This step gelatinizes the surface, helping bagels hold their shape and differentiating them from regular bread rolls.
Batch Planning: This recipe makes 16 bagels, perfect for crowds or freezing. You can divide the dough to create different flavor combinations by adding various mix-ins, just keep the total add-in weight consistent.
Storage: Cool completely before storing to prevent condensation that makes bagels soggy. Fresh bagels stay best at room temperature for 2-3 days in a paper bag. For longer storage, slice and freeze them in airtight containers.
Nutrition
Serving: 1bagel | Calories: 297kcal | Carbohydrates: 63g | Protein: 8g | Fat: 2g | Saturated Fat: 0.3g | Polyunsaturated Fat: 1g | Monounsaturated Fat: 0.3g | Cholesterol: 1mg | Sodium: 620mg | Potassium: 105mg | Fiber: 3g | Sugar: 16g | Vitamin A: 9IU | Vitamin C: 0.1mg | Calcium: 25mg | Iron: 1mg