



Make these Decorated Valentine’s Day Cookies with rich chocolate dough, heart shaped cookie designs, and festive sprinkles. Simple cookie decorating for Valentine’s Day treats everyone loves!

WANT TO SAVE THIS RECIPE?
Enter your email below and we’ll send it straight to your inbox. Plus you’ll get great new recipes from us every week!
Quick Recipe Overview

WHAT: Soft chocolate cookies topped with Valentine sprinkles or conversation hearts pressed directly into the dough before baking.
WHY: Skip complicated cookie decorating and royal icing techniques while still creating beautiful, festive Valentine treats everyone loves.
HOW: Mix chocolate cookie dough, roll into balls, press in decorations, then bake for 8-10 minutes until set.
Jump to:
- Quick Recipe Overview
- Why I Love Making Decorated Valentine Day Cookies
- Ingredient Notes
- Decorated Valentine Day Cookies
- How To Make Decorated Valentine Day Cookies
- FAQs for Decorated Valentine Day Cookies
- My Best Tips for Making Decorated Valentine Day Cookies
- What to Serve With Decorated Valentine Day Cookies
- Storage & Reheating Tips
- More Delicious Cookie Recipes to Try
Why I Love Making Decorated Valentine Day Cookies
I started making these decorated cookies when my daughter was four and wanted to help with Valentine’s Day treats for her class. Traditional heart shaped cookie decorating was too complicated for little hands, but pressing sprinkles into chocolate dough? She could do that all day! Now it’s our annual tradition, and we’ve perfected the technique over the years.
The rich chocolate dough hides minor imperfections, and the press-in decorations actually stick (unlike sprinkles that fall off regular sugar cookies). You get gorgeous, festive decorated cookies without the stress of cookie decorating skills.
They taste incredible too – that deep cocoa flavor with sweet conversation hearts or sparkly pink sprinkles makes them feel special without being overly complicated.

🩷 Melissa
Let’s bake up some love this Valentine’s Day with these irresistible chocolate cookies!
Whether you’re making treats for your kids’ classroom party, surprising your sweetheart, or just indulging your own chocolate cravings, this recipe delivers bakery-worthy results with minimal effort.
The best part? You don’t need any fancy piping skills or royal icing techniques—just press on some colorful sprinkles or conversation hearts, and you’re done!
Ingredient Notes
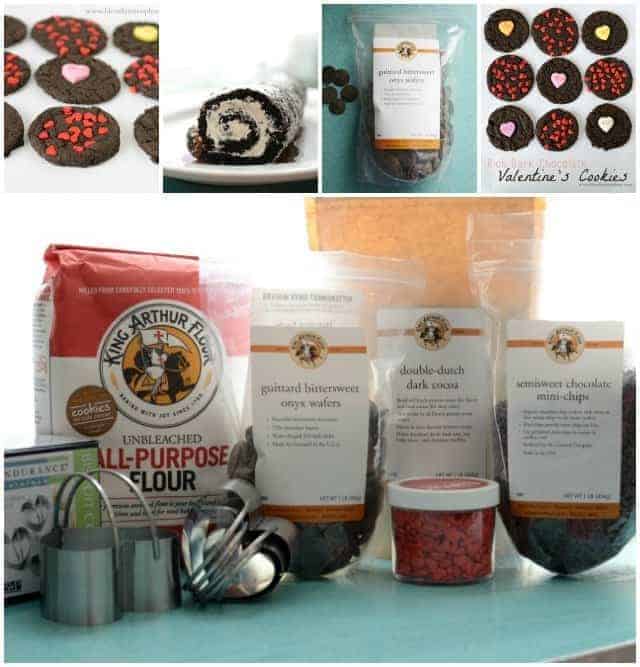
Double-Dark Dutch Cocoa: This gives the cookies their deep, rich chocolate color and intense flavor. King Arthur’s Flour version is excellent, but any Dutch-process cocoa works beautifully.
Valentine Sprinkles: Look for high-quality baking sprinkles, such as heart-shaped sprinkles, pink and red jimmies, and nonpareils. Buy them early – stores run out fast as Valentine’s Day approaches!
Conversation Hearts: Use the classic larger conversation hearts that sit on top of the cookie. The mini versions are too small and tend to sink into the dough during baking.
See the recipe card below for full information on ingredients and quantities.
WANT TO SAVE THIS RECIPE?
Enter your email below and we will send it straight to your inbox. Plus you will get great new recipes from us every week!

Decorated Valentine Day Cookies
Ingredients
- 1 cup butter softened
- 1 cup granulated sugar
- ½ cup brown sugar
- 1 teaspoon vanilla extract
- 2 eggs
- 2 ¼ cups all-purpose King Arthur Flour
- ⅔ cups King Arthur's Flour double-dark Dutch cocoa
- 1 teaspoon baking soda
- ¼ teaspoon salt
- Valentine sprinkles and/or large conversation hearts
Instructions
- Preheat the oven to 350° and line a baking sheet with parchment paper or a baking mat.
- In a large bowl or the bowl of your stand mixer beat together the butter and sugars until light and fluffy, about 3 minutes.1 cup butter, 1 cup granulated sugar, ½ cup brown sugar
- Add the vanilla and eggs and beat to combine well.1 teaspoon vanilla extract, 2 eggs
- Add the flour, cocoa, soda, and salt and stir to combine.2 ¼ cups all-purpose King Arthur Flour, ⅔ cups King Arthur's Flour double-dark Dutch cocoa, 1 teaspoon baking soda, ¼ teaspoon salt
- Form the dough into 1 to 1 ½-inch balls. Dip the top of the ball into the heart sprinkles and then lightly press the sprinkles into place. Place on the cookie sheet.Valentine sprinkles and/or large conversation hearts
- For the conversation heart cookies, form the dough into 1 to 1 ½-inch balls and place on the cookie sheet. With the bottom of a glass of measuring cup slightly flatten the dough ball. Place a conversation heart in the center of the dough and press lightly to get it to stick into the dough.
- Bake the cookies for 8 to 10 minutes until the centers are set. Let the cookies cool on the pan for 2 or 3 minutes and then place them on a wire rack.
- Store extra cookies in an air-tight container.
Notes
Nutrition
How To Make Decorated Valentine Day Cookies
Step 1: Preheat oven to 350°F and line baking sheets. Beat softened butter with both sugars until fluffy (about 3 minutes), then add vanilla and eggs. Mix in flour, cocoa, baking soda, and salt until just combined.
Step 2: Form dough into 1 to 1½-inch balls. For sprinkle-topped cookies, dip the top of each ball into valentine sprinkles and press lightly. For conversation heart cookies, form balls and place on the sheet.
Step 3: Press sprinkles firmly into dough to help them stick. For conversation heart versions, gently flatten each dough ball with the bottom of a glass, then press a candy heart into the center.
Step 4: Bake 8-10 minutes until centers appear set. Cool on the pan for 2-3 minutes, then transfer to a wire rack to cool completely. Store in an airtight container.
FAQs for Decorated Valentine Day Cookies
Since the dark color makes it hard to judge doneness visually, rely on touch and timing. The centers should look set (not wet or shiny) and spring back slightly when gently pressed. Set a timer for 8 minutes and check them carefully.
Make sure your butter is softened but not melted, and chill the dough for 30 minutes if your kitchen is warm. Also verify you’re using the correct flour measurement by spooning it into your measuring cup rather than scooping.
Let the baked cookies cool completely, then pipe royal icing designs on top. The chocolate base pairs beautifully with pink icing or white decorating details.
My Best Tips for Making Decorated Valentine Day Cookies
☞ Keep Your Butter Properly Softened: It should be soft enough to leave a fingerprint but not melty or greasy. Butter that’s too soft creates flat, spreading cookies that won’t hold decorations well.
☞ Press Sprinkles Firmly But Gently: You want them embedded enough to stick through baking but not so deep they disappear into the dough. A light press with your fingertip does the trick.
☞ Work With One Tray At A Time: Decorate a full baking sheet before putting it in the oven. This prevents the dough from getting too warm and ensures all cookies bake for the same amount of time.
☞ Cool Completely Before Storing: Warm cookies create condensation in containers, making them soggy. Let them cool on wire racks for at least 30 minutes before packing them up.
What to Serve With Decorated Valentine Day Cookies
Pair these chocolate valentine cookies with cold milk or hot cocoa for a classic combination. They’re also perfect alongside vanilla ice cream for an easy dessert.
For a Valentine’s party spread, serve with strawberries dipped in white chocolate and pink lemonade. A cheese plate with fruit and crackers balances the sweetness nicely for adult gatherings.
Storage & Reheating Tips
Room Temperature
Store cookies in an airtight container at room temperature for up to 5 days. Place parchment paper between layers to prevent sticking.
Refrigerator
These cookies don’t require refrigeration, but you can store them in the fridge for up to 2 weeks if preferred. Bring to room temperature before serving for best texture.
Freezer
Freeze baked cookies in a freezer-safe container or bag for up to 3 months. Thaw at room temperature for about 30 minutes before serving.
Make Ahead
Prepare the dough and refrigerate up to 3 days in advance, or freeze dough balls on a baking sheet, then transfer to a freezer bag for up to 3 months. Bake from frozen, adding 1-2 extra minutes to the baking time.
More Delicious Cookie Recipes to Try


Did you try this recipe? Leave a ⭐️ rating below and share it on Instagram.

Leave a Reply