
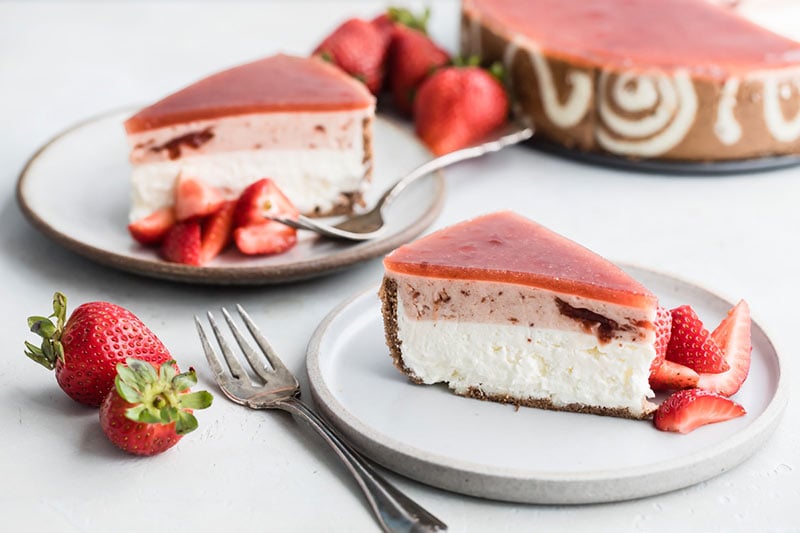
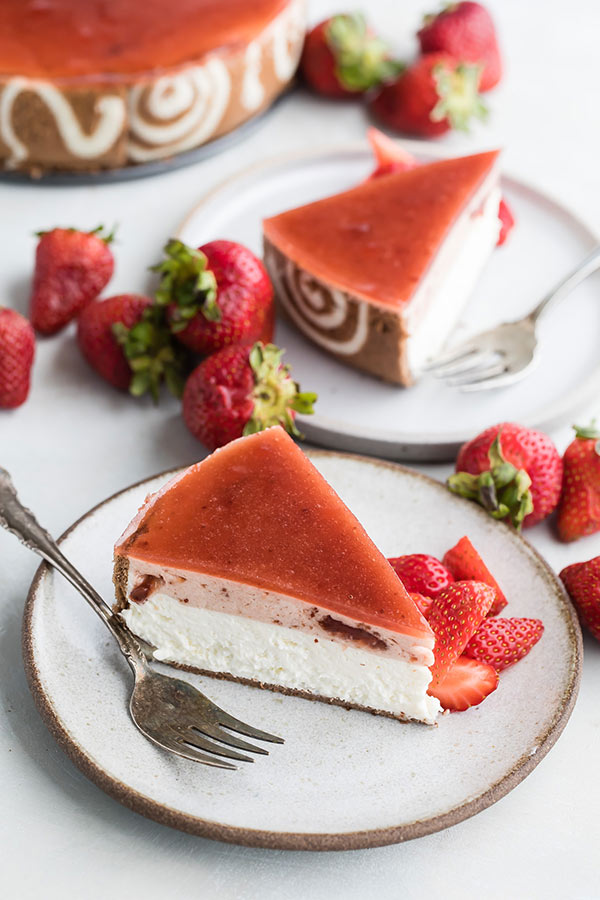
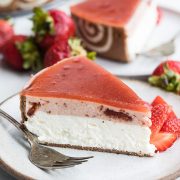
This gorgeous Strawberry Cheesecake Entremet is a multi-layered mousse cake that is perfect for a holiday or party. It has a thin layer of cake on the bottom and sides, a layer of creamy lemon cheesecake, a layer of strawberry mousse and finished with a clear strawberry jelled layer on top.
WANT TO SAVE THIS RECIPE?
Enter your email below and we’ll send it straight to your inbox. Plus you’ll get great new recipes from us every week!
What is an Entremet
An entremet is a French term for a fancy dessert with many different layers of cake and pastry creams, created in a mold and served cold. Essentially a trifle that is layered and molded instead of tumbled together in a glass bowl.
The first time I made an entremet was in 2011 as part of a Daring Bakers challenge.
I was intimidated by the challenge to make an entremet at first. It all sounded so foreign and fancy, but taken step by step it really isn’t hard at all.
It’s a little time consuming to make, but all the steps are fairly easy, so don’t let all the steps deter you from making it.

The Joconde and Joconde Imprime (Sponge Cake Design)
A joconde (sponge cake) batter is used because it bakes into a moist, flexible cake. Similar to the cake you’d use to make an ice cream cake roll.
A joconde imprime is the fancy name for the decorative design baked into the sponge cake providing an elegant finish.
You can make any design you like for the base and sides of the cake. The design on the bottom will be hidden but it helps give the cake a little structure.
The cake for the sides will be cut into strips, so be sure and pipe your design for that in rows.
The recipe is in grams, so you’ll need a digital scale to make it. More and more, I’m finding a scale is an essential kitchen tool.
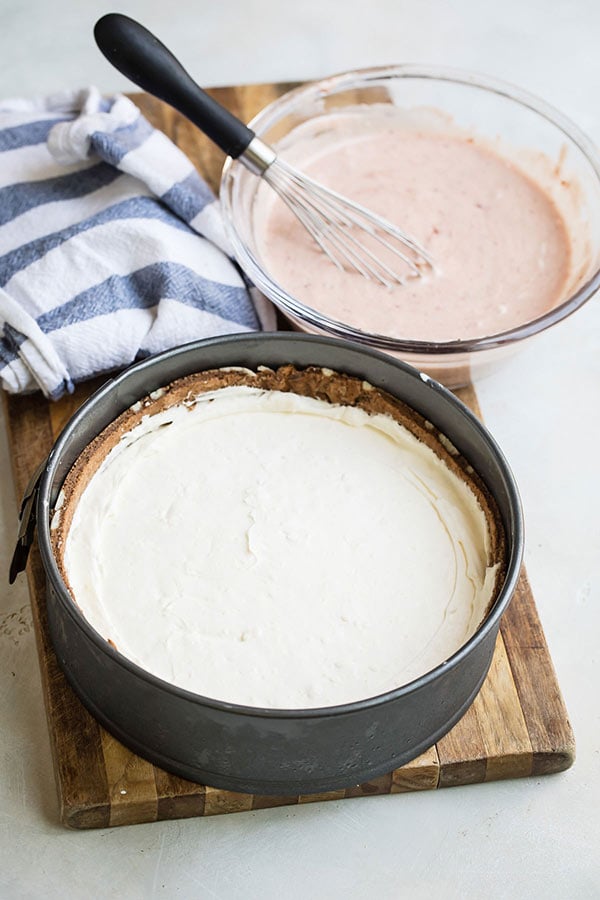
I topped my chocolate sponge cake with a light no-bake lemon cheesecake, which was then topped with a strawberry mousse layer, and finished with a strawberry gelee (a jelled strawberry layer.)
It’s important that the cake layer fits tightly on the cake base and is high enough on the sides to keep the fillings inside of it making it easy to remove from the springform pan and serve.
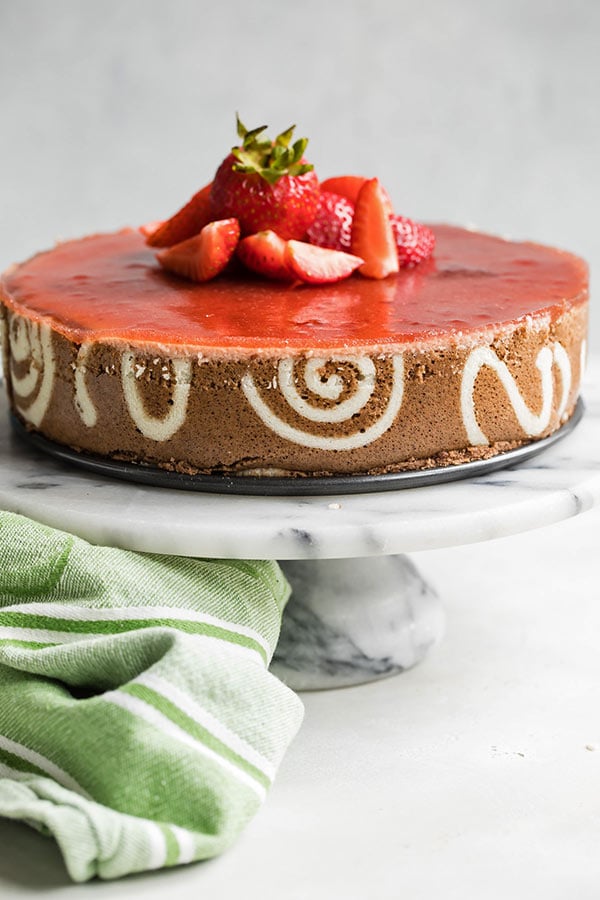
It would make a gorgeous Valentine’s Day dessert. Pipe heart shapes with the white batter and then cover it with the chocolate cake batter.
How to Make Entremet – Step by Step Instructions
White Joconde-Décor Paste
Chocolate Joconde (Sponge Cake)
Lemon Cheesecake Filling
Strawberry Mousse
Strawberry Gelee
It’s a light, refreshing elegant dessert that will wow your guests. I hope you’ll give it a try.
WANT TO SAVE THIS RECIPE?
Enter your email below and we will send it straight to your inbox. Plus you will get great new recipes from us every week!
Strawberry Cheesecake Entremet
Equipment
Ingredients
White Joconde-Décor Paste
- 7 tablespoons/100g unsalted butter softened
- 100 g Confectioners’ icing sugar
- 100 g egg whites about four
- 110 g cake flour
Chocolate Joconde (Sponge Cake)
- 85 g almond flour/meal
- 75 g confectioners’ icing sugar
- 15 g cake flour
- 10 g Dutch cocoa powder
- 3 large eggs / 150g
- 3 large egg whites / 90g
- 10 g white granulated sugar or superfine caster sugar
- 2 tablespoons / 30g unsalted butter melted
Lemon Cheesecake Filling
- 3 tablespoons fresh lemon juice
- 1 envelope 2 ¾ teaspoons unflavored gelatin
- 16 oz. 2 packages cream cheese, softened to room temperature
- ½ cup sugar
- pinch salt
- ⅔ cup whipping cream
Strawberry Mousse
- 3 tablespoons cold water
- 200 grams strawberry puree
- 40 grams sugar
- 1 envelope 2 ¾ teaspoons unflavored gelatin
- 150 grams whipping cream soft peaks
Strawberry Gelee
- 3 tablespoons cold water
- 300 grams strawberry puree
- 80 grams sugar
- 1 envelope 2 ¾ teaspoons unflavored gelatin
Instructions
White Joconde-Decor Paste
- Cream butter and sugar until light and fluffy (use a stand mixer with blade, handheld mixer, or by hand). Gradually add egg whites. Beat until well blended. Fold in flour.
- Place two Silpats on two baking sheets. Pipe design onto mats. (If you do not have a piping bag. Fill a ziplock bag and snip off corner for a homemade version of one.) Slide the baking sheets with paste into the freezer. Freeze hard – approx 15 minutes.
- While the design is in the freezer, prepare chocolate Joconde batter (recipe below.) Remove from the freezer. Quickly pour the Joconde batter over the designs. Spread evenly to completely cover the pattern of the Décor paste.
- Bake at 475ºF until the joconde (sponge cake) bounces back when lightly pressed, approx. 5–15 minutes. It will bake quickly, so watch closely. Cool until it’s cool enough to handle. Do not leave too long, or you will have difficulty removing it from Silpat.
- Flip cooled cakes on to parchment paper. Carefully peel off Silpats. The cakes should be right side up, and pattern showing.
- (This short video will help explain the process of layering the entremet.) Preparing the mold for entremets: Start with a large piece of parchment paper laid on a very flat baking sheet. Then a large piece of cling wrap over the parchment paper. Place a spring form pan ring, with the base removed, over the cling wrap and pull the cling wrap tightly up on the outside of the mold. Line the inside of the ring with a curled piece of parchment paper overlapping top edge by ½ inch. CUT the parchment paper to the TOP OF THE MOLD. It will be easier to smooth the top of the cake.
- Preparing the Jaconde for Molding: Trim the cake of any dark crispy edges. You should have a nice rectangle shape. Decide how thick you want your "Joconde wrapper". Traditionally, it is ½ the height of your mold. This is done so more layers of the plated dessert can be shown. However, you can make it the full height. Once your height is measured, then you can cut the cake into equal strips, of height and length. Use a very sharp paring knife and ruler (I found it was easier to use the full height).
- Make sure your strips are cut cleanly and ends are cut perfectly straight. Press the cake strips inside of the mold, decorative side facing out. Once wrapped inside the mold, overlap your ends slightly. You want your Joconde to fit very tightly pressed up to the sides of the mold.
- Then gently push and press the ends to meet together to make a seamless cake. The cake is very flexible so you can push it into place. You can use more than one piece to "wrap" your mold, if one cut piece is not long enough. The mold is done, and ready to fill.
Chocolate Joconde Sponge
- In a clean mixing bowl whip the egg whites and white granulated sugar to firm, glossy peeks. Reserve in a separate clean bowl to use later.
- Sift almond flour, confectioner’s sugar, cake flour and cocoa powder (this can be done into your dirty egg white bowl). On medium speed, add the eggs a little at a time. Mix well after each addition. Mix until smooth and light. (If using a stand mixer use blade attachment. If hand held a whisk attachment is fine, or by hand.)
- Fold in one third reserved whipped egg whites to almond mixture to lighten the batter. Fold in remaining whipped egg whites. Do not over mix. Fold in melted butter. Note: Makes enough sponge for the side and bottom of an 8" round mold.
Lemon Cheesecake Filling
- Put the lemon juice in a small bowl and sprinkle the gelatin over the top. Let it stand until the gelatin softens, about 5 minutes. Microwave the mixture until it is bubbling around the edges and the gelatin dissolves, about 30 seconds or less. Set aside.
- In a large bowl with a handheld mixer or in the bowl of a stand mixer, beat the cream cheese, sugar, and salt until smooth and creamy, about 2 minutes. Slowly add the cream and beat until the mixture is light and fluffy, about 2 minutes. Add the gelatin mixture. Beat until the mixture is smooth and airy, about 3 minutes.
- Pour the filling into the prepared jaconde and smooth the top. Refrigerate the cheesecake until set, about 1 hour.
Strawberry Mousse
- Put the water in a small bowl and sprinkle the gelatin over the top. Let it stand until the gelatin softens, about 5 minutes. Microwave the mixture until it is bubbling around the edges and the gelatin dissolves, about 30 seconds or less. Add the gelatin to the strawberry puree.
- Fold the whipped cream in to the puree. Pour the mousse on top of the cheesecake layer and let it set in the refrigerator.
Strawberry Gelee
- Put the water in a small bowl and sprinkle the gelatin over the top. Let it stand until the gelatin softens, about 5 minutes. Microwave the mixture until it is bubbling around the edges and the gelatin dissolves, about 30 seconds or less. Add the gelatin to the strawberry puree. Chill the gelee until it starts to thickened.
- Pour the gelee on top of the strawberry mousse and let it set several hours in the refrigerator before serving.
Notes
Pin It:


Paula
oh, this looks so delicious! I`m absolutely sure that`s really tasty!
Have a great time,
Paula
Suzanne
fantastic job on your challenge, looks great and I bet it tasted wonderful too!
Esther
Wow! I am so impressed. That cake looks amazing and I bet it tastes great too. It would be a great Valentine’s day dessert too. Btw, thanks for answering the questions I had. The answers were really helpful. 🙂
Jamie
WOW! I am stunned by your talent and the gorgeousness of this dessert! Intimidated? I will never believe it! Fabulous, Barbara, and the flavors are marvelous! Congrats on a stunning challenge!
marla {family fresh cooking}
This is one of the MOST beautiful cakes I have ever seen!! OMG are you a talented baker. I bet this cheesecakes tastes unbelieveable!
FOODESSA
OMG…Barbara…you knocked this one right out of the park…absolutely successful!!!
Flavourful wishes,
Claudia
Vicky
Looks absolutely amazing! I made a cheesecake layer for mine too but used a baked cheesecake recipe — I’ve never used gelatin to make cheesecake but your cake looks so delicious I must try it
Barbara
Exquisite, Barbara! You did a lovely job on this challenge. I’ve never attempted an Entrerment….another challenge for me!
Faith
You did an absolutely stunning job on this, Barbara! Your directions are fantastic and I’m thinking of trying this one…definitely bookmarking! 🙂
Lisa Mary
The layers look lovely, the flavours would be scrumptious and your gelee is wonderful! I wanted mine thicker but didn’t know how!
Anna Johnston
A really BIG slice for me please Barbara – it looks wonderful, well done.
bake in paris
Such an elegant color coordination! Just love the look when everything is put together! Lemon cheese cake, strawberry mousse and gelee with chocolate sponge must be a delicious mix of flavors.
Kim
What a beautiful dessert! I love the simplicity and the clean lines between the layers! So elegant. Nice job on the challenge!
Renata
We all had so much to learn from this challenge! I think most of us finished our Entremets willing to do it again, not only to perfect our “maths” but also because it was so much fun. Your designs are gorgeous, and your finished Entremet looks delicious and elegant!
Thanks for your lovely comment on mine! I really appreciate it!
Lora
Barbara. This is just absolutely gorgeous. Bravo!
Judy
Barbara, this is so impressive! It must have taken you all day to make this. A very special dessert and delicious too I bet.
Stephanie Miskew
Wow – that is spectacular! Congratulations on such a beautiful and delicious accomplishment – Cheers:)
chef_d
Wow your strawberry cheesecake looks so pretty and delicious! Excellent work on this challenge!
Joni
Barbara, that looks so amazing — wow what a project to do this — that is at least an afternoon full of work. It looks like it belongs in a fine French bakery sitting in the window tempting people to come in…Joni
Maggie
Barbara that is simply exquisite!