
WANT TO SAVE THIS RECIPE?
Enter your email below and we’ll send it straight to your inbox. Plus you’ll get great new recipes from us every week!
I was invited to join the Bread Baking Babes a while back and I had the best of intentions of jumping right in and baking up a storm. In February for the BBB 3rd Anniversary, the Babes were to pick a favorite bread that they had baked over the last three years and bake that bread again.
They had baked so many fabulous breads it was hard for me to pick just one, but the Coccodrillo bread won out when Natashya, Living In the Kitchen with Puppies, declared it her son’s all time favorite bread. Since Natashya is a fabulous bread maker, I knew this bread was something special.
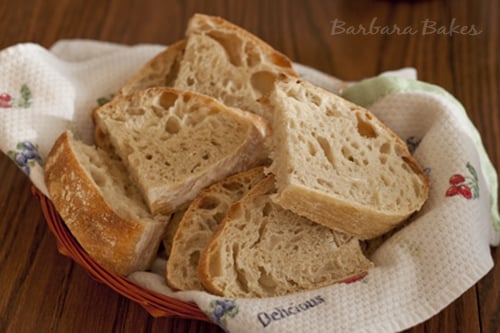
I bought all the ingredients, then life got in the way and I didn’t make the bread in time for the roundup. But since I had all the ingredients I made it last week and I’m so glad I did. It’s a fabulous Italian bread with a crisp, chewy exterior and light, moist interior with a slight sour dough flavor.
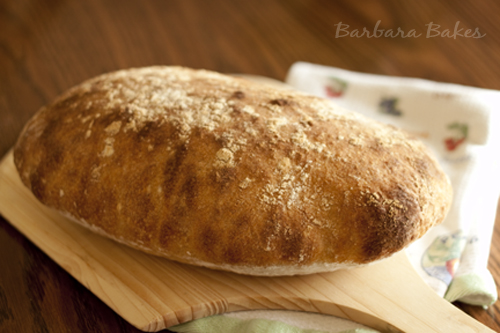
The bread is made over three days, but it really only takes a few minutes the first two days. It is a super wet dough, so if you haven’t baked with no-knead wet doughs before, be sure and watch the video describing how to shape this dough. Enjoy!
WANT TO SAVE THIS RECIPE?
Enter your email below and we will send it straight to your inbox. Plus you will get great new recipes from us every week!
Coccodrillo Bread Recipe
Ingredients
First starter:
- ½ teaspoon active dry yeast or ⅙ small cake 3 grams fresh yeast
- 1 cup warm water
- ¼ cup 35 grams durum flour
- ¾ cup 90 grams unbleached stone-ground flour* (*use strong bread flour -stone ground or not- for a better result)
Second starter:
- 1 ¼ teaspoons active dry yeast or ½ small cake 9 grams fresh yeast
- ¼ cup warm water
- 1 ¼ cups water room temperature
- ½ cup 70 grams durum flour
- 1 ½ cups 180 grams unbleached stone-ground flour (use strong bread flour -stone ground or not- for a better result)
Dough
- ¼ cup 35 grams durum flour
- 1 to 1 ¼ cups 120 to 140 grams unbleached stone-ground flour (use strong bread flour -stone ground or not- for a better result)
- 1 ½ teaspoons 10-15 grams salt* (*it says 25 g in the book, but this will get you a very, very salty crocodile)
Instructions
First starter:
- The morning of the first day, stir the yeast into the water; let stand until creamy, about 10 minutes.
- Add the flours and stir with a wooden spoon about 50 strokes or with the paddle of an electric mixer about 30 seconds.
- Cover with plastic wrap and let rise 12 to 24 hours. The starter should be bubbly.
Second starter:
- The evening of the same day or the next morning, stir the yeast into the warm water; let stand until creamy, about 10 minutes.
- Add the water, flours and dissolved yeast to the first starter and stir, using a spatula or wooden spoon or the paddle of the electric mixer until smooth.
- Cover with plastic wrap and let rise 12 to 24 hours.
- Dough
- By mixer: The next day, add the durum flour and 1 cup unbleached flour to the starter in a mixer bowl; mix with the paddle on the lowest speed for 17 minutes. Add the salt and mix 3 minutes longer, adding the remaining flour if needed for the dough to come together. You may need to turn the mixer off once or twice to keep it from overheating.
- By hand: If you decide to make this dough by hand, place the starter, durum flour, and 1 cup unbleached flour in a wide mouthed bowl. Stir with a rubber spatula or wooden spoon for 25 to 30 minutes; then add the salt and remaining flour if needed and stir 5 minutes longer. The dough is very wet and will not be kneaded.
- First Rise: Pour the dough into a Hammarplast bowl or a wide mouthed large bowl placed on an open trivet on legs or on a wok ring so that air can circulate all around it. Loosely drape a towel over the top and let rise at about 70° F, turning the dough over in the bowl every hour, until just about tripled, 4 or 5 hours.
- Shaping and Second Rise: Pour the wet dough onto a generously floured surface. Have a mound of flour nearby to flour your hands, the top of the oozy dough, and the work surface itself. This will all work fine-appearances to the contrary-but be prepared for an unusually wet dough. Make a big round shape of it by just folding and tucking the edges under a bit. Please don't try to shape it precisely; it's a hopeless task and quite unnecessary. Place the dough on well, floured parchment or brown paper placed on a baking sheet or peel. Cover with a dampened towel and let rise until very blistered and full of air bubbles, about 45 minutes. (Here's a video showing how to shape the super wet dough.)
- Baking: Thirty minutes before baking, heat the oven with a baking stone in it to 475° F. Just before baking, cut the dough in half down the center with a dough scraper; a knife would tear the dough. Gently slide the 2 pieces apart and turn so that the cut surfaces face upward. Sprinkle the stone with cornmeal. If you feel brave, slide the paper with the dough on it onto the stone, but the dough can also be baked directly on the baking sheet. When the dough has set, slide the paper out. Bake for about 30 to 35 minutes. Cool on a rack.

George Church
Tried this today, it’s in the oven now. It was so wet that I had to put it loaf pans. I’m sure that I did something wrong any ideas?
I added an extra 1/2 cup of flour and it still ran like pancake batter. Any suggestions would be appreciated. Maybe I should stick to sourdough that turns out well for me.
Geo in Pa
Barbara Schieving
Hi George – it does sound like you skipped a step maybe. Don’t be afraid when making bread to add more water or flour until the dough is the consistency that feels right to you.
Lynn Deuel
This recipe is a direct quote from Carol Fields’ “The Italian Baker”. Did she get credit?
Barbara Schieving
Thanks for bringing this to my attention. Since I was baking along with the Bread Baking Babes, I somehow missed the attribution. I have updated the post with attribution and a link to buy the cookbook.
Erin
Wonderful! I love the big, airy crumb. Do you have a recommendation as to where I can get durum flour, or even the whole durum wheat berries? It’s impossible to find around here (Salt Lake). I’d love to give this one a try.
Jamie
I love the way this bread sounds and if it has both yours and Natashya’s seal of approval I must make it next! Looks perfect!
Anna Johnston
Oh Barbara this bread looks delicious too 🙂
Georgia @ The Comfort of Cooking
What a wonderful looking bread! Great job on it. I bet it would as delicious with a swipe of butter as it would on a sandwich! Thanks for sharing. You have a beautiful blog and I’m looking forward to exploring your recipes! 🙂
Angela
I want to bake this just so I can say it!
Lisa
What a lovely looking bread! I need to check out the BBB’s challenges more often. I never thought a bread I’ve never heard of existed, but here’s one – and they’ve stumped me with others! Definitely going to try it when I get some time.
The Jr. Chef
That bread looks beautiful! Too pretty to eat, but I’m sure it tastes fantastic. Wonderful recipes and pictures- you are very talented. Please visit my blog Picky Eater Solutions, I am a new food blogger just learning the ropes. http://www.pickyeatersolutions.blogspot.com
Barbara
Coccodrillo is a new name to me, but it sure looks like a marvelous bread, Barbara. The crunchy crust and sourdough flavor is right up my alley!
Cakelaw
It is beautiful looking bread – love all the air holes in the dough.
Anna
YUMMY! 🙂 Looks gorgeous. At first glance, I swear you’d written Crocodile Bread… ‘Now whats that?’ my brain asked. LOL! Barbara, Im craving a slice with a smidge of butter and a sweetened cuppa tea.
Lorraine @ Not Quite Nigella
Mum this looks wonderful! I’ve never heard of this type of bread before but it sounds like a must bake! 😀 xxx
Paula
The bread looks awesome. Can just imagine how wonderful it would be with some Brie!
Megan
What a beautiful loaf of bread.
Betty @ scrambled hen fruit
This looks so good! I’m thinking that I’d love some with a dish of really good olive oil and balsamic vinegar. 🙂
Mimi
Perfect!
Mimi
Maria
I want a slice with homemade strawberry jam:)
Joy
The Bread looks wonderful.
Elizabeth
Wow. Well done, Barbara. I’ve never been successful when trying to make Coccodrillo. (I’ve tried 3 times and have admitted defeat.) I’m curious; you did use an electric mixer?