
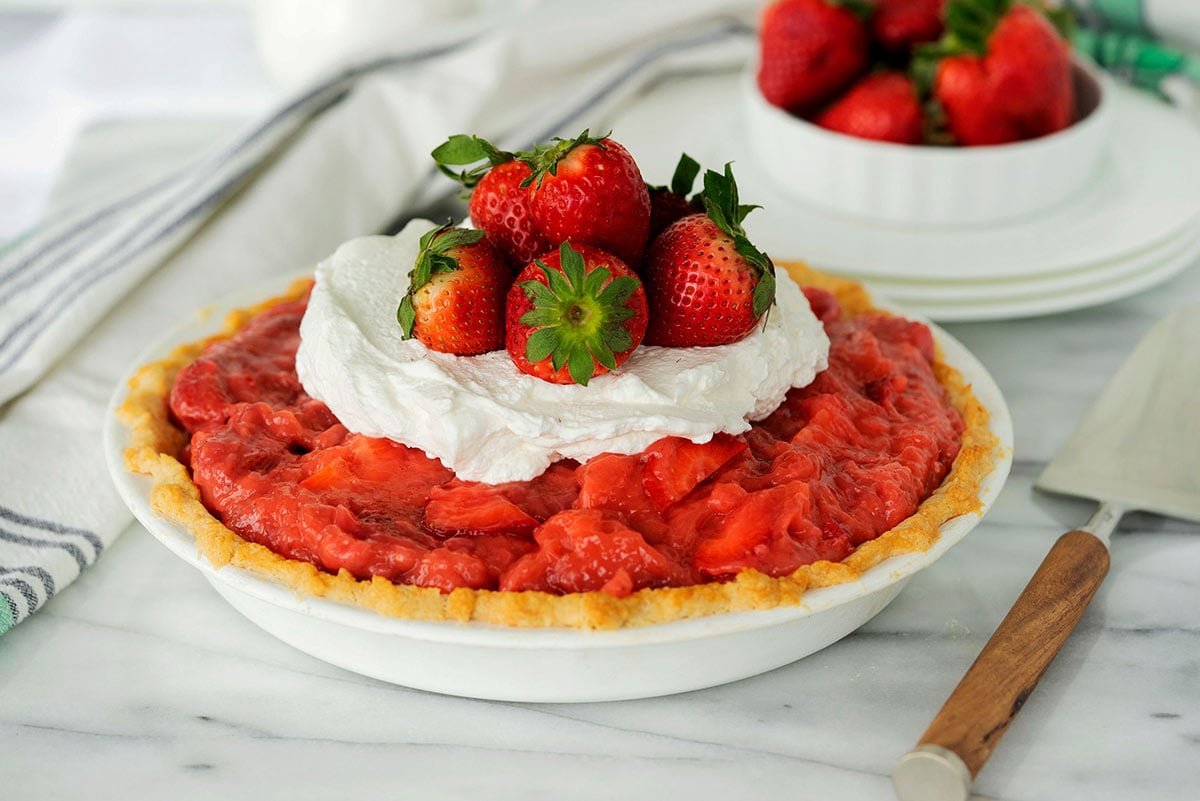
Fresh Strawberry Pie with homemade pie crust and fresh seasonal berries brightened up with lemon juice is the perfect summer dessert recipe.
WANT TO SAVE THIS RECIPE?
Enter your email below and we’ll send it straight to your inbox. Plus you’ll get great new recipes from us every week!
What makes this pie so delicious is that the filling is pure and simple: fresh strawberries two used ways, crushed strawberries to make the strawberry sauce mixed with uncooked fresh berries. It doesn’t use fillers, jello, or junket.
As a result, the strawberry flavor is bold, fresh, and naturally sweet. Use a homemade pie crust for an impressive dessert that’s actually quite easy to make!
Update: Strawberry season is nearly here, so I’ve updated this fresh berry pie with new photos, tips and tricks to help you make and enjoy it!
How to Make Fresh Strawberry Pie
This is a simple pie recipe that’s all about highlighting fresh strawberry flavor.
Here is how I recommend you make the recipe for success:
1. Make the pie dough and chill pie dough rounds
2. Roll out pie dough and place in pie plate
3. Chill the crust in the refrigerator
4. Bake crust and cool completely
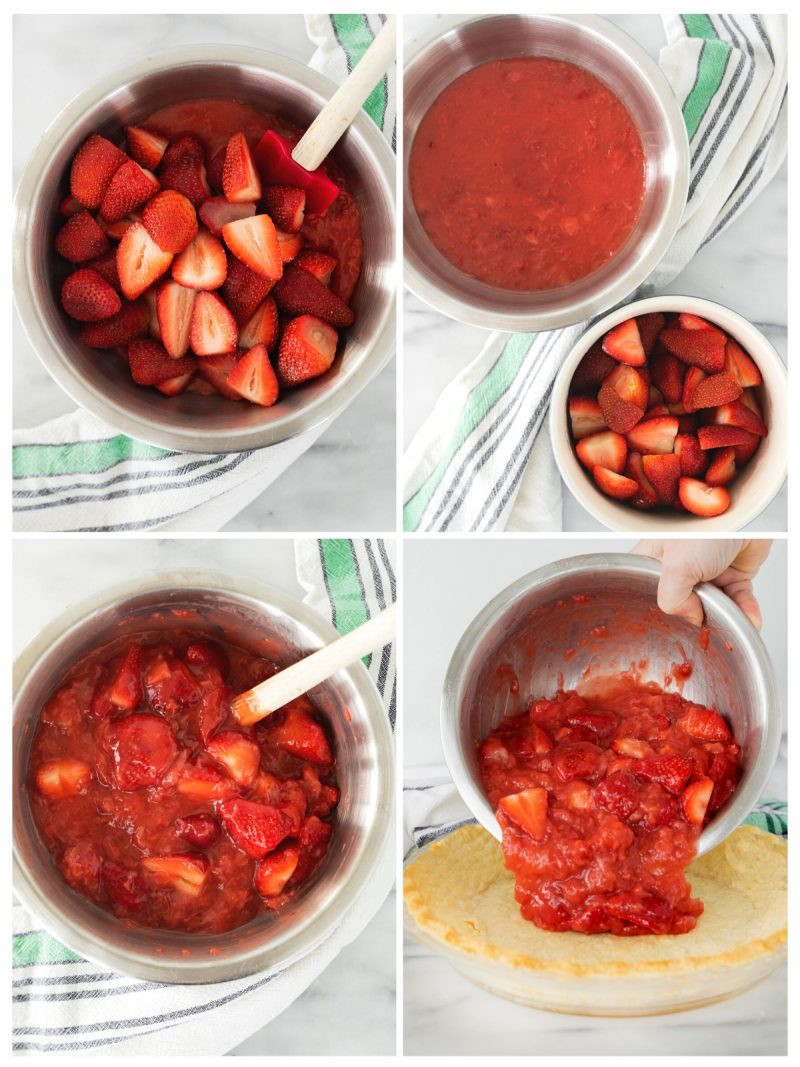
5. Make crushed strawberry filling, let cool
6. Mix in chopped strawberries
7. Pour into pie crust, chill pie to set the filling
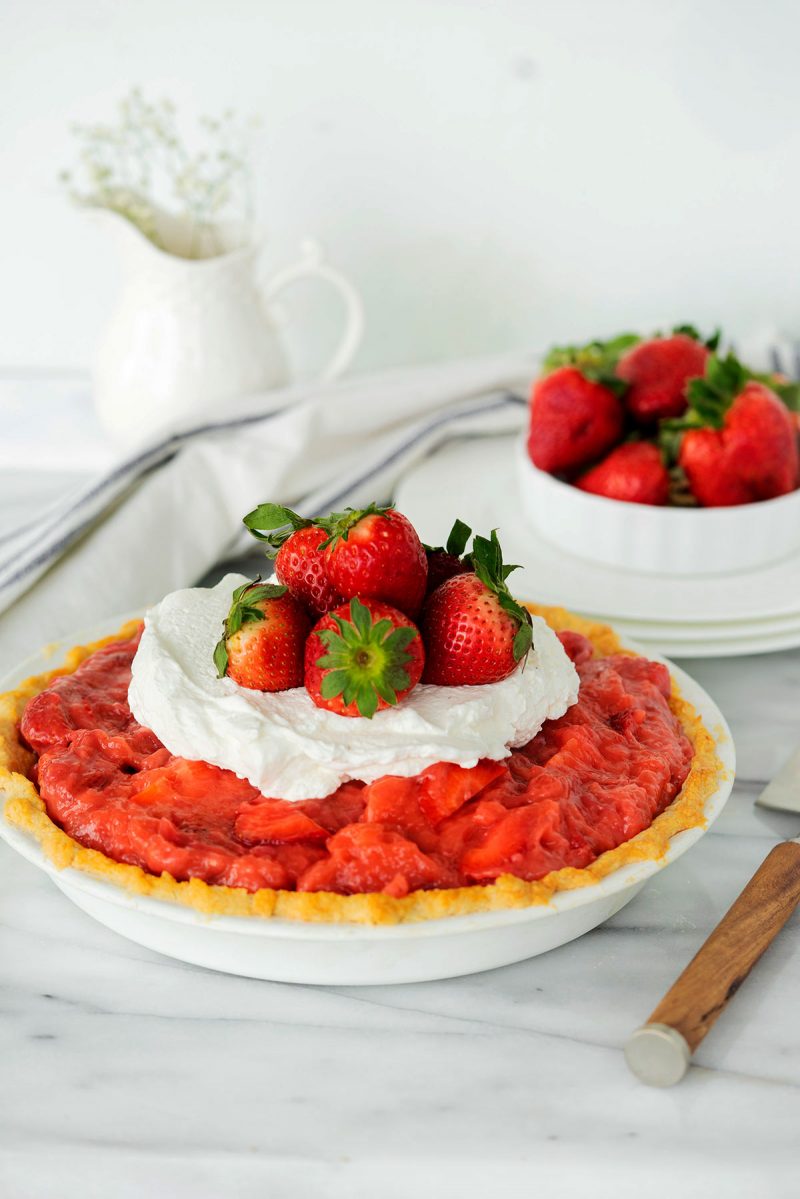
8. Garnish with whipped cream and more berries on top
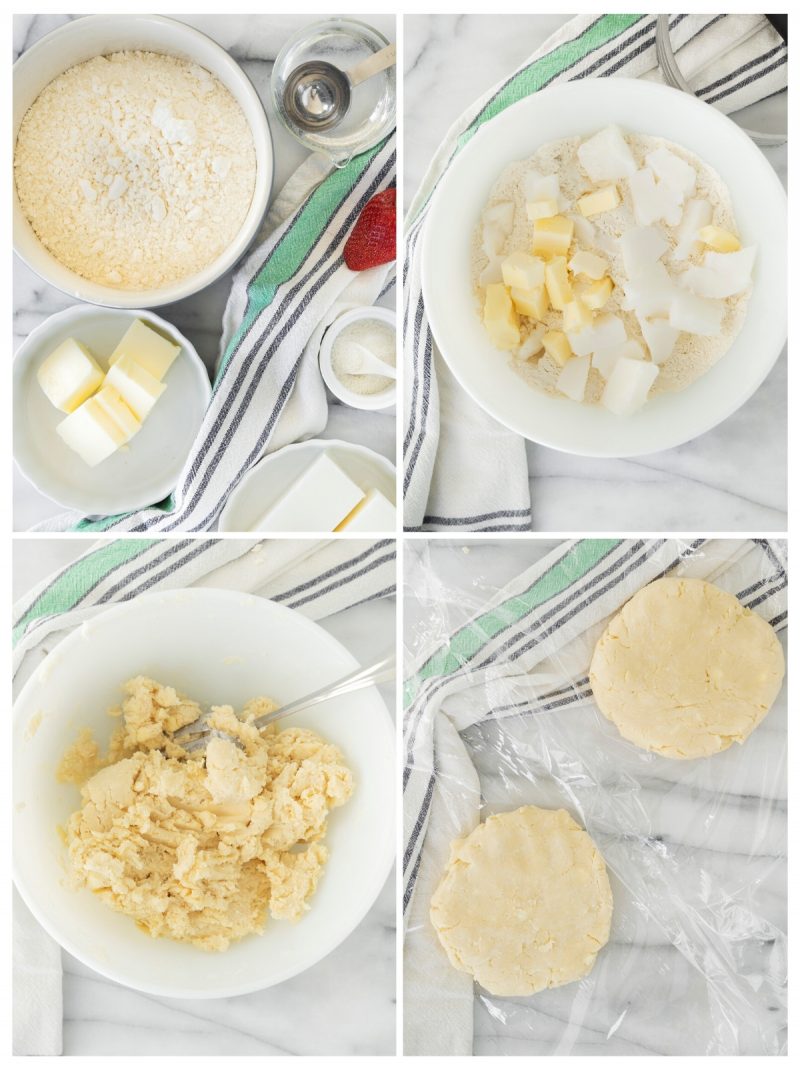
Homemade Pie Crust
The first step is to make the pie crust. It will need to chill so make sure you account for this in your timing. Click here for a full in-depth pie crust tutorial on how to make the flakiest pie crusts.
Note: when making pie dough, it is imperative that your fats (butter and shortening) be ice cold. Also, be sure to use ice water.
The easiest way to roll out the pie dough is to place the disc of chilled dough between two pieces of plastic wrap or parchment paper. This way you will not have to add additional flour to your dough, which can make it tough.
Use a heavy rolling pin and roll in all directions to keep the crust in a circle shape.
When laying the rolled-out pie dough into the pie plate, avoid stretching the dough. This can cause tearing and shrinkage when the crust bakes. And don’t forget to chill the dough when it’s in the pie plate before baking!
Just before you bake the crust, use a fork to poke holes on the bottom and sides of the crust. This ensures that no air bubbles form from trapped air during baking.
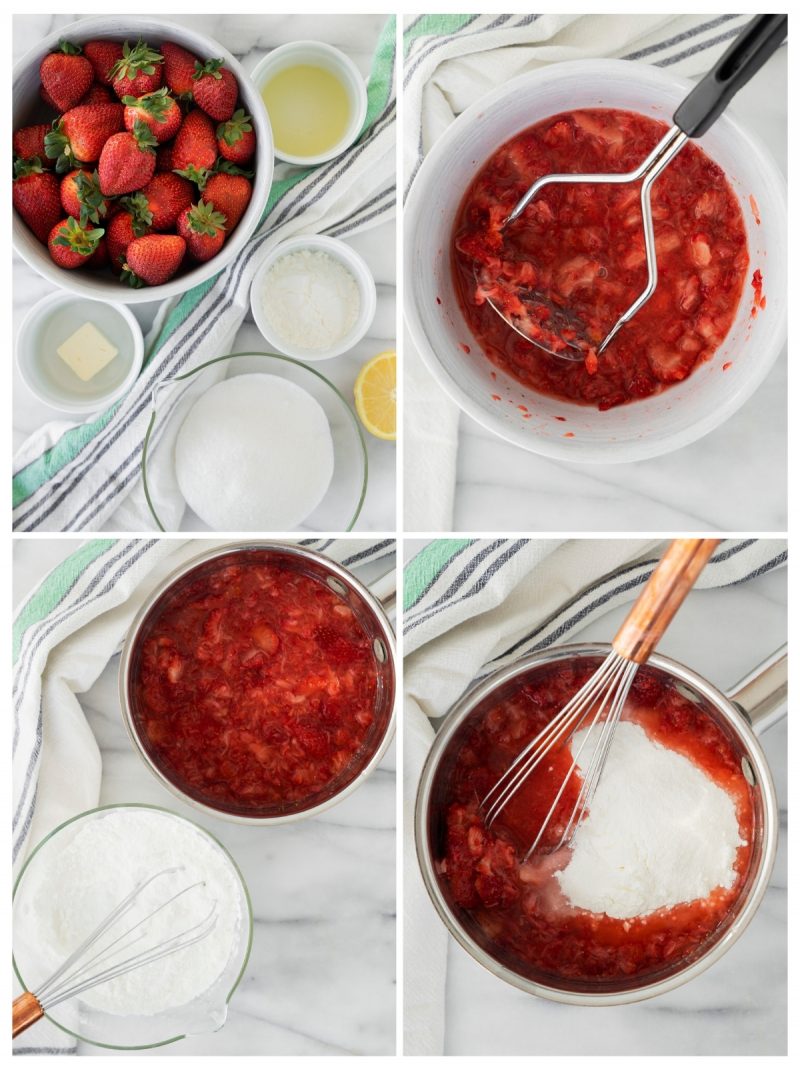
Fresh Strawberry Filling
You will want fresh strawberries for this pie recipe. They should be ripe but still firm with no blemishes or bruises on the outside.
I like to crush the strawberries with a potato masher. If you puree them they get foamy and pink.
When you combine the crushed strawberries with the cornstarch sugar mixture in a saucepan, you’ll cook it until it thickens. This can take around 7 minutes over medium heat. Stir the berries constantly so that the mixture heats evenly and doesn’t stick to the bottom of the pan.
If you want your strawberry sauce to be a darker red, you can add a drop or two of red food coloring.
Once the mixture is cooled, stir in chopped fresh strawberries very gently. You want the chopped strawberries to stay whole for texture in the pie.
Assembling Fresh Strawberry Pie
I like to top this fresh strawberry pie with homemade whipped cream. It perfectly compliments the strawberries.
To make whipped cream, simply beat 1 cup cold heavy cream and 1 tablespoon confectioners sugar, until soft fluffy whipped cream forms.
To assemble the pie, fill the cooled crust with whipped cream. Finally, top with the fresh strawberry filling.
Storing and Serving
This pie is best enjoyed chilled. Keep the pie refrigerated until ready to serve.
To serve, cut slices with a sharp knife. The first slice of pie is the hardest to get out, then the rest will come out easier and cleaner.
Store any leftovers covered and in the refrigerator for 2 to 3 days.
Also, if you have extra strawberries, check out these tips on how to wash, store and freeze fresh strawberries.

More Fruity Dessert Recipes
If you love fresh fruit sweetened up for dessert, give these recipes a try next:
- Classic Strawberry Shortcake is everyone’s favorite all-American dessert with fresh berries, light whipped cream, and buttery shortcakes.
- White Chocolate Raspberry Cheesecake in a Jar is creamy, tangy, and full of seasonal berry flavor.
- Strawberry Cheesecake Entremet is an elegant and refined homemade cheesecake with fresh berries.
- Layered Instant Pot Strawberry Cheesecake means you can make sweet and stunning layered berry cheesecake right in a pressure cooker!
WANT TO SAVE THIS RECIPE?
Enter your email below and we will send it straight to your inbox. Plus you will get great new recipes from us every week!

Fresh Strawberry Pie
Equipment
Ingredients
PERFECT PIE CRUST
- 2 ½ c. flour
- 1 t. salt
- ¼ c. unsalted butter chilled
- ⅔ c. shortening chilled (You get the flakiness from the shortening and the great taste from the butter)
- 5 to 6 T. ice water
FRESH STRAWBERRY FILLING
- 3 pints strawberries
- ⅔ c. sugar
- 4 T. cornstarch
- 1 T. lemon juice
- 1 T. butter
Instructions
- Combined flour and salt in a bowl. Cut butter into small cubes. Cut butter and shortening into flour mixture until it resembles very coarse meal. Gradually add water 1 Tablespoon at a time mixing with a fork. Divide in half, form into two round disks, and wrap in plastic. Chill for 30 minutes. Bake unfilled pie crust 15 – 20 min. at 450º.
- Crush 1 pint of berries, add enough water to make 2 cups. Combined sugar and cornstarch, then add to strawberries. Cook in a saucepan over medium heat until thickened. Add lemon juice and butter. Cool. Add remaining pints of strawberries to sauce and place in a baked pie shell (you can leave the strawberries whole, but I prefer them chopped into bite-size pieces). Serve with whipped cream

Jan
Oops! cornstarch!
Jan
Just saw your pie recipe and it is very similar to my late mother in-law’s fresh berry pie which also works wonderfully with raspberries and blueberries. She always added a few drops of red food coloring into the carstarch mixture as it was cooking to give it a deep red glossy color. Old pie recipes are the best. its what we remember from our childhoods.
Barbara
Hi Jan – I’ll have to try it with berries. I know I’d love it. I sometimes add a drop or two of food coloring too if the berries look pink instead of red. Good tip. Thanks!
Maggie
Barbara – not only do your recipes always sound absolutely yummy, but your execution of them is always so beautiful! I am ready to dig into this one.
Thanks for sharing (hmn, so we have a few pie days in the US … np, love pie 🙂
Barbara | VinoLuciStyle
We make the same pie…but I do leave the strawberries whole. I modified mine over the years to include a layered of sweetened mascarpone or cream cheese on top of the crust; in the event you have any left over, it sure help avoid a mushy bottom crust. I know…seldom happens but now, I just love the addition of that sweetened cream cheesey element!
Barbara
I would love a mascarpone layer with this pie. If the berries aren’t too big I’ll leave them whole too, but usually I end up getting the ones at Sam’s which are way more than a mouthful.
eleni
I love strawberries… well done with the pie!
Anonymous
I used to think I made good pie crust, but now I think I can make it even better.
Barbara Bakes
CookingKing – good luck with the pie crust. I have low humidity here in Utah. Just be sure and work quickly, keep everything as cold as possible and just add the water a little at a time, I imagine less would be better in your case. Let me know how it goes!
Cookingking
I might try your crust hints and attempt to make my own non store bought crust. Living in Texas, the heat is extreme and in the summer when I feel like making pies the most its extremely hard to keep the butter from from softening while working the crust. I can't promise I'll succeed but its worth another try.
Anita
Oh… a nice sweet pie – the best of both worlds. It looks great!
Barbara Bakes
Thanks for the nice comments. It was a big hit with my family.
Jenny
Mmmm,Strawberry pie sounds so good right now. Your pie looks beautiful and summery! Great pics!
Lisa
I like strawberry pie though I’ve never made one. Yours looks and sounds delicious!
I also like the idea about rolling dough between sheets of plastic wrap. I’ll have to give it a try next time.
Barbara Bakes
Kalyn – thanks for visiting my blog. I’ll have to spend some time on your blog as well. Looks like you’ve got some great low calorie recipes. I would be up for a food bloggers picnic. Keep me posted.
Kalyn
Very fun, this is the second Utah food blogger Alanna has helped me discover! Maybe this summer we’ll have to have a Utah Food Bloggers picnic or something.
Alanna
How yummy spring-delicious is your strawberry pie? Very, I bet!
Thanks so much for bringing pie to Pi Day at Kitchen Parade, especially for sharing your terrific tips for making pie crust. I really do hope we inspire others to give it a shot …