
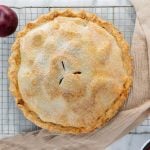
Learn how to make pie crust with this in-depth, step-by-step tutorial. Make the flakiest crust with a combination of butter for flavor and shortening for flakiness. This crust is perfect for all of your favorite pie recipes all year long.
For me, the key to the perfect pie crust is all about flavor and texture. This recipe makes an incredibly flakey, buttery pie crust. Both real butter and shortening mean that your crust is super flaky with tons of buttery flavor.
I used to struggle to make beautiful pie crusts. My dough always fell apart when I tried to move it from the counter to the pie plate. Or the crust would shrink when I baked it. I was usually disappointed with the flavor and they weren’t as flaky as I liked. Once I learned how to make better pie crusts, I had to write this tutorial on how to make easy pie crusts that come out perfectly every time.
Update: The holidays are right around the corner, which means it’s time to break out your favorite pie recipes. We’ve updated our pie crust tutorial with all of our best tips, tricks, and new photos so every pie on your holiday table can be a show-stopper this year.

How to Make Pie Crust
The first step to making homemade pie crust is to chill all of your ingredients. Make sure that the butter and shortening are both fresh from the fridge before you start mixing. And because you want to work quickly to keep the butter from warming and softening, it’s best to have all of your ingredients out and within reach.
When you have your “mise en place” established and you’re ready to get mixing, here are the steps to making the best pie crust:
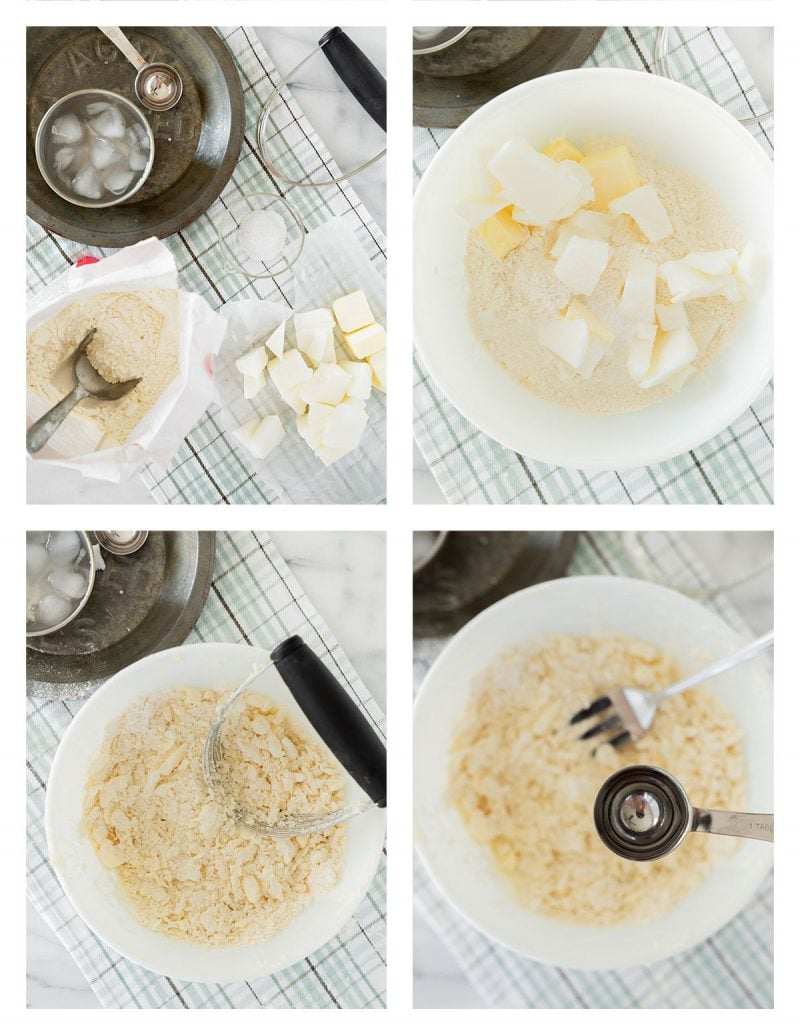
- Cut the cold butter and shortening into small pieces. This makes it easier to incorporate into the dry ingredients quickly without warming the fat too much.
- Use a pastry cutter to cut the butter and shortening pieces into the flour. Stop when you have pea-sized pieces of butter coated evenly in flour.
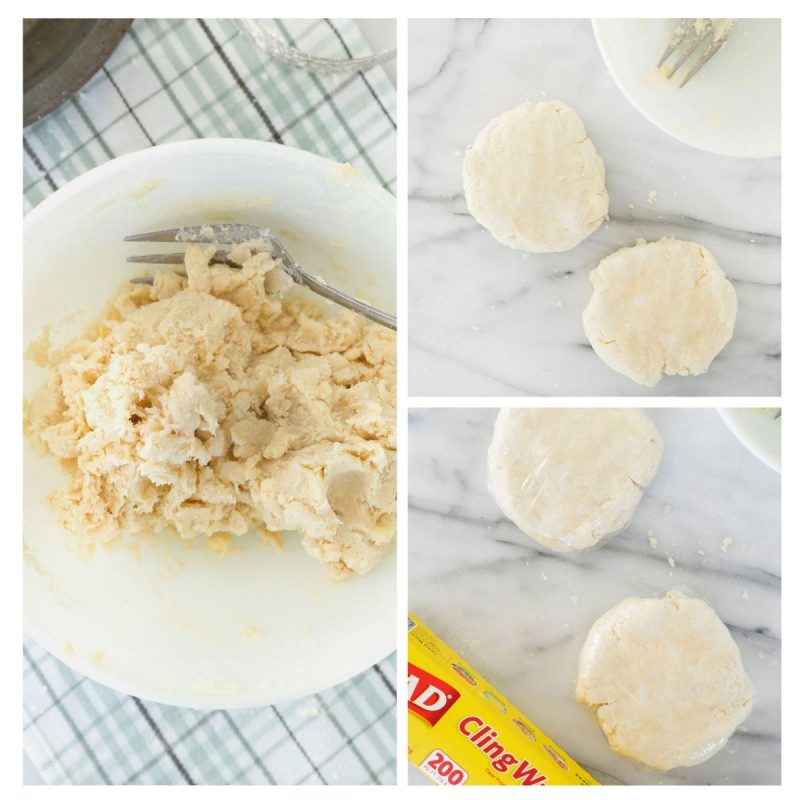
- Fold in ice water, one tablespoon at a time, using a fork. The mixture will still be pretty dry. If it’s difficult to get your dough to come together, rinse your hands in ice-cold water and dry them. Using your fingers press the dough mixture into a ball.
- Use your hands to gather the dough together into a rough ball. You don’t want to handle it too much because your hands will warm the dough.
- Place the dough in the center of a sheet of plastic wrap.
- Use the plastic wrap to knead the dough together so it forms a round, flat disc.
- Cover the dough with the plastic wrap and chill in the fridge for at least 30 minutes.
Rolling and Shaping Pie Crust
After your crust rests and chills in the refrigerator for at least half an hour, it’s ready to be rolled, shaped, and baked. Here’s how to shape a classic bottom crust for a pumpkin pie or similar recipe:
- Remove the dough from the plastic wrap and place it between two (I usually use four–two on top and two on the bottom) sheets of plastic wrap.
- Roll the pie crust into a circle about ⅛-inch thick, keeping the plastic wrap between your crust and rolling pin. If the plastic wrap gets tucked under the dough, just straighten it. If your dough slides around on the countertop, placing a Silpat or large cutting board underneath can help keep it in place.
- Roll the crust out large enough so that you have plenty of crust to come up the sides of your pie plate. I like to put the dish in the middle to measure it as I work.
- Peel off the top sheet of plastic. Grab hold of the bottom sheet of plastic and the dough and quickly but gently flip it over into your pie plate.
- Don’t stretch the dough when fitting it in the pie plate, or it will shrink as it bakes. After you’ve fit the crust in the pan, press it gently against the sides and bottom to ensure that no air is trapped between the dough and the pan. Peel the bottom sheet of plastic off after your dough is securely in the pie plate.
- Finish the edges. If you’re using a fluted tart pan, you can simply trim the excess crust so it’s flush with the top of the pan. Martha Stewart has a fun gallery of great decorative pie crust ideas to finish your edges.
- Prick the crust all over with a fork. This helps steam escape during baking so the crust doesn’t rise and then fall.
- Chill the pie crust in the pan for at least another 30 minutes before baking or filling with your favorite pie filling. If you’re chilling the pie for longer than 30 minutes, cover it with plastic wrap to prevent it from drying out.
Ingredients for The Flakiest Crust
If you want great flaky layers and real butter taste, ingredients matter just as much as technique. In all of my recipe tests, I’ve found that the only way to achieve crisp flakes and rich flavor is by using both butter and shortening.
The shortening creates perfect flakes while the butter adds rich, classic pie crust flavor.
The other pie crust ingredients are pantry staples: all-purpose flour, salt, and ice water.
Why Use Cold Butter and Shortening?
The reason to use cold ingredients for flaky pie crust is that as the crust cooks, the heat from the oven explodes solid fat particles. These miniature explosions of solid butter and shortening release steam. In turn, the steam creates individual crisp layers of crust.
If you were to use soft or melted butter, on the other hand, a lot of that moisture has already escaped from the butter before cooking. Instead of crisp, light layers, your pie crust is more likely to be oily and soggy.
For this reason, it’s important to use ice water and to avoid warming the dough too much by handling it or overmixing it.

Can I use a Food Processor?
You can use a food processor to cut the butter and shortening into the flour. However, it’s easy to overprocess the crust this way. Unless you are very quick with the pulse feature on your food processor, I recommend making your crust by hand using the steps in this recipe.
Decorating Homemade Pie Crust
This crust recipe is designed for optimal flakiness and flavor. All the flakes mean that this isn’t the best recipe for braiding or other fancy decorations.
However, you can use small cookie cutters on the leftover crust and lay them on top of your pie for elegant decorations that have plenty of lift and buttery richness. That’s how I decorated this festive Cranberry Pecan Pie, for example.

Making a Double Crust
For apple pies and other double-crust recipes, you can simply double the pie crust recipe as written. After placing the dough in the pie plate and chilling, fill it with your filling. Next, transfer the second rolled-out (chilled) pie crust on top of the filling using the same plastic wrap technique detailed above.
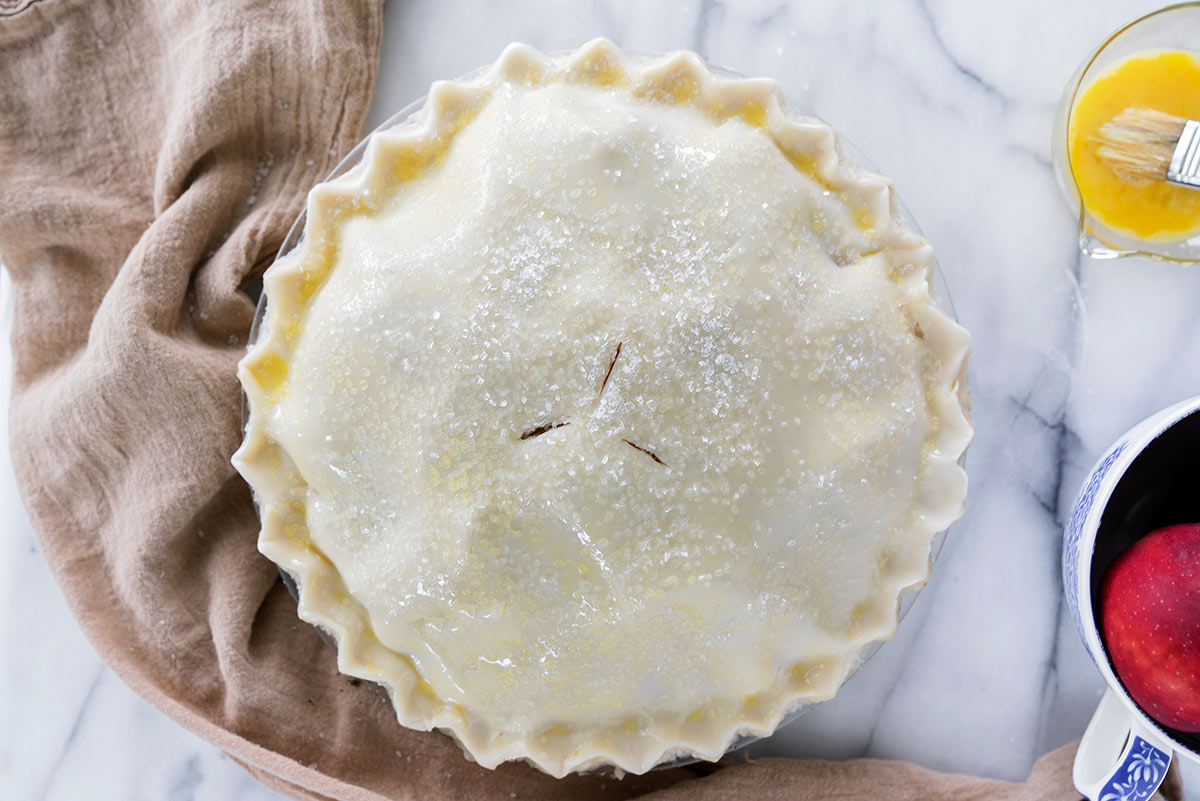
Seal the bottom and top crusts together by pinching them all the way around. If you find some edges are just not sticking, dab them with a little beaten egg to seal them.
Be sure to cut some vent holes on the top before baking. And for a golden, textured finish, brush the top crust with a beaten egg and sprinkle with sanding sugar.
Finally, refrigerate the filled pie for 30 minutes and bake as instructed.
What if My Dough Tears?
No worries! If your crust rips while you’re working with it, simply take an extra piece of dough from the edges to mend the torn area by pressing it into place.

Recipes for the Best Pie Crust
Once you’ve mastered how to make pie crust, all of your pies, large and small, will be delightfully flavorful and flaky. Here are some of my favorite ways to use pie crust all year long:
- Chicken Pot Pie, because this all-purpose pie crust recipe isn’t sweet, it’s perfect for savory baking too!
- Strawberry Rhubarb Pie has a flaky pie crust and a crumbly streusel topping for the best of both worlds.
- Classic Pecan Pie is a must-have Thanksgiving menu item with a buttery, sticky pecan filling.
Pie Crust Tutorial
Equipment
Ingredients
- 2 ½ cups flour
- 1 teaspoon salt
- ¼ cup unsalted butter chilled
- ⅔ cup shortening chilled (I use butter-flavored shortening)
- 5 to 7 tablespoons ice water
Instructions
- Combine the flour and salt in a bowl.
- Cut the butter and shortening into small cubes. Add the butter and shortening to the flour and cut it in with your hands or a pastry cutter until it resembles a very coarse meal.
- Gradually add water, 1 tablespoon at a time, mixing with a fork. Stop adding water and mixing when the dough comes together into a ball.
- Divide the dough in half, form each half into a round disc, and wrap in plastic. Chill for 30 minutes in the fridge.
- Shape and bake the unfilled pie crust for 15–20 minutes at 450ºF.

2sistersrecipes.com
Great tips Barbara!! Thanks so much! Have a great weekend!
Les zimmer
How do you keep the pie crust from caving in on a apple pie as it bakes. Starts out great, nice and high, then gives in. Thanks
Barbara Schieving
If you partially cook the apples before you put them in the crust that should help alleviate the problem. I love this recipe https://www.barbarabakes.com/2009/12/apple-cranberry-streusel-pie-sweet/ adapted from a Cook’s Illustrated recipe. Great question.
BreAna {Sugar and Spice and All Things Iced}
I used this recipe a couple of weeks ago and it turned out perfect! It was one of my first times making pie crust and I absolutely loved it! I used some of it to make individual pies in jars. Thanks for the great tutorial!
Barbara
Love your pie in a jar post. Thanks so much for taking the time to come back and let me know the recipe worked perfectly for you!
Libby
I was just perusing my own blog which I’m reworking and came across this youtube video which I posted. I demonstrates the “turning” on the surface which I talked about. I do it more often than she does in the video, but still the video comes pretty close to my methods. Here’s the clip
http://youtu.be/iS0MltybI14
Barbara
I enjoyed watching the video. I liked her tip about adding a little sugar to aid in browning. It would be fun to do a side by side comparison to see if the crust is flakier when rolled out using my method or this traditional method. Thanks for sharing.
Linda
Great tutorial! I’ve always used the shortening pie crust recipe from an old Betty Crocker cookbook, and the one time I tried all butter, it tasted good but was not flaky. I like your idea of part butter and will have to give it a try. I’ve never chilled my shortening, but it will be interesting to see if I notice a diff when I do. Making pie crust since 1970, but I’m finding I’m never too old to learn. 😉
a spoonful of yumm
so useful ! thanks for this tutorial 🙂
Libby
The Fear of Pastry – it is right up there with the fear of yeast baking which is why I started my own blog. Inactive for now, but hopefully a new site will go up by year’s end.
One way to possibly help get over the fear – Throw absolute Caution To The Wind and be prepared to fail. Be prepared to throw it away if it ticks you off. And if you did, then do it again, and again. Even on the same day if possible. Because it is the importance of the repetition that will help you get to KNOW YOUR DOUGH, and that’s so important. It’s sort of the way I discovered my own errors. I did 3 pies in one week where it was just the same old failure in one form or another. On the 4th one, I nailed it.
The closely spaced repetition will help you better analyze your errors. Lard works best for the practice crusts because it’s less expensive than butter, and it will “act” a little more like butter than Crisco. While the Crisco makes a good crust, I find it won’t chill quite like lard does. The lard is just a little more forgiving during the trials. My own standard recipe uses about a 2/3 lard 1/3 Crisco ratio.
Note: I don’t promote wasting of food. You can take the dough and try and re-refrigerate and start again. Problem is the dough integrity can be ruined depending on how hard you treated it. So while your recycled dough baked crust might be rock hard on the edges, it’s still edible. I’ve had success with one “recycle” of dough where the crust still came out decent. I think after that, you’re pushing it.
Barbara
Hi Libby. Thanks for sharing the info. Repetition really is the key.
Lorraine @ Not Quite Nigella
Great post mum! I know so many people that are scared of pastry and to be honest a few years ago I was too! But these are all great tips! 🙂 xxx
Christina @ Sweet Pea's Kitchen
I love homemade pie crusts…it is actually one of my favorite parts of the pie. If the crust isn’t flaky…no thanks! This pie crust looks great…I will have to give it a try next time I make a homemade pie! 🙂
Barbara
Super tutorial, Barbara. I hate to admit it, but the crust is my favorite part of ANY pie. And a bad one will ruin it.
Barbara
I love the crust too. I often try to make each bite a perfect bite by taking a forkful of the edge with each bite.