

WANT TO SAVE THIS RECIPE?
Enter your email below and we’ll send it straight to your inbox. Plus you’ll get great new recipes from us every week!
The January 2010 Daring Bakers’ challenge was hosted by Lauren of Celiac Teen. Lauren chose Gluten-Free Graham Wafers and Nanaimo Bars as the challenge for the month. The sources she based her recipe on are 101 Cookbooks and www.nanaimo.ca. Nanaimo Bars are a classic Canadian dessert created in Nanaimo, British Colombia. It’s pronounced Nah-nye-Moh.
Lauren is an amazing high school student who creates wonderful gluten-free treats and meals for her family. Growing up in Canada, Lauren would buy these rich and delicious treats at the grocery store. Now that the 2010 Olympics are being held in Canada she thought it was the perfect time to share Nanaimo bars with the world.

The first part of the challenge was to bake homemade graham crackers. I have seen lots of posts on homemade graham crackers but had never taken the time to make them. Since I didn’t have any of the GF flours, I decided to use whole wheat pastry flour instead. My dough was pretty sticky so I rolled the dough out between parchment paper.

My grahams puffed up a lot and didn’t keep their shape or holes on top. I thought they were just okay the day I made them, but the next day after being in a Ziploc overnight they tasted just right – honey sweet and crispy.
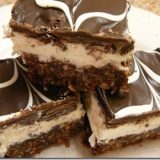
Then we used our homemade grahams to make the Nanaimo Bars. The bars have three layers: a crust containing graham cracker crumbs, cocoa, coconut and nuts, a middle custard (buttercream) layer, and a chocolate topping.
I’m not a fan of buttercream, so right after I made the bars I wasn’t so sure I liked them. But after resting overnight in the fridge the buttercream seemed to thicken up a bit and I found myself going back again and again throughout the day to have just a little bit more. I can see how these could be addicting!

Thanks for a fun challenge Lauren. Visit the Daring Bakers’ blogroll to check out all the wonderful Nanaimo Bar variations that the other Daring Bakers have whipped up. Visit Lauren of Celiac Teen for the GF version.
WANT TO SAVE THIS RECIPE?
Enter your email below and we will send it straight to your inbox. Plus you will get great new recipes from us every week!
Nanaimo Bars
Ingredients
- 2 ½ cups plus 2 tbsp of all-purpose wheat flour I used whole wheat pastry flour
- 1 cup Brown Sugar Lightly packed
- 1 teaspoon Baking soda
- ¾ teaspoon Kosher Salt
- 7 tablespoons Unsalted Butter Cut into 1-inch cubes and frozen
- ⅓ cup Honey Mild-flavoured such as clover.
- 5 tablespoons Whole Milk
- 2 tablespoons Pure Vanilla Extract
- Nanaimo Bars
- BOTTOM LAYER
- ½ cup Unsalted Butter
- ¼ cup Granulated Sugar
- 5 tablespoons Unsweetened Cocoa
- 1 Large Egg Beaten
- 1 ¼ cups Graham Cracker Crumbs See previous recipe
- ½ cup Almonds Any type, Finely chopped
- 1 cup Coconut Shredded, sweetened or unsweetened
- MIDDLE LAYER
- ½ cup Unsalted Butter
- 2 tablespoons and 2 teaspoons Heavy Cream
- 2 tablespoons Vanilla Custard Powder Such as Bird’s. Vanilla pudding mix may be substituted or 2 T. cornstarch and 1 teaspoon Vanilla
- 2 cups Powdered Sugar
- TOP LAYER I DOUBLED THIS LAYER
- 4 ounces Semi-sweet chocolate
- 2 tablespoons Unsalted Butter
Instructions
- In the bowl of a food processor fitted with a steel blade, combine the flours, brown sugar, baking soda, and salt. Pulse on low to incorporate. Add the butter and pulse on and off, until the mixture is the consistency of a coarse meal. If making by hand, combine aforementioned dry ingredients with a whisk, then cut in butter until you have a coarse meal. No chunks of butter should be visible.
- In a small bowl or liquid measuring cup, whisk together the honey, milk and vanilla. Add to the flour mixture until the dough barely comes together. It will be very soft and sticky.
- Turn the dough onto a surface well-floured with sweet rice flour and pat the dough into a rectangle about 1 inch thick. Wrap in plastic and chill until firm, about 2 hours, or overnight.
- Divide the dough in half and return one half to the refrigerator. Sift an even layer of sweet rice flour onto the work surface and roll the dough into a long rectangle, about ⅛ inch thick. The dough will be quite sticky, so flour as necessary. Cut into 4 by 4 inch squares. Gather the scraps together and set aside. Place wafers on one or two parchment-lined baking sheets. Chill until firm, about 30 to 45 minutes. Repeat with the second batch of dough.
- Adjust the rack to the upper and lower positions and preheat oven to 350 degrees Fahrenheit (180 degrees Celsius).
- Gather the scraps together into a ball, chill until firm, and reroll. Dust the surface with more sweet rice flour and roll out the dough to get a couple more wafers.
- Prick the wafers with toothpick or fork, not all the way through, in two or more rows.
- Bake for 15 – 25 minutes, until browned and slightly firm to the touch, rotating sheets halfway through to ensure even baking. Might take less, and the starting location of each sheet may determine its required time. The ones that started on the bottom browned faster.
- When cooled completely, place enough wafers in food processor to make 1 ¼ cups of crumbs. Another way to do this is to place in a large ziplock bag, force all air out and smash with a rolling pin until wafers are crumbs.
- For bottom Layer: Melt unsalted butter, sugar and cocoa in top of a double boiler. Add egg and stir to cook and thicken. Remove from heat. Stir in crumbs, nuts and coconut. Press firmly into an ungreased 8 by 8 inch pan.
- For Middle Layer: Cream butter, cream, custard powder, and icing sugar together well. Beat until light in colour. Spread over bottom layer.
- For Top Layer: Melt chocolate and unsalted butter over low heat. Cool. Once cool, pour over middle layer and chill.
- These bars freeze very well, so don’t be afraid to pop some into the freezer.

Suzanne Marie
How do I make the beautiful top? They are lovely and an eager to try hem! Thank you so much.
Barbara Schieving
Hi Suzanne – it’s really pretty easy to make the fun lines. I just melt a little white chocolate or make a little bit of thick white icing. The put the icing in a pastry bag or a Ziploc bag and snip off the corner and pipe some lines across the top. Then while the icing is still wet, you take a toothpick and drag the lines in opposite directions every other row.