
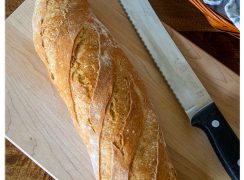
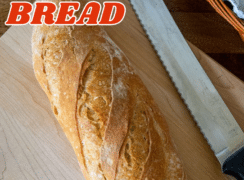
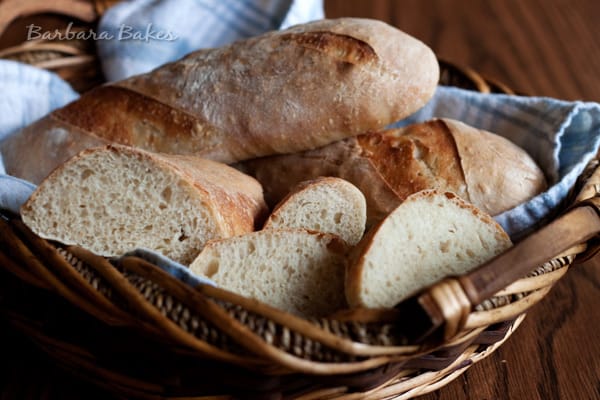
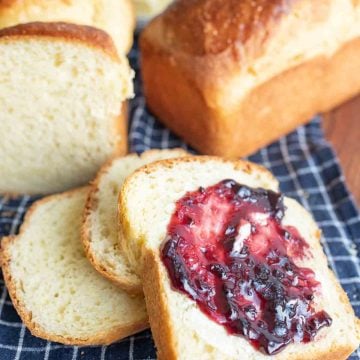
There is nothing quite like the smell of fresh bread wafting through the house to make a busy weeknight feel a little more cozy. Whether you’re trying to elevate a simple spaghetti dinner or looking for a comforting side with your bowl of soup, this Homemade French Bread Recipe is the perfect solution.
As a busy home cook, I know you don’t have time to make recipes that might fail. That is why this is my go-to homemade bread recipe. It’s straightforward, reliable, and uses basic pantry staples that you already have on hand.
WANT TO SAVE THIS RECIPE?
Enter your email below and we’ll send it straight to your inbox. Plus you’ll get great new recipes from us every week!
Jump to:
- What is Homemade French Bread?
- Key Takeaways
- Ingredient Notes
- Homemade French Bread Recipe
- Equipment Needed for Homemade Bread
- The Pizza Peel and Cornmeal Trick
- Creating the Perfect Crust
- How To Make French Bread
- How to Shape A French Bread
- How to Bake French Bread Loaves
- Letting the Bread Cool
- Pro Tips for the Best French Bread
- Recipe FAQs
- Variations and Substitutions
- What to Serve with Homemade French Bread
- Storage and Reheating
- More Homemade Bread Recipes
- More Yeast Bread Recipes to Consider
What is Homemade French Bread?
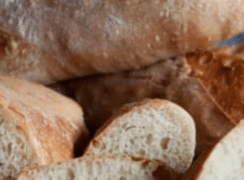
Homemade French bread is a classic, crusty loaf characterized by its light, airy interior and golden, crispy crust. People love it because it only requires four simple ingredients: flour, water, yeast, and salt. This is a budget-friendly and delicious alternative to store-bought loaves.
While many home bakers feel intimidated by making French bread, this recipe breaks it down into manageable steps that even beginners can master. I’ve found the magic happens when you give the dough a little extra time to rest and rise. I’m going to show you exactly how to use slow fermentation and proper proofing to get that perfect flavor at home.
Key Takeaways
- Simplified Process: This adaptation uses a stand mixer, making the kneading process more accessible for home bakers. It saves time and energy while still producing dough with the perfect texture.
- Authentic Flavor: The recipe follows Julia Child’s classic method, ensuring a traditional French bread taste. The result is a crusty exterior and soft, airy interior reminiscent of bakery-quality bread.
- Steam Magic: You’ll learn the professional bakery trick of creating steam in your home oven using just ice cubes and a preheated pan, resulting in that coveted crackling crust.
- Family Approved: The kids will love the soft, fluffy center and be even more excited for dinnertime.
- Budget-Friendly: This recipe uses what is already in your pantry; no extra ingredients are required.
- Perfect for Meal Prep: Make extra loaves at once and freeze the extras to use at a later time.
- Achievable for All: The recipe is designed to be approachable, even for those new to bread baking. With patience and attention, anyone can create a loaf that looks and tastes like it came from a French boulangerie.
🥖 Feeling adventurous? Every time I bring my Russian braided bread to the neighborhood potluck, it disappears in minutes!
Ingredient Notes
- Instant or active dry yeast – This is the rising agent that is necessary to give the bread height and texture.
- All-purpose flour – A high-quality all-purpose flour is necessary to give the bread its structure.
- Salt – The salt will enhance the flavor of the wheat; don’t skip it or the bread will taste flat.
- Water – Warm water will be used to “wake up” the yeast. This should feel like warm bath water, nearing 120 degrees F.
- Cornmeal – This ingredient is only needed if you use the peel option; cornmeal is sprinkled onto the pizza peel to avoid sticking. It is not needed in the dough itself.
See the recipe card below for full information on ingredients and quantities.
WANT TO SAVE THIS RECIPE?
Enter your email below and we will send it straight to your inbox. Plus you will get great new recipes from us every week!

Homemade French Bread Recipe
Equipment
- KitchenAid Stand Mixer, 5 Qt
- Pizza Stone for Oven and Grill, 15 x 12 Inch
- Bread Lame, Premium Long Handle
Ingredients
- 2 ¼ teaspoons 1 packet instant or active dry yeast
- 3 ½ cups all-purpose flour*
- 2 ¼ teaspoons salt
- 1 ½ cups warm water 120ºF – 130ºF
- Cornmeal for pizza peel optional
Instructions
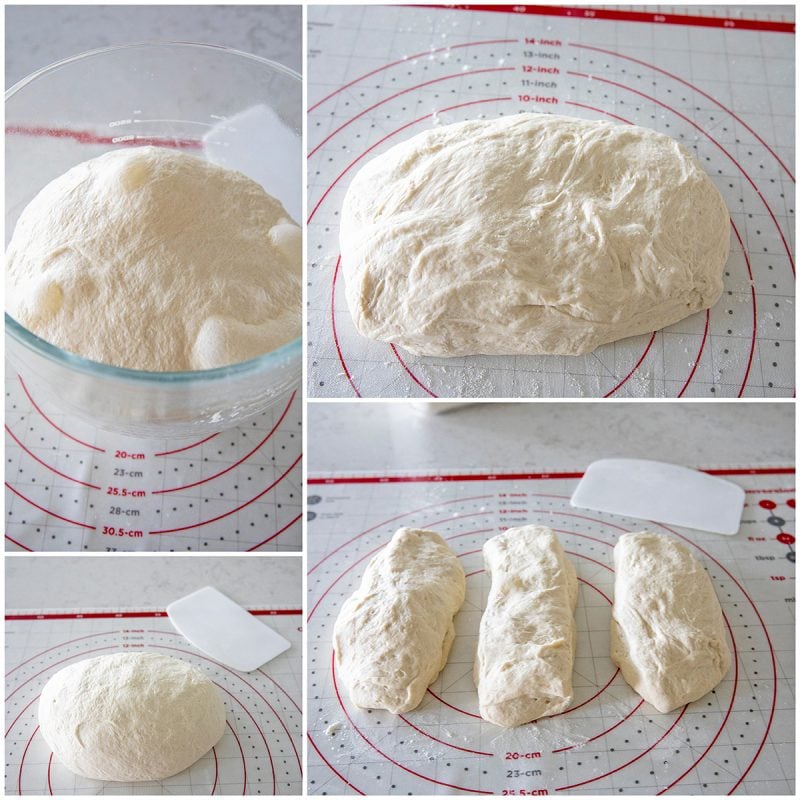
- In the mixing bowl of a stand mixer using the flat beater, combine the yeast, 2 ½ cups flour and salt. Mix on low for about 30 seconds.
- With the motor running on low, pour in the warm water. Continue mixing until a shaggy dough forms. Clean off beater and switch to the dough hook.
- Mix in the remaining cup of flour a little at a time, to make a soft dough, adding more or less flour as needed.
- Knead the dough for 5 minutes. The surface should be smooth and the dough will be soft and somewhat sticky.
- Turn the dough onto a kneading surface and let rest for 2 – 3 minutes while you wash and dry the bowl and oil it or spray it with non-stick spray.
- Return the dough to the mixing bowl and let it rise, covered, at room temperature (about 75ºF) until 3 ½ times its original volume. This will probably take about 3 hours.
- Gently deflate the dough and return it to the bowl. Let the dough rise at room temperature until not quite tripled in volume, about 1 ½ to 2 hours.
- Meanwhile, prepare the rising surface: rub flour into canvas or linen towel placed on a baking sheet. (You can use parchment paper.)
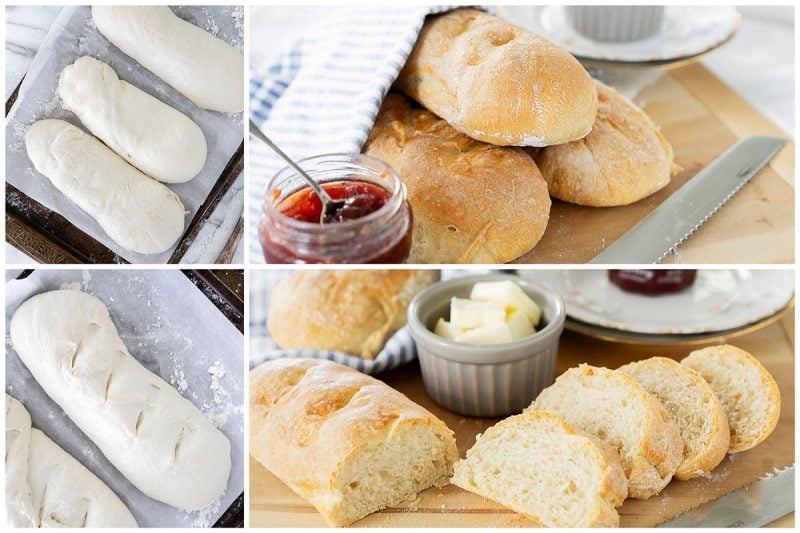
- Divide the dough into 3 pieces. Fold each piece of dough in two, cover loosely, and let the pieces relax for 5 minutes.
- Shape the loaves and place them on the prepared towel or parchment. Cover the loaves loosely and let them rise at room temperature until almost triple in volume, about 1 ½ to 2 ½ hours.
- Preheat oven to 450ºF. Set up a "simulated baker's oven" by placing a baking stone on the center rack, with a metal broiler pan on the rack beneath, at least 4 inches away from the baking stone to prevent the stone from cracking.
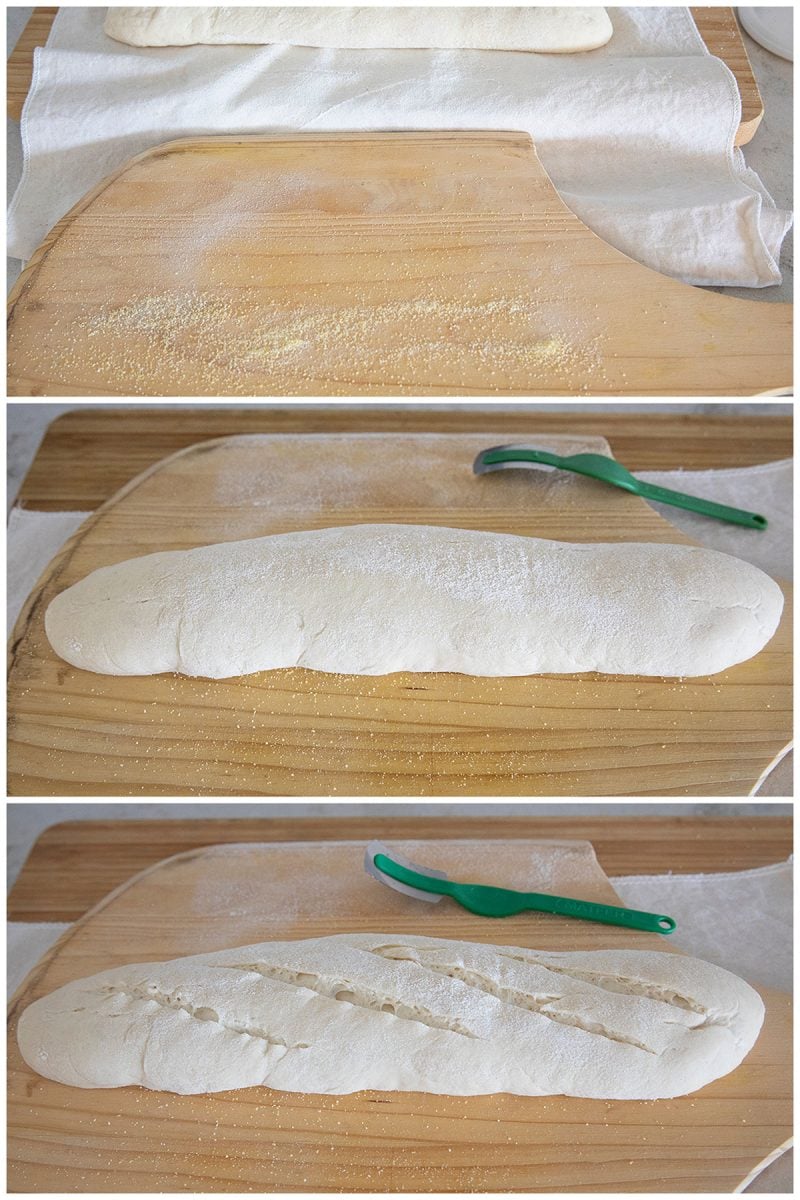
- Transfer the risen loaves onto a peel sprinkled with cornmeal.
- Slash the loaves with a lame or sharp knife.
- Spray the loaves with water. Slide the loaves into the oven onto the preheated stone and add a cup of hot water to the broiler tray.
- Bake for about 25 minutes until golden brown. (If you used parchment paper you will want to remove it after about 10-15 minutes to crisp up the bottom crust. Spray the loaves with water three times at 3-minute intervals.
- Cool for 2 – 3 hours before cutting.
Notes
Nutrition
Equipment Needed for Homemade Bread
You don’t need much special equipment to make a perfect loaf of homemade classic French Bread, though there are a few items I find especially useful. For example, I like to use my stand mixer to knead the dough, but you could certainly do it by hand. Of course, that’s how Julia did it.
Other readers have made this recipe in a bread machine, which is another great way to make this recipe even simpler! Julia calls for rising the loaves on linen, but you can use parchment paper. Plus, the parchment makes the loaves easy to move onto the baking stone.
The Pizza Peel and Cornmeal Trick
A pizza peel (a large, flat paddle used to slide bread into the oven) is an excellent tool to transfer your loaves to the oven. If you use a peel, I recommend a light sprinkle of cornmeal on the surface first. The cornmeal acts like a tiny ball bearing to help the dough slide off easily.
If you do not have a peel, it’s best to do the final rise of the shaped loaves directly on the baking sheet you plan to use. That way, the entire pan goes straight into the oven.
Creating the Perfect Crust
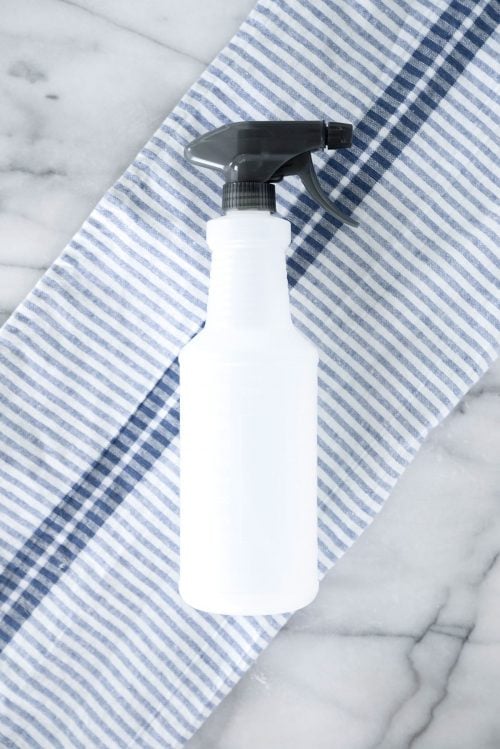
A spray bottle filled with water is also helpful to moisten the dough before it goes into the oven and again during the first few minutes of baking. This created the steam necessary for that classic “shatter” when you bite into the crust.
Finally, the number one tool I’d recommend for perfect French bread is a pizza stone. You can certainly make homemade bread without one (just use a baking sheet), but a hot stone helps ensure that the crust gets delightfully crisp and golden. It’s fantastic for other recipes too, especially pizza!
How To Make French Bread
Step 1: If you want to have French bread for dinner, you need to start this recipe first thing in the morning. The recipe requires two long rises to develop a flavorful dough.

Step 2: The dough itself is a simple combination of flour, water, salt and yeast. Start by mixing the dry ingredients together for just a few seconds in the stand mixer. Then, slowly stream in the water with the mixer running.
Pro Tip: I simplified Julia’s original recipe to use a stand mixer. I rarely knead dough by hand because the mixer makes it so easy, but if you don’t have a mixer, you can mix the dough by hand.
Step 3: Once a shaggy dough forms, switch to the dough hook attachment. Let the machine knead the dough for about 5 minutes on medium speed. The dough is done kneading when it’s smooth, elastic, and can be stretched easily, but it is still slightly sticky. See below for the telltale signs of a well-kneaded dough.
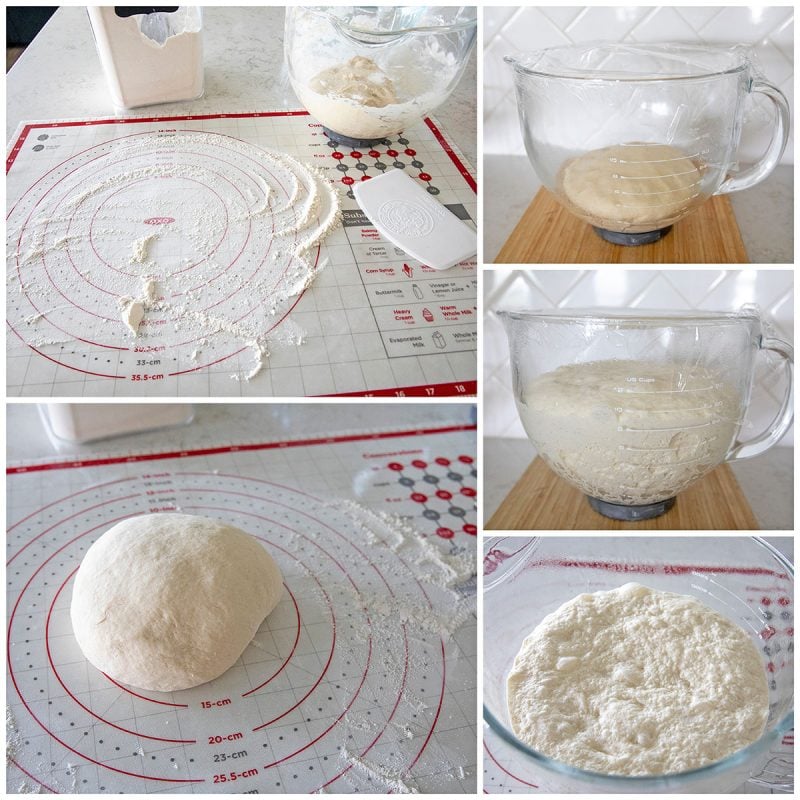
Step 4: Remove the dough from the mixing bowl, grease the bowl with cooking spray, return the dough to the bowl, cover and let rise for 3 hours. The dough should increase by 3 ½ times.
Step 5: Gently remove the dough from the bowl and fold it over a couple of times to redistribute the gases. It should be light and pillowy soft.
Step 6: Let it rise for a second time until it grows 2 to 3 times in size, about 1½ to 2 hours. After the second rise, the dough is ready to be shaped before its final rise, before baking it in the oven.
How to Shape A French Bread
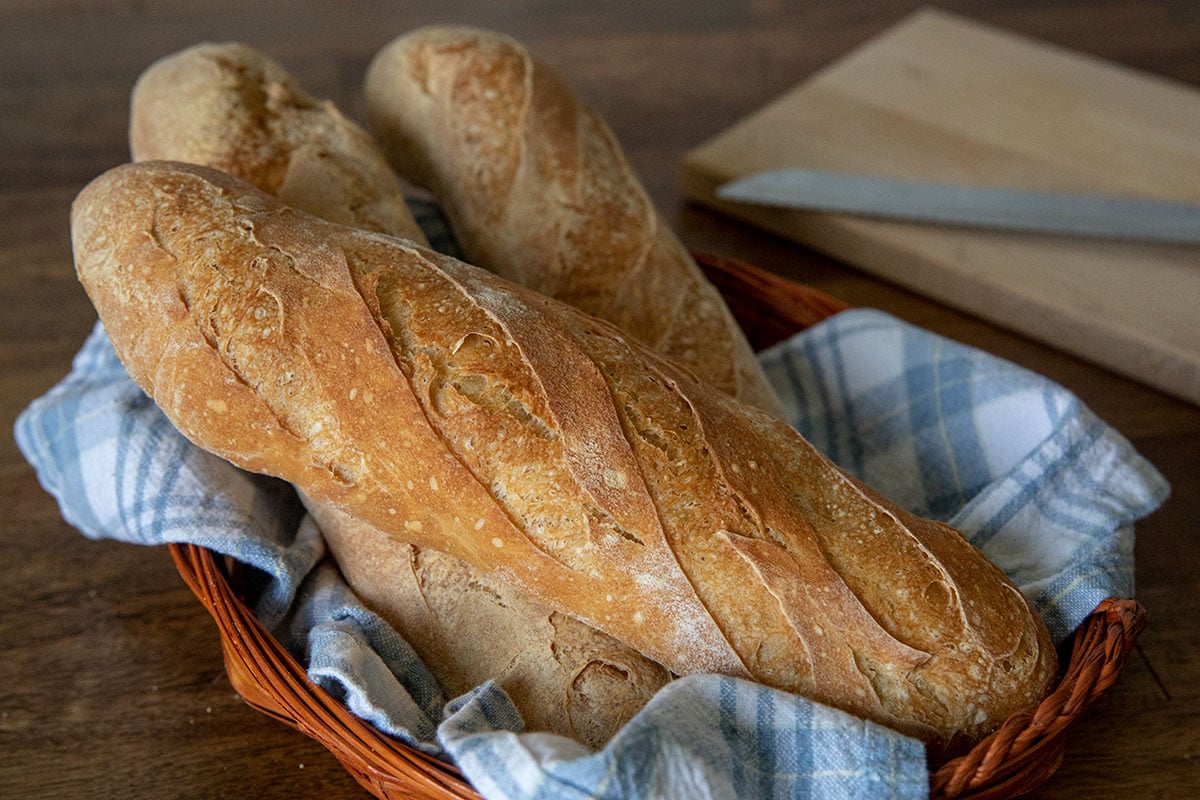
Start by weighing your dough and dividing the total weight by the number of loaves you want to make. This French Bread recipe will make three small loaves. Or, if you don’t mind loaves that are the exact same size, just use a bench scraper to divide the dough into three pieces.
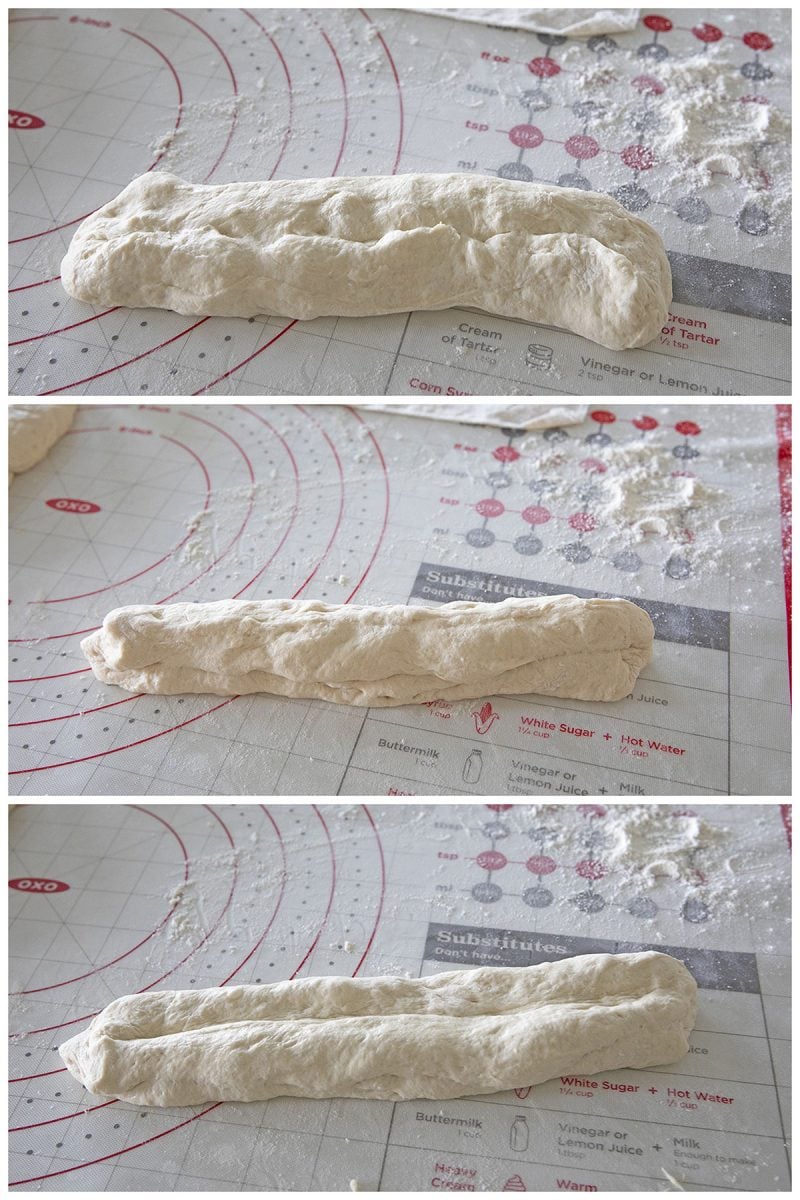
Shape the baguette by gently stretching one side of the dough on top and then fold the other side on top.
Make a well down the middle and stretch the sides together. Then use two hands to gently roll the dough back and forward to elongate the bread. (If you have questions about shaping the loaves, check out this video.)
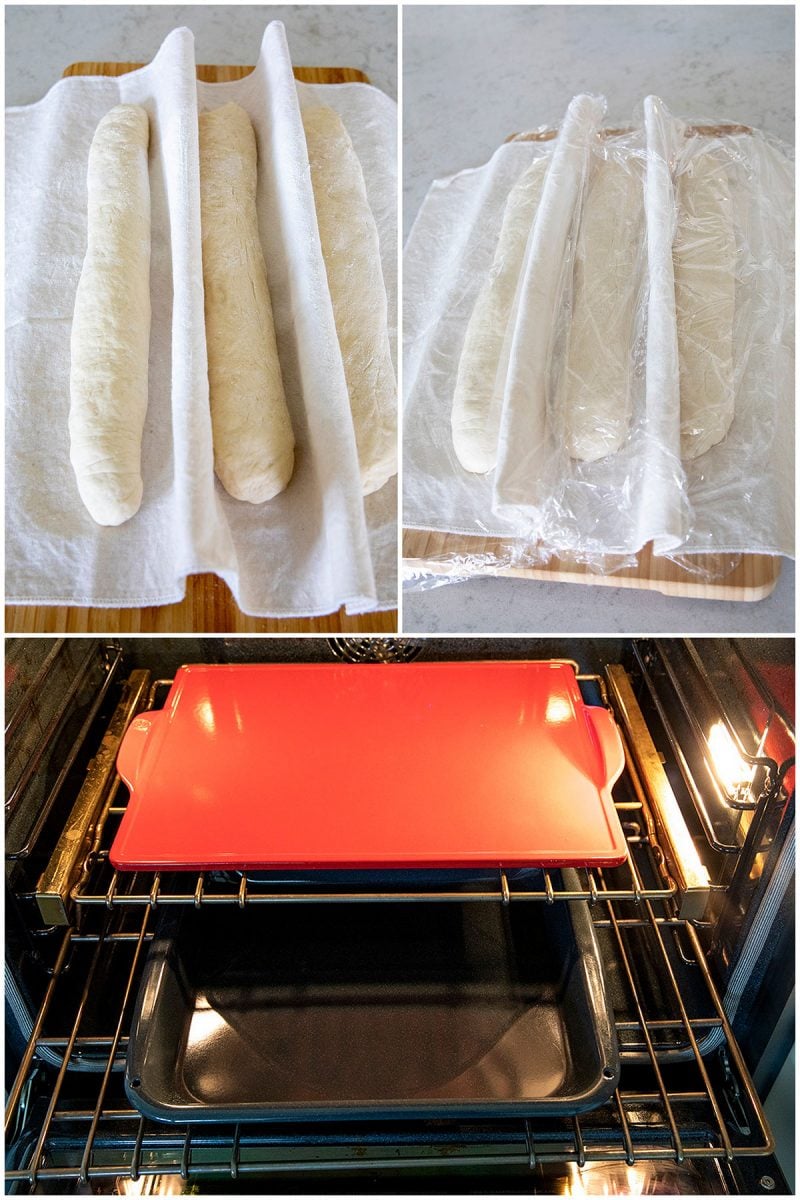
Once your loaves are shaped, transfer them to a proofing cloth or parchment paper for the final rise. Cover them with plastic wrap or a dish towel and let the loaves rise for the final time. They should nearly triple in volume over the course of 1½ to 2½ hours.
While your loaves are rising, heat your baking stone in a hot oven at 450 degrees F. Place a roasting pan on a rack beneath the baking stone or rack where you’ll bake your loaves.
How to Bake French Bread Loaves
Spritz the dough with water before transferring the shaped loaves to a baking stone with a peel. Alternatively, if you’re not using a baking stone, simply slide the baking sheet with the shaped loaves directly into the oven.
Transferring the dough to the pizza peel can be a delicate operation, so you can also rise your bread on parchment paper and put it on the pizza stone in the oven on the parchment paper. If you bake your bread on parchment paper, remember to remove the paper 10-15 minutes into baking.
Pour 1 cup of water into the roasting pan in the oven and quickly close the door to prevent much steam from escaping. Bake for about 25 minutes, until the dough is nicely browned on top.
Letting the Bread Cool
And here’s the hardest part: try to let the bread cool for a couple of hours before cutting it, if you can. If you cut the bread before it’s cool, the inside of the bread can be a little gummy instead of light and airy.
Pro Tips for the Best French Bread
- Perfect Proofing Environment: Maintain a consistent warm temperature for proofing by placing the dough in a turned-off oven with the light on or near a bowl of hot water. This ensures the dough rises evenly, especially in cooler kitchens.
- Handle the Dough Gently: During shaping, avoid pressing too hard or overworking the dough, as this can knock out the air pockets essential for the bread’s airy crumb.
- Steam for Crust: Place a pan of hot water on the lower oven rack while baking to create steam. This is critical for achieving the signature golden, crackly crust of French bread.
- Double-Side Baking: For the last 5 minutes of baking, flip your loaves upside down directly on the oven rack. This unexpected technique ensures your bottom crust gets just as crispy as the top, preventing any soggy bottoms.
- Let it Cool: I know it’s tempting, but let the bread fully cool for 2-3 hours before slicing into the bread. This ensures the interior sets.
Recipe FAQs
Your dough should pass the “window pane test“ – when you stretch a small piece between your fingers, it should become thin enough to see light through without tearing. The surface should be smooth and slightly tacky but not sticky, typically taking 8-10 minutes of hand kneading.
A crispy crust depends on steam during the first 10 minutes of baking. Make sure you’re preheating your baking pan in the bottom of the oven and adding ice cubes to create steam. Also, resist the urge to open the oven door during the first 15 minutes of baking.
Using the pizza stone and a tray of water underneath helps to simulate a baker’s oven and will give you a beautiful crisp crust. The addition of moisture in the oven helps develop a golden crisp crust. If you skipped spraying the loaf before or during the oven, or you didn’t add water to a pan, you won’t get the crust you’re looking for. As the water evaporates in the oven, it crisps up the outer layer of dough.
Flat French bread usually means the dough was either under-proofed or over-proofed during the second rise. The dough should increase by about 50% in size and slowly spring back when gently poked – if it bounces back immediately, it needs more time; if it doesn’t bounce back at all, it’s over-proofed.
Before baking, score your loaves. You can use a lame, which is a fancy term for the blade that bread bakers use to score bread. A sharp knife or a straight razor will also work.
Once cooled completely, wrap the loaf tightly in plastic wrap and foil. This will stay fresh in the freezer for up to 3 months. I suggest slicing the bread before freezing, so that you can pull out individual slices if preferred instead of the entire loaf.

Variations and Substitutions
- Garlic Herb Twist – Add 1 tablespoon of dried Italian seasoning and 1 teaspoon of garlic powder to the flour for a savory garlic bread.
- Cheesy Crust – Sprinkle shredded parmesan or cheddar over the loaves during the last 5 minutes of baking.

What to Serve with Homemade French Bread
This homemade bread recipe pairs well with many comfort meals such as:
Garlic Parmesan Chicken and Pasta
Storage and Reheating
Room Temperature
Do not store homemade French bread in the refrigerator; it will dry out and go stale quickly.
Wrap the bread loosely in foil, a paper bag, or in a bread box for up to 2 days at room temperature. It’s best to avoid plastic bags if you want to keep the exterior crispy.
Freezer
To store in the freezer, let the bread cool completely. Then wrap it tightly in plastic wrap and foil. Store in the freezer for up to 3 months. For individual slices, slice the bread before storing.
Reheating
When ready to reheat, from frozen, bake the bread at 350 degrees F for 10 minutes. To restore the crispy texture, spritz lightly with water before baking.
More Homemade Bread Recipes
Below are other fantastic bread recipes you should try:
- Croissants are the flaky, buttery pastry that I probably don’t need to convince you are divine. This is a wonderful project recipe to make with friends or kids.
- If you love sweet and flaky pastries, you’ll adore the Danish Braid with Apple Filling, a beautiful dessert filled with spiced apple goodness and perfect for special occasions.
- Overnight English Muffins are the buttery, doughy breakfast guaranteed to have you springing out of bed in the morning!

More Yeast Bread Recipes to Consider


Baking bread at home does not have to be a daunting task reserved for the weekends. This Homemade French Bread Recipe is designed for real life. It’s quick enough for a weeknight but simple enough that the kids can help knead the dough.
Give it a try, and you’ll see that nothing compares to the pride of putting a fresh, warm loaf of bread on the dinner table.
Did you try this recipe? Leave a ⭐️ rating below and share it on Instagram.

Sid
Well since Italians can stomp grapes to make wine, French make bread I decided to join both worlds and drink a little wine, eat some French bread. A Beginner in bread making, cakes, pies are my specialty,, I followed the recioe as directed and proud to say that the results were awesome, not once but twice. My first baguette looked more like a bread stick the second try, better, third try, awesome.
Thankfully watched the video and followed both chefs shaping the loaves….A recipe I will share to my baker friends !!!!
Reg Armstrong
This recipe generates a wonderful bread. I chuckle to myself, thinking of old July nattering away as I watch my KitchenAid churn away. A bit time consuming, but worth every minute to us.
David
Hi,
The amount of salt in the baguette recipe seems excessive, 12.8 gr, which is 2.85% of flour weight. Standard recipes call for 2.0% of flour weight. Is this an error?
Thanks,
David
Sophie
Not sure if I am reading to quickly but where in the instructions does it say how to use the yeast?
Melissa Griffiths
It’s in step 1 of the recipe! Hope that helps!
Vera
The truth will be revealed in a couple hours, but the second and third rise, my dough never did rise. The first rise it almost doubled in size. Don’t know what I did wrong, but hoping it still taste good when it comes out of the oven in about 20 minutes.
gina
Can I do the mixing in a bread maker then take it out and let it rise and knead it the appropriate number of times?
Melissa Griffiths
I think that would work great!
Steph
I am not the type of person who heavily modifies a recipe and then comments. I will say this recipe is amazing as is! However I ordered French T55 flour from amazon and used an emile henry mini baguette baking dish so it made 5 smaller baguettes. This made for a life changing version of this splendid recipe!
Rehoboth
Nice post
David Bassham
Just want to Thank You for spending the time on this website/blog. I haven’t made this yet, but I intend to. Have to wait for a weekend.
Lynsey
I’ve made this twice now and both times the loaves have barely risen once shaped and don’t brown at all in the oven but taste great – I can’t figure out what’s going wrong!!!
Melissa Griffiths
How fresh is your yeast? Do you know if your oven is accurate? Any other changes? Happy to help!
Van
My bread just didn’t brown. It tastes okay but didn’t get the golden crust. My crust is more of an off white color but the bread is done. Also,when I pulled the plastic off after the rise it made my dough de-gas again.
Mike
this is my go to recipe for baguette if I decide to put the dough in the frige overnight after knealing do you think I should cut back on the amount of yeast and the next day should I follow the directions the same way for 2nd rise and shaping…..thank you
Melissa Griffiths
I wouldn’t cut it down but a cold ferment overnight generally lends to a really nice baguette texture. I would just follow the rest of the instructions the next day and give it a little time to warm up.
Mike
thank you love this recipe
Ginger
I don’t understand this flour to water ratio. It was more like a batter than a dough. I added a bit at a time, and probably almost doubled the flour, and obviously more yeast. I ended up with 4 loaves. Will taste it tomorrow, but it smells and looks yummy.
Barbara Schieving
Hi Ginger – for French bread you do want a higher hydration level. Here’s a good explanation https://www.kingarthurbaking.com/blog/2021/08/16/with-bread-is-wetter-better-high-hydration-dough but I’m sure your loaves will be delicious, but perhaps not as open a crumb as a typical French bread.
Luca
What can you use if you don’t have a pizza stone?
Melissa Griffiths
You can use a rimless baking sheet or a rimmed on turned upside down!
Happycamper12000
Biggest downside to this recipe is that it’s not possible to do if you have literally ANYTHING ELSE going on. Let it raise 3 times, so this than and the other. If this bread is bad I may just freakout. It’s in the oven now and just read spray with water every 3 mins and just about freaked out. I have literally worked at a bread bakery where we made tons of different breads, guess how many needed this over the top BS? None.
Barbara Schieving
Hi Happy camper – You do get better browning in a home oven by spritzing it with water as Julia Child recommends, but of course, if you prefer to simplify you don’t have to follow her instructions. The three rises add flavor to the bread but if you only want to do 1 or 2, do what works for you.
BreadHead83
Oh my gosh….it was so worth the time and effort. This was perfect for a relaxed winter weekend day at home. While you do have to be available every couple hours to punch down, kneed, shape, etc, you can be busy with other things in the in-between time. Again, it was so worth it. When I took my first bite, my daughter looked at me and said, Mom, what’s wrong? Don’t cry!” I told her, “I’m not crying! I’m just so very happy!” Lol
Barbara Schieving
That’s the best review ever. Thanks so much! I’m so glad you loved the bread.
Hugh Cruik
First rule of baking bread: never freak out. What’s the point? I’ve also worked in a bread bakery and I have never, ever had a loaf come out “bad.” Maybe it didn’t come out exactly as I wanted it to but every loaf is still edible and delicious. If you don’t like interacting with the dough a few times over the course of half a day then just go with no-knead breads.
Janell Brumfield
I have made this bread every day for over a week and it’s turned out really good but I can’t get big holes inside my bread , help me plaese what am I doing wrong ? 🙏🎶♥️😂!
Melissa Griffiths
Have you tried measuring out your flour? Sometimes if you are a little heavy on the flour it doesn’t make the same light holes.
Zsa Zsa Gabor
Dear Unhappy Camper
You will find that if you follow the recipe exactly you will get the desired result. But since you “worked in a bakery” you probably thought that you knew better and didn’t follow the recipe. Good luck with that!
Tim Ryan
Thanks for this, you had me at mixer. My first attempt was pretty good, looking forward to the second, I think more water in the pan and a pizza stone. I’m wondering though, for the first rise, can I let it rise overnight? TIA
Barbara Schieving
Hi Tim – I haven’t tried it with this recipe, but I often let doughs rise overnight in the refrigerator.
Tim Ryan
Barbara, thanks for the reply and just to make sure I understand since I’m new to rising breads. Do you let it rise first and then put it in the fridge? Or actually let it rise in the fridge? I only ask because I thought that the dough needed to be warm to rise. Thank you.
Barbara Schieving
You can do it either way, but if you let it rise first, you may have to punch it down a couple of times. It’s easier to refrigerate after kneading. Here’s more info https://redstaryeast.com/yeast-baking-lessons/postpone-baking/
Tim Ryan
Thanks for the answers and your patience. This is what happens when engineers bake. 🙂
Barbara Schieving
Always happy to help – have fun!
Judy Lamantia
First rise… My dough has almost doubled in size in about 1 hour! Refrigerate it
to slow it down or just proceed with it as it is?
Barbara Schieving
Hi Judy – the longer it rises, the more flavor it gets, so you can refrigerate it to slow it down, but it isn’t necessary if you prefer to just go ahead and proceed. Just keep a close eye on the final rise so it doesn’t rise too much.
Dorian
These were wonderful. Made this recipe, but used a baguette pan instead of a baking stone. Followed all the other directions including spraying the baguettes in the oven and the pan of hot water under the baguette pan. Just lightly greased the baguette pan with butter. Did not use any parchment paper. Scored the tops of the two long loaves. These turned out beautifully.
Definitely a time investment with all the proofing/rising, but did it on a slow day at home. Good taste and texture. Will do again when I have time!
Barbara Schieving
So nice to hear you loved the recipe – thanks Dorian. I’ve been thinking about buying a baguette pan.
Carole R Pratt
what about the cornmeal??
Barbara Schieving
Hi Carole – the cornmeal helps keep the risen dough from sticking to the peel. I’ve updated the directions. Enjoy!
Carol
Well that looks delicious. I don’t think I’d have the patience to make it but I love reading all the steps! That’s definitely a labor of love.
Barbara Schieving
Thanks Carol! I think you’d be surprised just how easy it is. Time-consuming yes, but definitely fun.
Judy
As an experienced pressure cooking instructor, is there any way to use the pressure cooker for this recipe? Thanks.
Barbara Schieving
Hi Judy – excellent question 🙂 Yes, you can use the pressure cooker/ Instant Pot to proof/rise the French bread dough more quickly. You can do Steps 4 and 5 like this https://jenuinehome.com/proof-dough-in-instant-pot/ and then continue with step 6 on as written. Have fun!
Sandy
My poor loaves deflated when I transferred them to my baking tray. Three hours of proofing wasted. Very sad. If anyone has tips for how not to deflate their loaves I would be more than happy to hear it.
Barbara Schieving
Hi Sandy – sorry you had trouble transferring your bread. As I noted above in the blue box – Transferring the dough to the pizza peel can be a delicate operation, so you can also rise your bread on parchment paper and put it on the pizza stone in the oven on the parchment paper. If you bake your bread on parchment paper, remember to remove the paper 10-15 minutes into baking. You can also rise and bake your bread on a baking sheet on parchment paper so you don’t have to transfer your bread at all.
Also, you can deflate and reshape dough – here’s more info https://www.kingarthurbaking.com/blog/2018/02/21/over-proofed-dough#:~:text=On%20the%20right%3A%20the%20forgotten,discernible%20difference%20between%20the%20two.