
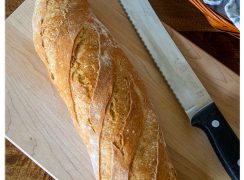
There is nothing quite like the smell of fresh bread wafting through the house to make a busy weeknight feel a little more cozy. Whether you’re trying to elevate a simple spaghetti dinner or looking for a comforting side with your bowl of soup, this Homemade French Bread Recipe is the perfect solution.
As a busy home cook, I know you don’t have time to make recipes that might fail. That is why this is my go-to homemade bread recipe. It’s straightforward, reliable, and uses basic pantry staples that you already have on hand.
WANT TO SAVE THIS RECIPE?
Enter your email below and we’ll send it straight to your inbox. Plus you’ll get great new recipes from us every week!
Jump to:
- What is Homemade French Bread?
- Key Takeaways
- Ingredient Notes
- Homemade French Bread Recipe
- Equipment Needed for Homemade Bread
- The Pizza Peel and Cornmeal Trick
- Creating the Perfect Crust
- How To Make French Bread
- How to Shape A French Bread
- How to Bake French Bread Loaves
- Letting the Bread Cool
- Pro Tips for the Best French Bread
- Recipe FAQs
- Variations and Substitutions
- What to Serve with Homemade French Bread
- Storage and Reheating
- More Homemade Bread Recipes
- More Yeast Bread Recipes to Consider
What is Homemade French Bread?
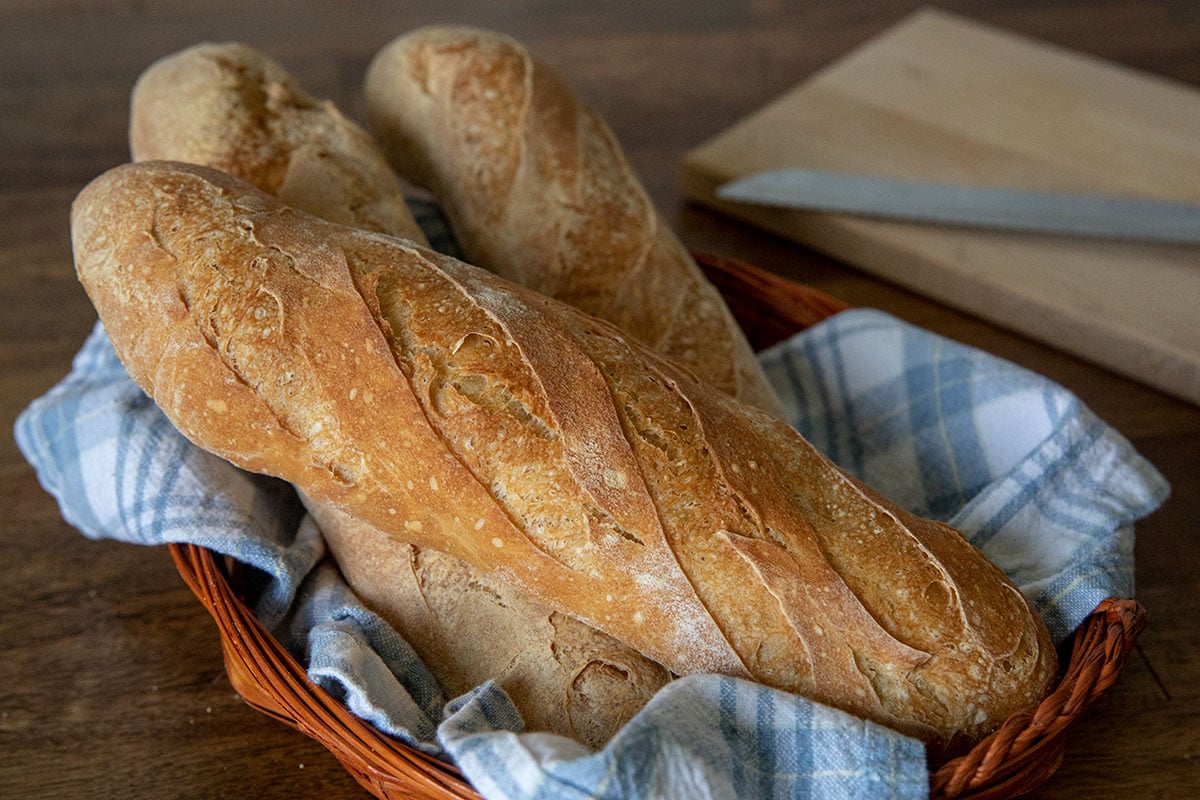
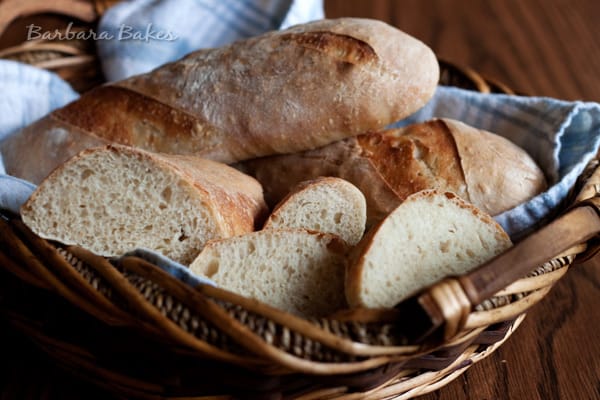
Homemade French bread is a classic, crusty loaf characterized by its light, airy interior and golden, crispy crust. People love it because it only requires four simple ingredients: flour, water, yeast, and salt. This is a budget-friendly and delicious alternative to store-bought loaves.
While many home bakers feel intimidated by making French bread, this recipe breaks it down into manageable steps that even beginners can master. I’ve found the magic happens when you give the dough a little extra time to rest and rise. I’m going to show you exactly how to use slow fermentation and proper proofing to get that perfect flavor at home.
Key Takeaways
- Simplified Process: This adaptation uses a stand mixer, making the kneading process more accessible for home bakers. It saves time and energy while still producing dough with the perfect texture.
- Authentic Flavor: The recipe follows Julia Child’s classic method, ensuring a traditional French bread taste. The result is a crusty exterior and soft, airy interior reminiscent of bakery-quality bread.
- Steam Magic: You’ll learn the professional bakery trick of creating steam in your home oven using just ice cubes and a preheated pan, resulting in that coveted crackling crust.
- Family Approved: The kids will love the soft, fluffy center and be even more excited for dinnertime.
- Budget-Friendly: This recipe uses what is already in your pantry; no extra ingredients are required.
- Perfect for Meal Prep: Make extra loaves at once and freeze the extras to use at a later time.
- Achievable for All: The recipe is designed to be approachable, even for those new to bread baking. With patience and attention, anyone can create a loaf that looks and tastes like it came from a French boulangerie.
🥖 Feeling adventurous? Every time I bring my Russian braided bread to the neighborhood potluck, it disappears in minutes!
Ingredient Notes
- Instant or active dry yeast – This is the rising agent that is necessary to give the bread height and texture.
- All-purpose flour – A high-quality all-purpose flour is necessary to give the bread its structure.
- Salt – The salt will enhance the flavor of the wheat; don’t skip it or the bread will taste flat.
- Water – Warm water will be used to “wake up” the yeast. This should feel like warm bath water, nearing 120 degrees F.
- Cornmeal – This ingredient is only needed if you use the peel option; cornmeal is sprinkled onto the pizza peel to avoid sticking. It is not needed in the dough itself.
See the recipe card below for full information on ingredients and quantities.
WANT TO SAVE THIS RECIPE?
Enter your email below and we will send it straight to your inbox. Plus you will get great new recipes from us every week!
Homemade French Bread Recipe
Equipment
- KitchenAid Stand Mixer, 5 Qt
- Pizza Stone for Oven and Grill, 15 x 12 Inch
- Bread Lame, Premium Long Handle
Ingredients
- 2 ¼ teaspoons 1 packet instant or active dry yeast
- 3 ½ cups all-purpose flour*
- 2 ¼ teaspoons salt
- 1 ½ cups warm water 120ºF – 130ºF
- Cornmeal for pizza peel optional
Instructions
- In the mixing bowl of a stand mixer using the flat beater, combine the yeast, 2 ½ cups flour and salt. Mix on low for about 30 seconds.
- With the motor running on low, pour in the warm water. Continue mixing until a shaggy dough forms. Clean off beater and switch to the dough hook.
- Mix in the remaining cup of flour a little at a time, to make a soft dough, adding more or less flour as needed.
- Knead the dough for 5 minutes. The surface should be smooth and the dough will be soft and somewhat sticky.
- Turn the dough onto a kneading surface and let rest for 2 – 3 minutes while you wash and dry the bowl and oil it or spray it with non-stick spray.
- Return the dough to the mixing bowl and let it rise, covered, at room temperature (about 75ºF) until 3 ½ times its original volume. This will probably take about 3 hours.
- Gently deflate the dough and return it to the bowl. Let the dough rise at room temperature until not quite tripled in volume, about 1 ½ to 2 hours.
- Meanwhile, prepare the rising surface: rub flour into canvas or linen towel placed on a baking sheet. (You can use parchment paper.)
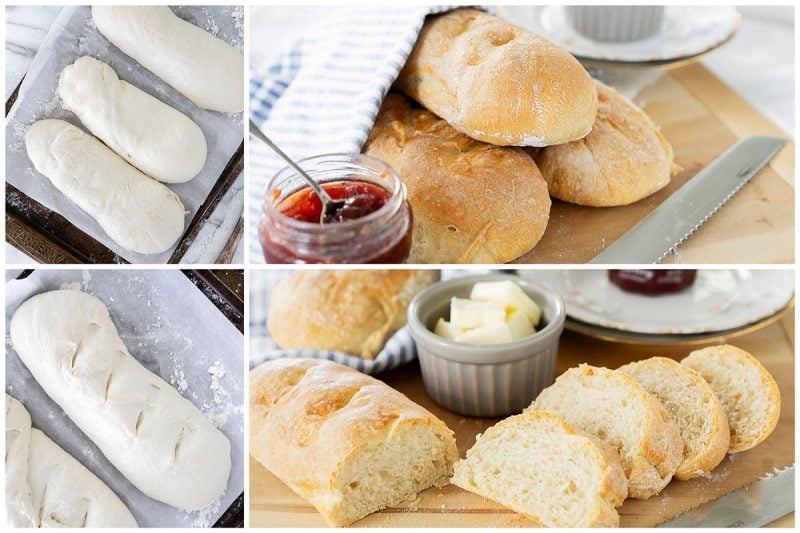
- Divide the dough into 3 pieces. Fold each piece of dough in two, cover loosely, and let the pieces relax for 5 minutes.
- Shape the loaves and place them on the prepared towel or parchment. Cover the loaves loosely and let them rise at room temperature until almost triple in volume, about 1 ½ to 2 ½ hours.
- Preheat oven to 450ºF. Set up a "simulated baker's oven" by placing a baking stone on the center rack, with a metal broiler pan on the rack beneath, at least 4 inches away from the baking stone to prevent the stone from cracking.
- Transfer the risen loaves onto a peel sprinkled with cornmeal.
- Slash the loaves with a lame or sharp knife.
- Spray the loaves with water. Slide the loaves into the oven onto the preheated stone and add a cup of hot water to the broiler tray.
- Bake for about 25 minutes until golden brown. (If you used parchment paper you will want to remove it after about 10-15 minutes to crisp up the bottom crust. Spray the loaves with water three times at 3-minute intervals.
- Cool for 2 – 3 hours before cutting.
Notes
Nutrition
Equipment Needed for Homemade Bread
You don’t need much special equipment to make a perfect loaf of homemade classic French Bread, though there are a few items I find especially useful. For example, I like to use my stand mixer to knead the dough, but you could certainly do it by hand. Of course, that’s how Julia did it.
Other readers have made this recipe in a bread machine, which is another great way to make this recipe even simpler! Julia calls for rising the loaves on linen, but you can use parchment paper. Plus, the parchment makes the loaves easy to move onto the baking stone.
The Pizza Peel and Cornmeal Trick
A pizza peel (a large, flat paddle used to slide bread into the oven) is an excellent tool to transfer your loaves to the oven. If you use a peel, I recommend a light sprinkle of cornmeal on the surface first. The cornmeal acts like a tiny ball bearing to help the dough slide off easily.
If you do not have a peel, it’s best to do the final rise of the shaped loaves directly on the baking sheet you plan to use. That way, the entire pan goes straight into the oven.
Creating the Perfect Crust
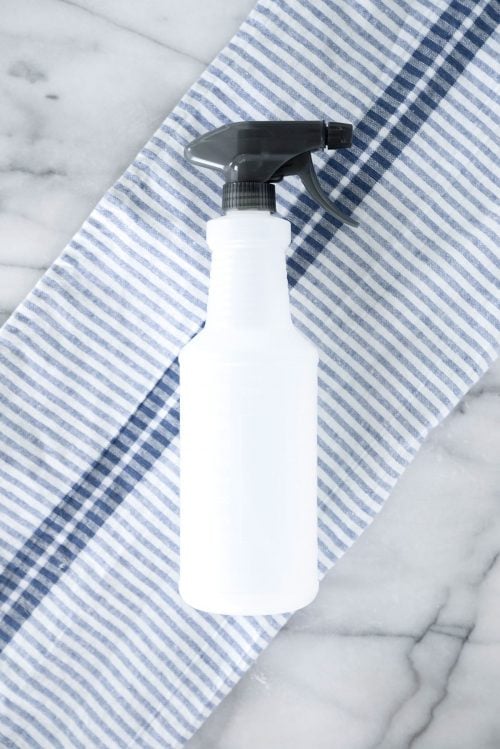
A spray bottle filled with water is also helpful to moisten the dough before it goes into the oven and again during the first few minutes of baking. This created the steam necessary for that classic “shatter” when you bite into the crust.
Finally, the number one tool I’d recommend for perfect French bread is a pizza stone. You can certainly make homemade bread without one (just use a baking sheet), but a hot stone helps ensure that the crust gets delightfully crisp and golden. It’s fantastic for other recipes too, especially pizza!
How To Make French Bread
Step 1: If you want to have French bread for dinner, you need to start this recipe first thing in the morning. The recipe requires two long rises to develop a flavorful dough.

Step 2: The dough itself is a simple combination of flour, water, salt and yeast. Start by mixing the dry ingredients together for just a few seconds in the stand mixer. Then, slowly stream in the water with the mixer running.
Pro Tip: I simplified Julia’s original recipe to use a stand mixer. I rarely knead dough by hand because the mixer makes it so easy, but if you don’t have a mixer, you can mix the dough by hand.
Step 3: Once a shaggy dough forms, switch to the dough hook attachment. Let the machine knead the dough for about 5 minutes on medium speed. The dough is done kneading when it’s smooth, elastic, and can be stretched easily, but it is still slightly sticky. See below for the telltale signs of a well-kneaded dough.
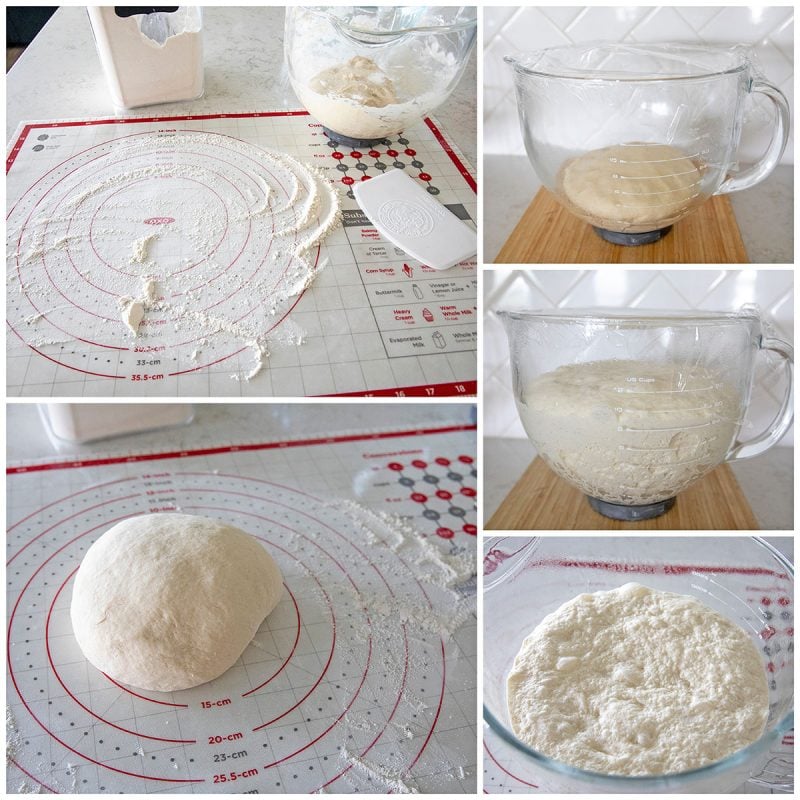
Step 4: Remove the dough from the mixing bowl, grease the bowl with cooking spray, return the dough to the bowl, cover and let rise for 3 hours. The dough should increase by 3 ½ times.
Step 5: Gently remove the dough from the bowl and fold it over a couple of times to redistribute the gases. It should be light and pillowy soft.
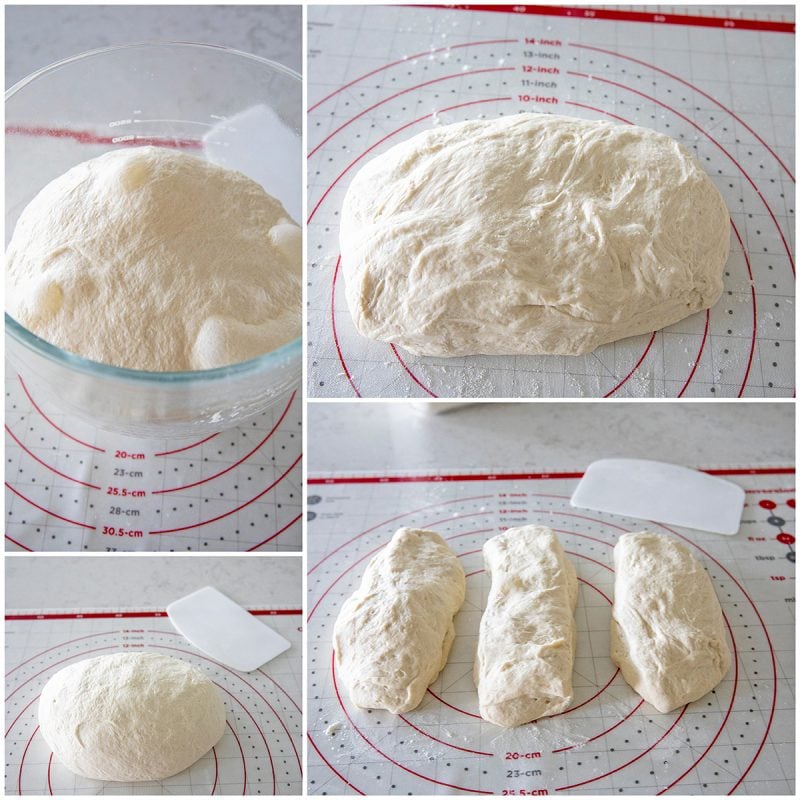
Step 6: Let it rise for a second time until it grows 2 to 3 times in size, about 1½ to 2 hours. After the second rise, the dough is ready to be shaped before its final rise, before baking it in the oven.
How to Shape A French Bread
Start by weighing your dough and dividing the total weight by the number of loaves you want to make. This French Bread recipe will make three small loaves. Or, if you don’t mind loaves that are the exact same size, just use a bench scraper to divide the dough into three pieces.
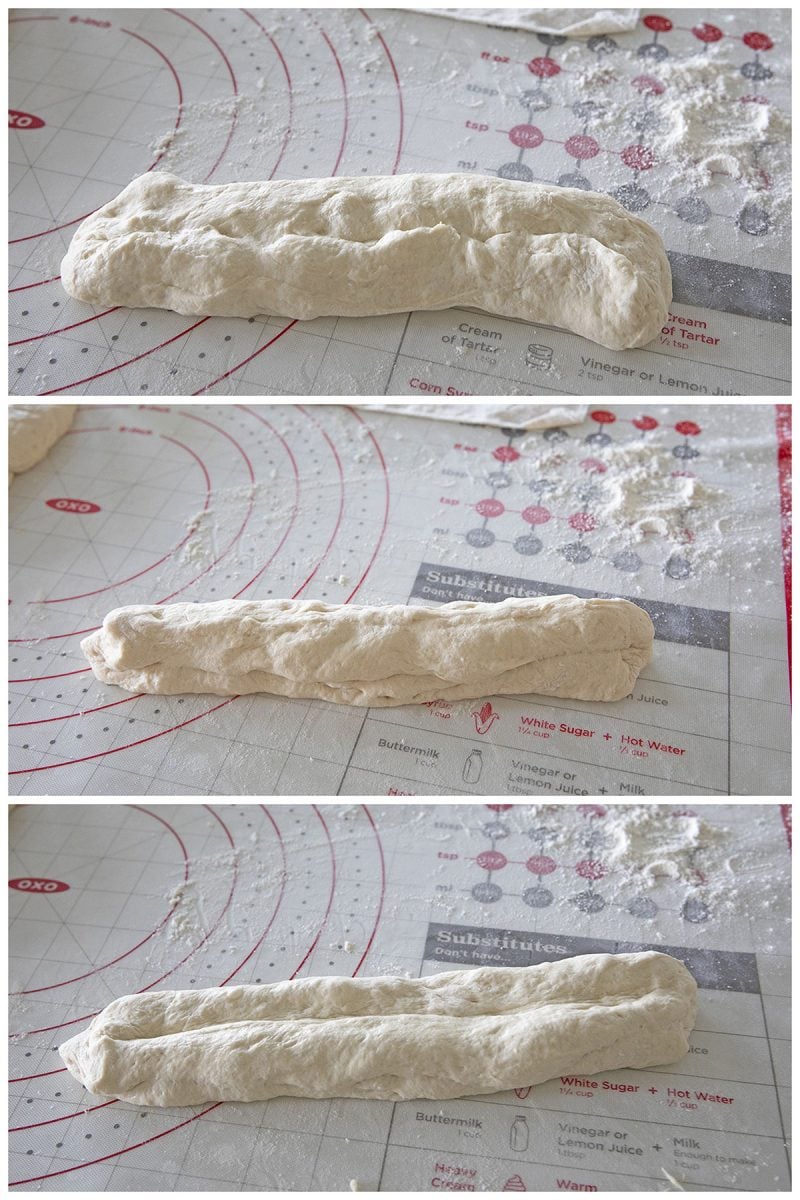
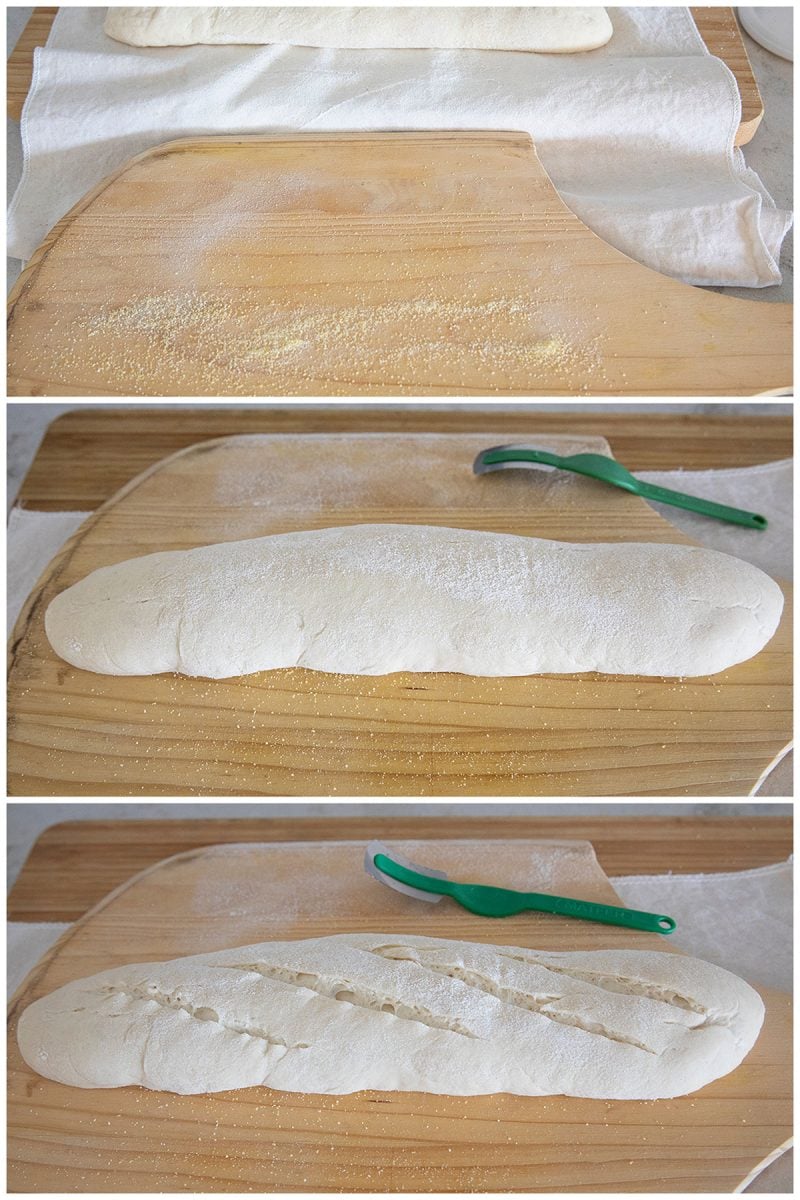
Shape the baguette by gently stretching one side of the dough on top and then fold the other side on top.
Make a well down the middle and stretch the sides together. Then use two hands to gently roll the dough back and forward to elongate the bread. (If you have questions about shaping the loaves, check out this video.)
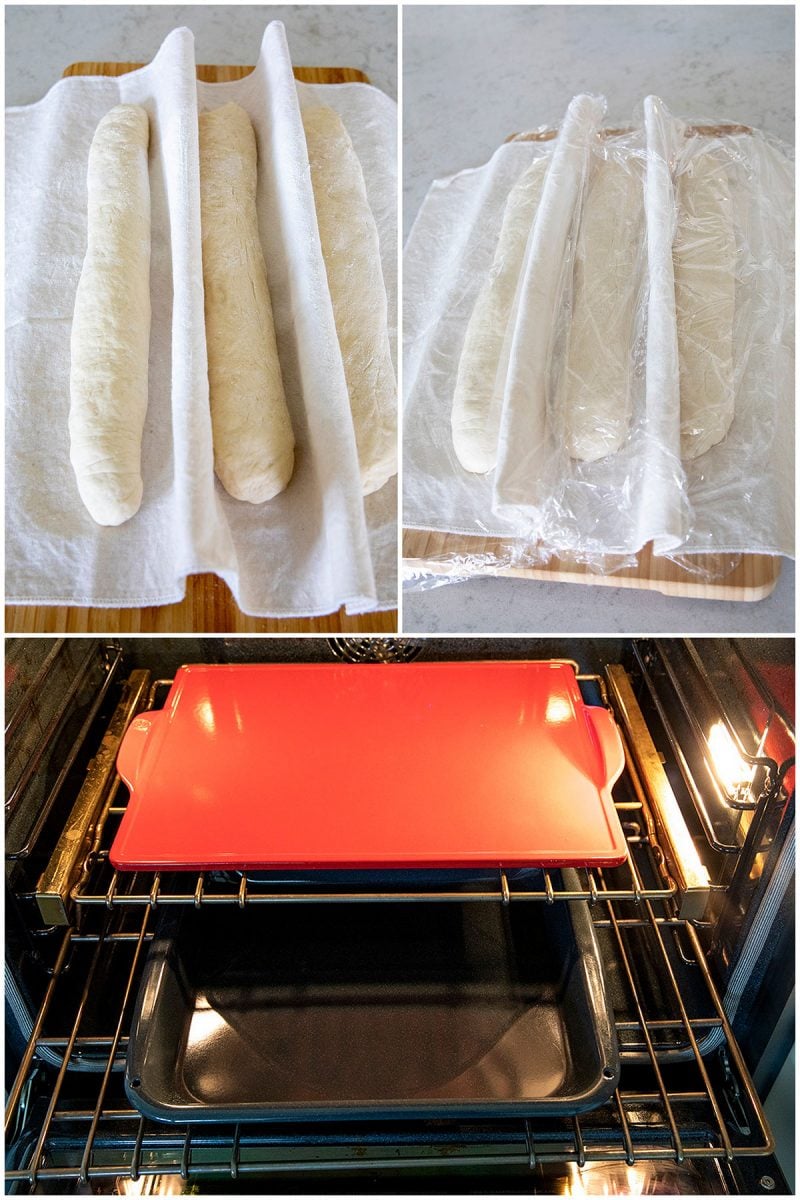
Once your loaves are shaped, transfer them to a proofing cloth or parchment paper for the final rise. Cover them with plastic wrap or a dish towel and let the loaves rise for the final time. They should nearly triple in volume over the course of 1½ to 2½ hours.
While your loaves are rising, heat your baking stone in a hot oven at 450 degrees F. Place a roasting pan on a rack beneath the baking stone or rack where you’ll bake your loaves.
How to Bake French Bread Loaves
Spritz the dough with water before transferring the shaped loaves to a baking stone with a peel. Alternatively, if you’re not using a baking stone, simply slide the baking sheet with the shaped loaves directly into the oven.
Transferring the dough to the pizza peel can be a delicate operation, so you can also rise your bread on parchment paper and put it on the pizza stone in the oven on the parchment paper. If you bake your bread on parchment paper, remember to remove the paper 10-15 minutes into baking.
Pour 1 cup of water into the roasting pan in the oven and quickly close the door to prevent much steam from escaping. Bake for about 25 minutes, until the dough is nicely browned on top.
Letting the Bread Cool
And here’s the hardest part: try to let the bread cool for a couple of hours before cutting it, if you can. If you cut the bread before it’s cool, the inside of the bread can be a little gummy instead of light and airy.
Pro Tips for the Best French Bread
- Perfect Proofing Environment: Maintain a consistent warm temperature for proofing by placing the dough in a turned-off oven with the light on or near a bowl of hot water. This ensures the dough rises evenly, especially in cooler kitchens.
- Handle the Dough Gently: During shaping, avoid pressing too hard or overworking the dough, as this can knock out the air pockets essential for the bread’s airy crumb.
- Steam for Crust: Place a pan of hot water on the lower oven rack while baking to create steam. This is critical for achieving the signature golden, crackly crust of French bread.
- Double-Side Baking: For the last 5 minutes of baking, flip your loaves upside down directly on the oven rack. This unexpected technique ensures your bottom crust gets just as crispy as the top, preventing any soggy bottoms.
- Let it Cool: I know it’s tempting, but let the bread fully cool for 2-3 hours before slicing into the bread. This ensures the interior sets.
Recipe FAQs
Your dough should pass the “window pane test“ – when you stretch a small piece between your fingers, it should become thin enough to see light through without tearing. The surface should be smooth and slightly tacky but not sticky, typically taking 8-10 minutes of hand kneading.
A crispy crust depends on steam during the first 10 minutes of baking. Make sure you’re preheating your baking pan in the bottom of the oven and adding ice cubes to create steam. Also, resist the urge to open the oven door during the first 15 minutes of baking.
Using the pizza stone and a tray of water underneath helps to simulate a baker’s oven and will give you a beautiful crisp crust. The addition of moisture in the oven helps develop a golden crisp crust. If you skipped spraying the loaf before or during the oven, or you didn’t add water to a pan, you won’t get the crust you’re looking for. As the water evaporates in the oven, it crisps up the outer layer of dough.
Flat French bread usually means the dough was either under-proofed or over-proofed during the second rise. The dough should increase by about 50% in size and slowly spring back when gently poked – if it bounces back immediately, it needs more time; if it doesn’t bounce back at all, it’s over-proofed.
Before baking, score your loaves. You can use a lame, which is a fancy term for the blade that bread bakers use to score bread. A sharp knife or a straight razor will also work.
Once cooled completely, wrap the loaf tightly in plastic wrap and foil. This will stay fresh in the freezer for up to 3 months. I suggest slicing the bread before freezing, so that you can pull out individual slices if preferred instead of the entire loaf.

Variations and Substitutions
- Garlic Herb Twist – Add 1 tablespoon of dried Italian seasoning and 1 teaspoon of garlic powder to the flour for a savory garlic bread.
- Cheesy Crust – Sprinkle shredded parmesan or cheddar over the loaves during the last 5 minutes of baking.

What to Serve with Homemade French Bread
This homemade bread recipe pairs well with many comfort meals such as:
Garlic Parmesan Chicken and Pasta
Storage and Reheating
Room Temperature
Do not store homemade French bread in the refrigerator; it will dry out and go stale quickly.
Wrap the bread loosely in foil, a paper bag, or in a bread box for up to 2 days at room temperature. It’s best to avoid plastic bags if you want to keep the exterior crispy.
Freezer
To store in the freezer, let the bread cool completely. Then wrap it tightly in plastic wrap and foil. Store in the freezer for up to 3 months. For individual slices, slice the bread before storing.
Reheating
When ready to reheat, from frozen, bake the bread at 350 degrees F for 10 minutes. To restore the crispy texture, spritz lightly with water before baking.
More Homemade Bread Recipes
Below are other fantastic bread recipes you should try:
- Croissants are the flaky, buttery pastry that I probably don’t need to convince you are divine. This is a wonderful project recipe to make with friends or kids.
- If you love sweet and flaky pastries, you’ll adore the Danish Braid with Apple Filling, a beautiful dessert filled with spiced apple goodness and perfect for special occasions.
- Overnight English Muffins are the buttery, doughy breakfast guaranteed to have you springing out of bed in the morning!

More Yeast Bread Recipes to Consider


Baking bread at home does not have to be a daunting task reserved for the weekends. This Homemade French Bread Recipe is designed for real life. It’s quick enough for a weeknight but simple enough that the kids can help knead the dough.
Give it a try, and you’ll see that nothing compares to the pride of putting a fresh, warm loaf of bread on the dinner table.
Did you try this recipe? Leave a ⭐️ rating below and share it on Instagram.

Eva
This recipe is a disaster. It takes hours and hours and hours and hours and hours and in the final rise, doesn’t rise. Flat little puddles. I think the temperature of the water recommended is too high and kills the yeast.
Not a do over. Just a waste of ingredients and time.
Barbara Schieving
Hi Eva – sorry you had trouble with the bread. The longer rise times help make a more flavorful bread. Perhaps your yeast was old? If you added the yeast to the flour as directed in the recipe, the water temperature is exactly right. See https://redstaryeast.com/yeast-baking-lessons/yeast-types-usage/active-dry-yeast/ – Active Dry Yeast can be added directly to dry ingredients:Use liquid temperatures of 120°F-130°F
Anne Reed
I’ve used lots of different bread recipes, and this was by far the best. I used a bread machine instead of my stand mixer. It didn’t seem to rise well the third time after I scored it but I proceeded to bake anyway and the density and size turned out perfect. Great recipe.
Barbara Schieving
Thanks for taking the time to let me know you loved the recipe Anne!
Chuck Warrinet
I recently tried this recipe as well, after making French bread with an old recipe that came from a French cooking class. After the long rising time(s), I did get 2 nice baguettes, which didn’t deflate after slashing (I can’t recommend a good bread lame highly enough), but they didn’t rise at all in the oven, and didn’t have the same great texture I’m used to from my old recipe (total rising time 3 hours). Thanks, as always, Julia, but I’m sticking with my tried and true bread.
Susan Lee Wilson
The rising times do seen excessive to me too, with the danger that the final loaves will not rise in the oven. I will also use another recipe to be sure my loaves will rise when baked. Also, the “total time” of 25 minutes is misleading, if you add in the 7.5 hours of rising time she recommends! This is an all-day procedure, it seems. (However, I have great respect for Julia, and do love her Bombe Aux Trois Chocolats — guarantees you absolute adoration when served as a special dessert.)
Barbara Schieving
Hi Susan – thanks for pointing out the total time didn’t include the rising time. I’ve updated the recipe.
Lynn Robb
The third rise took three hours and only got about double in size. When I slashed the loaves prior to putting in the oven..very gently and very shallow…they completely deflated and I had to throw the whole thing out after spending seven and a half hours on this project. I cannot recommend this recipe.
Barbara Schieving
Hi Lynn – sorry you had trouble with the recipe. Sounds like your yeast wasn’t fresh or perhaps your water was too warm and you killed some of the yeast. Red Star yeast has a great troubleshooting guide that explains more of the reasons for dough that rises too slowly. https://redstaryeast.com/tips-troubleshooting/troubleshooting-guide/problem/
Briar
Yeah for some reason my 3rd rise went awry as well and ruined the loaves! I know the yeast was fresh and I make bread frequently and temp my water each time so I would be surprised if I killed it. Pretty disappointing 🙁
Barbara Schieving
Hi Briar – I’ve added a link to the Julia Child’s video in the notes section of the recipe that may help explain the rising method better.
Meredith Elmore
I made the bread in my bread machine and it was fine but I am interested in how many carbs per slice it might be since I’m using French Francine’s flour . Francine‘s.com can’t tell me . Supposedly French flour has many fewer carbohydrates than American made can you tell me about carbohydrates if I make a 1 pound loaf or 2 pound loaf I can count my own slices
Jason
Hi there,
I have just ventured into bread making and tried your recipe last weekend. What a hit! My wife and I absolutely loved the finished result. The only thing I forgot to do was score the baguettes before baking. They still turned out great. The steam oven also worked well, and my crust was as good as the local bakery. I’m in the middle of making the recipe again today, this time remembering to score. Thanks so much for sharing this great recipe!
Barbara Schieving
Thanks so much Jason! It must smell wonderful at your house today 🙂
Ken Nardone
Thanks, Barbara! I made this delicious bread using my bread machine on the dough/pasta cycle. We got 2 long French baguettes that were scrumptious & even had that professional baked crunching sound during a light squeeze! We served the bread with our spinach/artichoke/crab meat/cheese/pepper dip & everyone asked about the bread! We thought the dip was the main event but this bread shines!
Barbara Schieving
Thanks Ken! Sounds like you did everything just right. That dip does sound great 🙂
whirleycook
Oh my goodness. My diet is so blown out of the water! My husband is in the kitchen right now sneaking the last piece of this delicious bread. We are slathering it with soft butter and serving it alongside spaghetti. I hear him in the kitchen. I want to fight him for it. It’s that good. Followed the recipe exactly except for a couple of things. I brushed it with an egg wash before baking. Then, I found that when I put the water into the pan beneath the baking stone, it didn’t sizzle very good. So I took the pan out and threw in about three quarter cup of ice cubes directly onto the oven floor. That seemed to work better for me and I got a nice steamy oven. Also, I fear we could not wait for the bread to cool and ate it barely 15 minutes out of the oven. I will be making this bread again – goodbye grocery store French bread – but I’ll start a lot earlier in the day so as to give it time to cool.
Barbara Schieving
Thanks so much for the sweet comment. I’m so glad you loved the bread. Thanks for sharing your tips. I too find it almost impossible to wait to cut the bread. It’s smells heavenly and just sits there on the counter tempting you.
rosanna
This is not Julia’s recipe. First there’s no sugar. If you are going to publish a recipe you should include all the ingredients otherwise it won’t turn out correctly.
1 pkg yeast – 1/3 cup tepid water (not over 110 degrees)
1/4 teaspoon sugar- 3 1/2 cups (1 pound) unbleached flour-bread flour if possible -plus more if needed -1 Tbs rye or whole wheat flour-2 1/4 tsp salt-1 cup cold water,plus 1/3 cup or so additional water.
This is her master recipe for French bread out of The Way To Cook book.
Barbara Schieving
Hi Rosanna – sounds like she used a slightly different recipe in Mastering the Art of French Cooking, Vol. 2 which my recipe is adapted from. I’ve linked to the video of her making it above. https://www.youtube.com/watch?v=9iH3hjDUhWw She doesn’t use a mixer to make her dough, but if you’ve ever watched this video https://www.youtube.com/watch?v=SHX0pv8_JOE I don’t think she would be stressed by the change.
rosanna
I looked thru all of my Julia Child cookbooks( I have 6) and only in “The Way To Cook” book does she use sugar AND the food processor. Since that is my usual go to book, I was convinced that it was the correct recipe for success since yeast (usually ) needs something to eat (the sugar). Apparently not. I will have to try it this way. My apologies Barbara.
Fran Telese
I made this bread today. Followed the recipe exactly. The bread deflated for the final rise. I broke the dough into four loaves. I did the final rise and what turned out was 4 baggets. The outside was crusty, however the bread was a little salty. Won’t be making this again.
Debbie
I am looking forward to trying this recipe. Do you spray the loaves with water while they are in the oven or after they are finished baking and are out?
Barbara Schieving
Hi Debbie – you want to spray the loaves while they’re baking to re-create the effect of a steam oven.
Debbie
Thank you!
Lacy
I am getting ready to make this and it looks great! However, I have a few questions:
1. Can I use the loaf racks instead of a pizza stone and do I still need to add water in the broiler pan below it if I do?
2. Can I use an artisan bread flour instead of all purpose flour? If I do does it change anything else in the recipe as far as timing?
Barbara Schieving
Hi Lacy – you can use loaf racks; you don’t have to add the water, but the steam that’s created helps create a crisper crust. I don’t think you’d need to make any changes as far as timing goes.
Maria
Hi,
this sounds delicious! However, I was wondering whether you can freeze the loafs for a while after you’ve made them?
Barbara Schieving
Thanks Maria! Yes, French bread freezes very well, but the crust will for course lose some of its crispness.
Bella
Just stumbled across this and will be making it for our NYE dinner. I am guessing it will turn out very well after reading all of the great feedback! Happy New Year’s!
Barbara Schieving
Hi Bella – it will be a perfect addition to you NYE dinner. Enjoy!
Rob
Not sure if I ever tried Julia’s recipe before…this was easy and good! I did use a curved baguette pan which makes all the difference in the world for me. Many thanks!
Barbara Schieving
Thanks Rob! I’ve had my eye on those curved baguette pans.
Letty Flatt
Thanks Barbara.
So glad you linked to the Letterman/Julia skit. Hilarious!
My mother would be 100 years old this year as well.
Frankie
I love Julia Childs and my whole family loves French bread! I’ve been wanting to learn how to bake bread forever now but have been so afraid to. Everyone wonders why since I bake every cake and cookie recipe I can find. Anyways, I’m determined to try this recipe but do have a few questions first:
1) I don’t have a baking stone. Can I just bake the loaves on a baking sheet with corn meal spread out on the bottom to keep the bread from sticking to the baking sheet?
2) The last part of your instructions “spray the loaves with water three times at 3-min intervals”. What do you mean by that? So do I spray the first time when I put it into the oven, and 2 more times after that (2nd time after 3 mins in the oven and 3rd time after 6 mins in the oven?)
3) Can I start the dough at night and let it rise in the fridge over night so I can bake it fresh in the morning? If so at what stage of the instructions can I let it rise in the fridge over night? Can it be the last rise before going straight into the oven?
4) How can you be sure a bread a baked all the way through? I know if the outside crust is golden brown but is there another way to check? I heard about knocking the bottom of the bread and hearing a hallow sound. Is that true?
Sorry for so many questions but I would really appreciate your help. Thanks in advance! (my MIL also thank you you too as she’s a bread lover!!)
Frankie
Barbara Schieving
Hi Frankie!
– If you don’t have a baking stone, I would bake it on parchment on a baking sheet.
– Exactly
– It’s probably best to shape it in the morning.
– You can use an instant read thermometer if you’re unsure http://www.artisanbreadinfive.com/2010/05/17/underbaked-not-baked-through-to-the-center-what-am-i-doing-wrong
I really love the Amazing Bread in 5 if you interested in using refrigerated dough https://www.barbarabakes.com/2009/09/artisan-bread-in-five-minutes-day/.
Have fun baking! Even if you loaves are perfect the first time, they always bake up beautiful.
Frankie
Barbara,
THANK YOU SO MUCH for getting back to me so fast!! You are AMAZING!! Planning to try baking in the next couple of days. Will let you know how it turns out! Thanks again!!
Kindest regards!
Frankie
Barbara Schieving
Thanks Frankie – I think that’s the nice thing anyone said to me today.
Frankie
Hi Barbara,
I just wanted to drop you a note saying THANK YOU!! I tried the Amazing Bread in 5 using the refrigerator method and the bread came out wonderful!! My family LOVES IT!! They can’t wait until I make it again and my husband said “now we don’t have to buy bread and can always have fresh bread!! Oh, honey I need something to dip this bread in so please make chowder.”
Trying Julia Child’s French Bread recipe is still on my radar. I think I may have time this weekend. Will let you know how it turns out.
So thank you again and just a reminder to you “YOU ARE AMAZING! So so generous with helping me using your time!!”
Cheers!
Frankie
Barbara Schieving
Hi Frankie – I’m so glad you tried and loved the ABin5. Definitely try the Julia Child’s recipe when you’ve got time and want a loaf for dinner one day. It’s a great bread, just not as easy as the ABin5. Thanks for the update!
Donica
These were my same questions, so thank you!
tom
i doubled this recipe but could only get 8 cups of flour to come up with what seemed like the right texture of dough. am i doing something wrong? this is the second time i’ve made this bread from your recipe…i also baked it for an extra 10 minutes…despite the lesser amount of flour i used, and the additional baking time, it is best french bread i’ve had since visiting paris in ’99. thank you so much!!
Barbara Schieving
Hi Tom – what a great comment. If you’re getting great loaves, sounds like you’re doing everything just right. I live in a very dry climate and my bread doughs need less flour, depending on the humidity the day you’re making your bread it will change how much flour you’ll need.
Janet Conover
I live in the desert as well and find that one must be very very flexible as to the water/flour proportions in any recipe, this one as well.
schmendric
The author adapted Julia’s recipe for her convenience, not mine. I’m still old fashioned enough to enjoy working the bread dough by hand. Julia’s original recipe would have been appreciated.
Barbara Schieving
If you prefer the original recipe, I’ve linked to Julia’s book and video.
Sarah
This is exactly what I was looking for to make for company on Friday. I live in South Louisiana, so I’ve always felt a responsibility to learn to make a proper French bread! Love your site, by the way! I’ll definitely be back!
Barbara Schieving
Thank Sarah! Have fun.
Mindy
I’ve never made bread before but wanted to try it for a French themed dinner party that we were hosting. I’m so thankful for your recipe! The bread came out delicious!!!
Barbara Schieving
Thanks Mindy for taking the time to let me know! I’m so glad you enjoyed it. Before you know it you’ll be whipping up all kinds of bread. Have fun!
QT
I don’t have a stand mixer, can I successfully make this bread without one? If so, is there anything specific you would suggest I do differently?
Barbara Schieving
Sure you can make it without a stand mixer. Here’s a link to the directions without a mixer http://sweetandthatsit.blogspot.ch/2012/08/french-bread-julia-childs-100th-birthday.html. Have fun!
Heather
Why are you adding yeast directly to the flour? This is not what Julia does and I used bread flour before watching her video and now it says not to use bread flour.. So I am starting over proofing the yeast properly and no using bread flour.
Barbara Schieving
Hi Heather – as I indicated, this is my quicker version of her recipe. With today’s better yeasts, there’s really no need to proof the yeast unless you’re concerned that it’s old.
M Kent
I tried this recipe and even having adjusted for humidity and elevation level found this to be somewhat disappointing although not totally unacceptable. Having looked at Julia’s actual recipe and procedure, this would only be very loosely considered close to hers. I found the water to flour ratio to be off, providing for a consistency far closer to a starter than a bread dough. Reducing the water content slightly and adding additional flour provided for a better result, as well increasing the bake time slightly.