
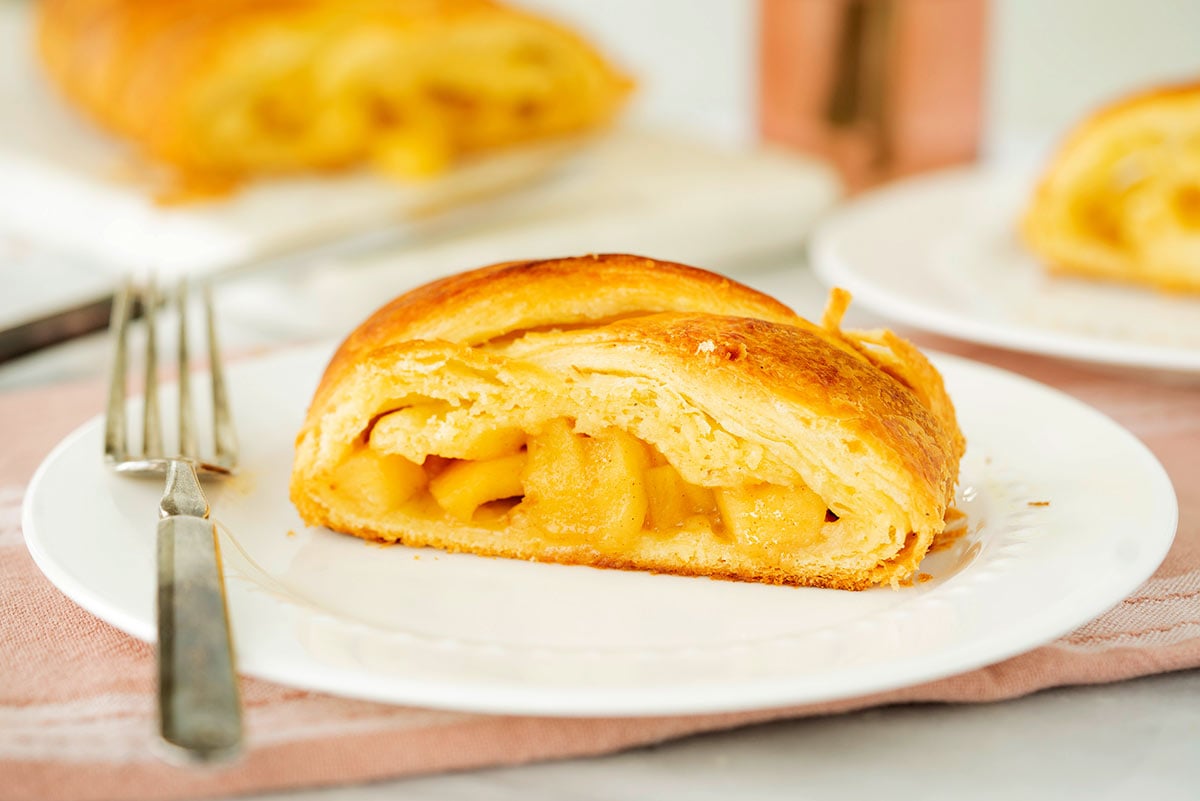
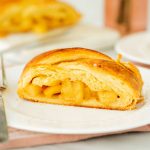
This Danish Braid with a flavorful cinnamon-spiced apple filling and a flaky buttery pastry is perfect for a special breakfast or brunch The recipe makes two braids, so there’s plenty for a crowd, or eat one now and freeze one for later.
WANT TO SAVE THIS RECIPE?
Enter your email below and we’ll send it straight to your inbox. Plus you’ll get great new recipes from us every week!
❤️ Why You’ll Love This Recipe: This flaky, buttery pastry is a show-stopping breakfast or brunch treat that looks impressive but is fun and easy to make. The apple filling is a great year-round treat.
Update: My family loves this weekend brunch treat. So I’ve updated the recipe with new step-by-step instructions and photos to help you make easy and delicious danish braid at home.

Making Danish Braid
Shortcut: You can make this recipe without homemade dough. Simply substitute store-bought puff pastry and fill, shape, and assemble the braid as described.
The dough comes together pretty quickly. To make things even easier, measure out all of your ingredients ahead of time.
If your dough feels too sticky, add a bit more flour until it’s soft and stretchy.
On the other hand, if your dough seems too dry, add milk to the mixer, 1 tablespoon at a time, until it comes together into a smooth dough.
After the dough is shaped, let it chill in the fridge for 30 minutes. When you take it out, it will be time to roll. If the dough is quite firm, be patient and let the dough warm up just a little bit as the gluten relaxes, it will be easier to roll it into an 18×13-inch rectangle.
Laminating the Dough with Butter
When you have your rectangle of dough, you’re ready to start laminating it with butter. This is what gives the Danish braid its signature flaky texture.
I like to use an offset spatula to spread the softened butter on the dough. It’s best to be gentle as you spread. The dough is soft and the butter is a little stiff, let the spatula do the work without damaging the dough.
No offset spatula? You can use a rubber spatula or butter knife.

You will roll and fold your dough a total of 4 times and refrigerate in between each roll and fold. It’s essential to keep the dough as cold as possible so the butter is encased in the layers of dough and doesn’t melt. It’s the solid butter between the layers of dough that creates the flaky layers.
Making Apple Filling
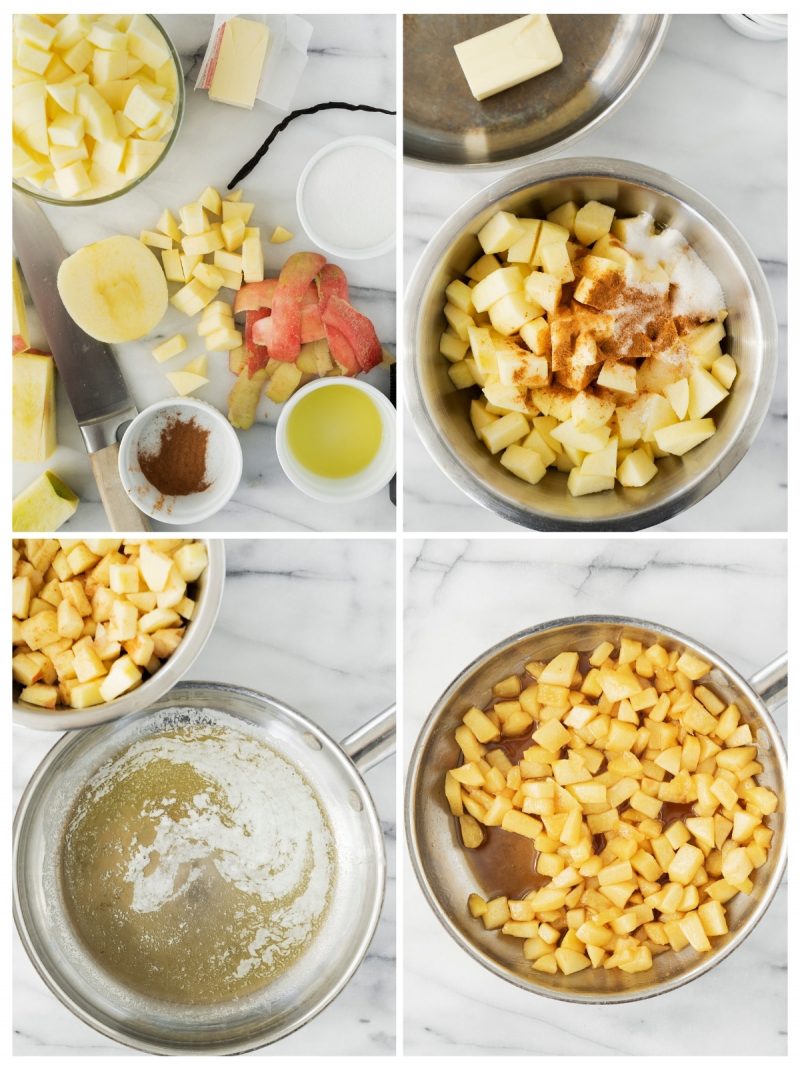
To make the apple filling for your braid, peel, slice and cut the apples into bite-sized pieces. Then, mix in the sugar, cinnamon, vanilla, lemon juice and butter and sauté as instructed.
When the filling is done, the apples should be tender but firm and the liquids thickened. Let the apple filling cool before you fill the dough to keep it from melting all of those buttery layers. You could even make the apple filling earlier in the day and refrigerate it until ready to use.
Assembling a Danish Braid with Apple Filling
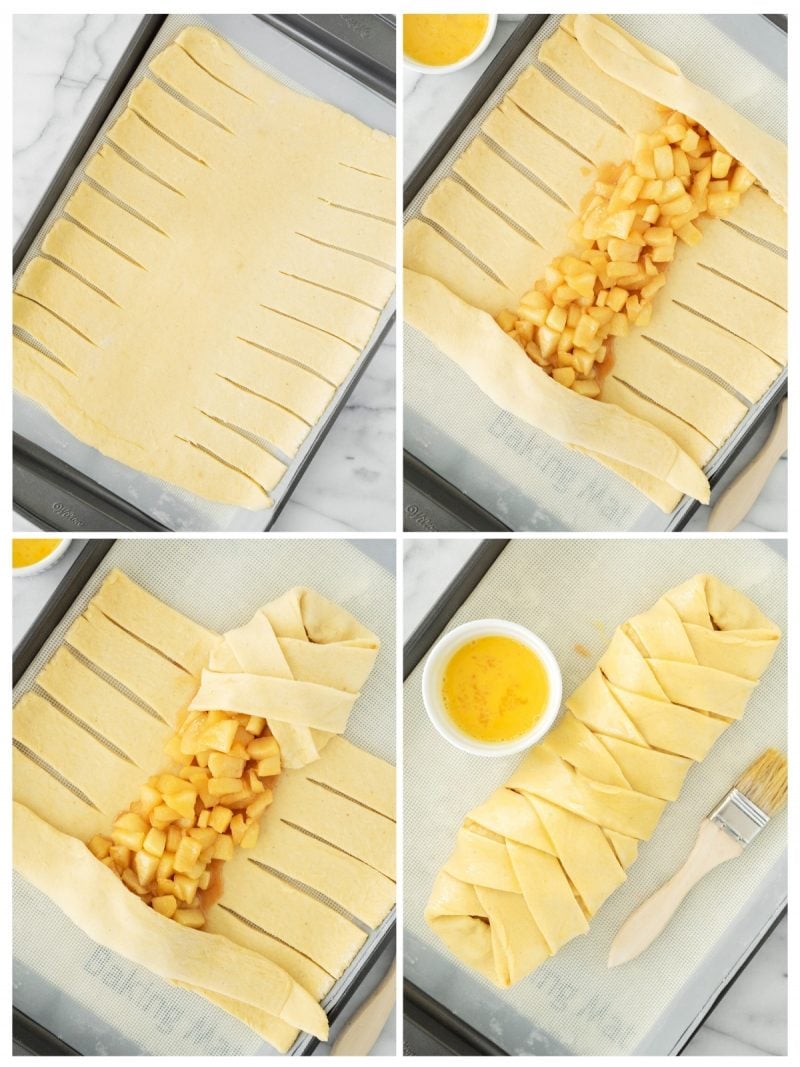
When you’re ready to assemble and shape the braid, you’ll want to use a pizza cutter or a very sharp knife
Each strip for the braid should be 5 inches long and 1 inch wide.
Next, spread the cooled apple filling in the center of the danish dough. It’s ok to include some of the thickened filling juices, but not a lot or it will leak when the dough rises.
When the filling is in place, fold the top and bottom end over the apple filling. This helps hold the filling in place.
Next it’s time for braiding. Do this by overlapping the left dough strip over the right dough strip. Repeat all the way down, tucking in any loose ends as needed.
Now brush the entire loaf with egg wash to give it a nice shiny glaze. Then cover the dough with plastic wrap. And let it rise for a few hours, until it’s nice and puffy. A warm location will help it rise faster.
Baking Danish Braid
Time to bake. After 10 minutes in the oven, you’ll want to rotate the pan. Also, check the braids. If they’re already golden brown, loosely lay aluminum foil over the danish to stop them from over-browning.
When danish is done take it out and let it cool for 15 minutes to let the apple juices set a bit.
While the danish is still hot, run a knife or offset spatula around the bottom of the danish to release it from sticking to any sticky liquid that may have leaked out of the braid.
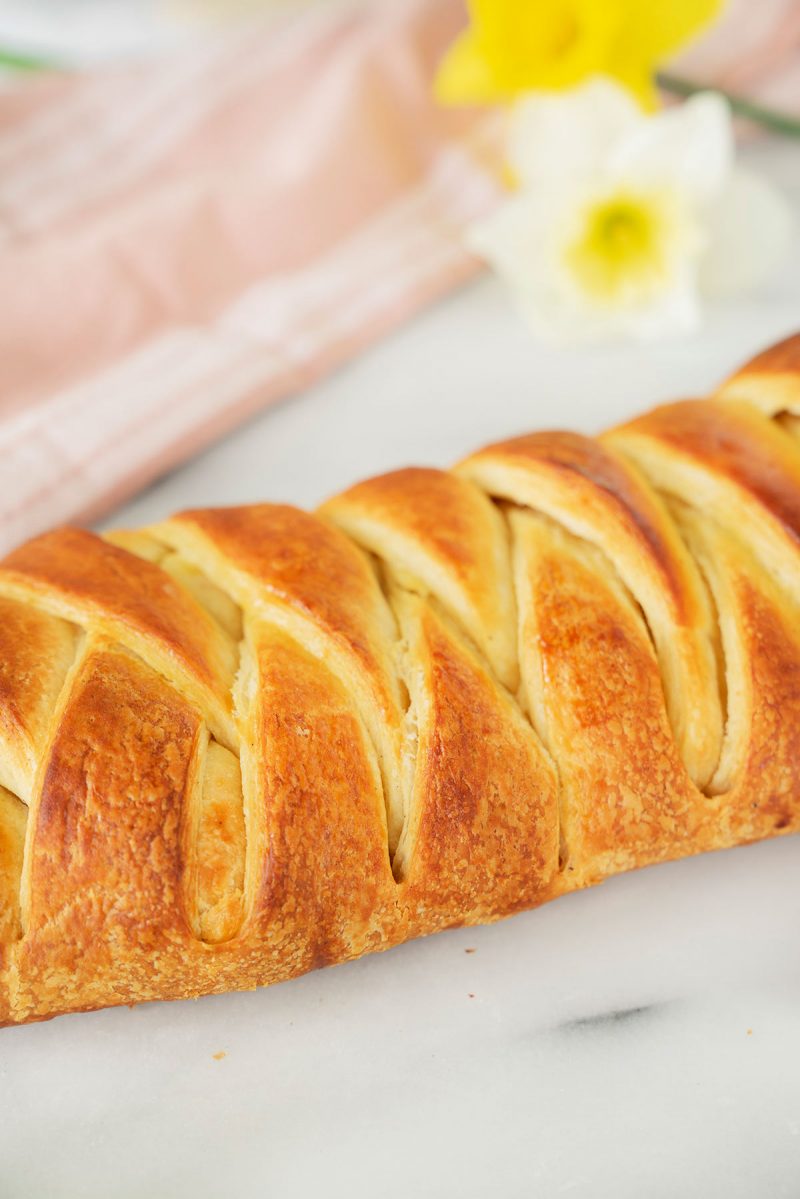
Once the sugary, sticky juices cool, they will crystalize and it will be harder to release the danish.
Serve your danish braid while it’s still warm.

Storage
You can refrigerate leftovers in an airtight container for up to four days. Reheat in a warm oven or the microwave in 20-second intervals to serve.
More Homemade Pastry Recipes to Try
If you love making your own patisserie-style pastries at home, you’ll love these other recipes:
- Kougin Amann is a layered croissant-like cake with a crispy sugar topping.
- A Pithivier is a golden and beautiful round pastry with a thick and hearty almond filling.
- Julia Child’s Croissants are a classic flaky breakfast pastry with quick blackberry jam.
- Vol-Au-Vents are delightfully puffy and light pastry bowls filled with creamy chicken stew.
WANT TO SAVE THIS RECIPE?
Enter your email below and we will send it straight to your inbox. Plus you will get great new recipes from us every week!
Danish Braid with Apple Filling
Equipment
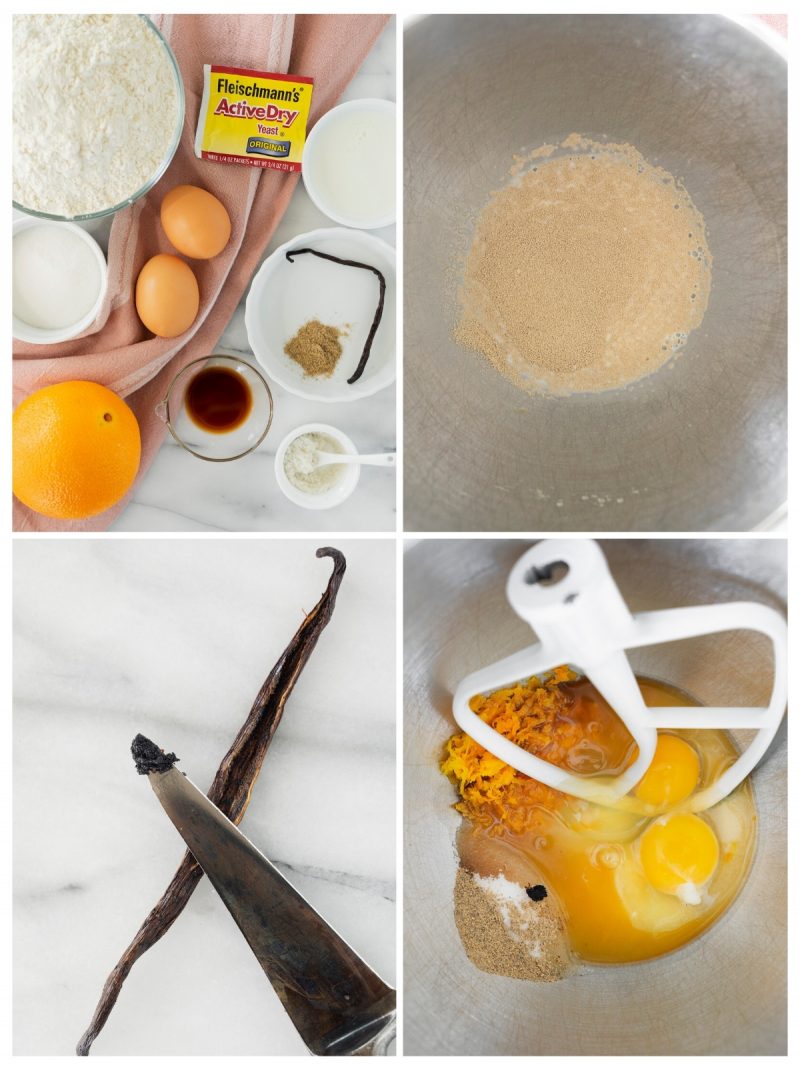
Ingredients
Dough (Detrempe)
- 1 ounce fresh yeast or 1 tablespoon active dry yeast
- ½ cup whole milk
- ⅓ cup sugar
- Zest of 1 orange finely grated
- ¾ teaspoon ground cardamom
- 1-½ teaspoons vanilla extract
- ½ vanilla bean split and scraped
- 2 large eggs chilled
- ¼ cup fresh orange juice
- 3-¼ cups all-purpose flour
- 1 teaspoon salt
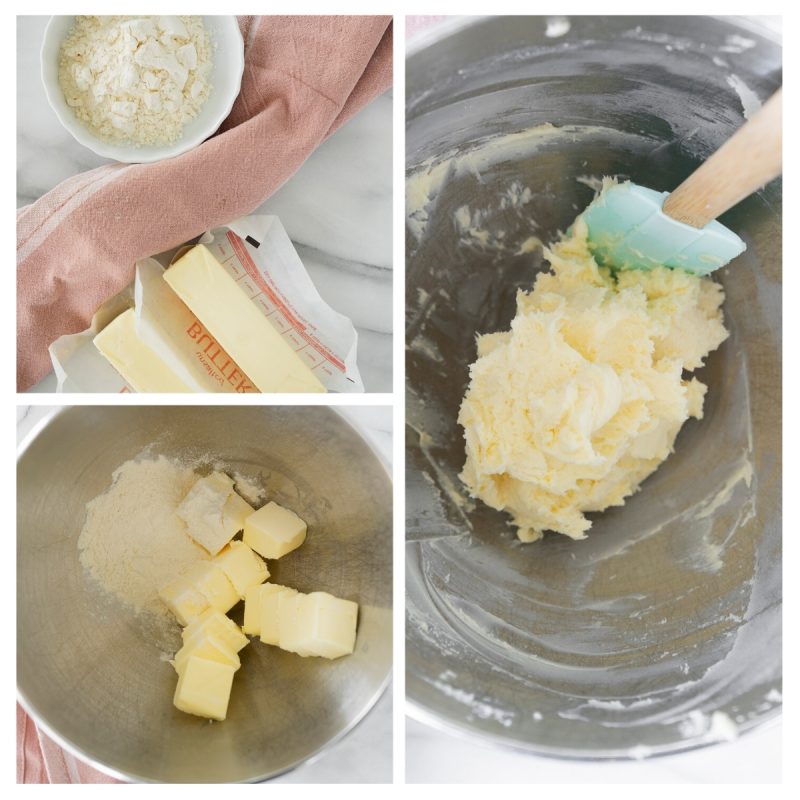
Butter block (Beurrage)
- ½ pound 2 sticks cold unsalted butter
- ¼ cup all-purpose flour
Apple Filling
- 4 Fuji or other apples peeled, cored, and cut into ¼-inch pieces
- ½ cup sugar
- 1 tsp. ground cinnamon
- ½ vanilla bean split and scraped
- ¼ cup fresh lemon juice
- 4 tablespoons unsalted butter
Danish Braid
- 1 recipe Danish Dough see below
- 2 cups apple filling jam, or preserves (see below)
Instructions
- DoughCombine yeast and milk in the bowl of a mixer fitted with the paddle attachment and mix on low speed. Slowly add sugar, orange zest, cardamom, vanilla extract, vanilla seeds, eggs, and orange juice. Mix well. Change to the dough hook and add the salt with the flour, 1 cup at a time, increasing speed to medium as the flour is incorporated. Knead the dough for about 5 minutes, or until smooth. You may need to add a little more flour if it is sticky. Transfer dough to a lightly floured baking sheet and cover with plastic wrap. Refrigerate for 30 minutes.
- Without a standing mixer: Combine yeast and milk in a bowl with a hand mixer on low speed or a whisk. Add sugar, orange zest, cardamom, vanilla extract, vanilla seeds, eggs, and orange juice and mix well. Sift flour and salt on your working surface and make a fountain. Make sure that the "walls" of your fountain are thick and even. Pour the liquid in the middle of the fountain. With your fingertips, mix the liquid and the flour starting from the middle of the fountain, slowly working towards the edges. When the ingredients have been incorporated start kneading the dough with the heel of your hands until it becomes smooth and easy to work with, around 5 to 7 minutes. You might need to add more flour if the dough is sticky.
- Butter BlockCombine butter and flour in the bowl of a mixer fitted with a paddle attachment and beat on medium speed for 1 minute. Scrape down the sides of the bowl and the paddle and then beat for 1 minute more, or until smooth and lump free. Set aside at room temperature.
- (Alternative method using a chilled butter block on this post https://www.barbarabakes.com/kouign-amann/)
- After the detrempe has chilled 30 minutes, turn it out onto a lightly floured surface. Roll the dough into a rectangle approximately 18 x 13 inches and ¼ inch thick. The dough may be sticky, so keep dusting it lightly with flour. Spread the butter evenly over the center and right thirds of the dough. Fold the left edge of the detrempe to the right, covering half of the butter. Fold the right third of the rectangle over the center third. The first turn has now been completed. Mark the dough by poking it with your finger to keep track of your turns, or use a sticky and keep a tally. Place the dough on a baking sheet, wrap it in plastic wrap, and refrigerate for 30 minutes.
- Place the dough lengthwise on a floured work surface. The open ends should be to your right and left. Roll the dough into another approximately 13 x 18 inch, ¼-inch-thick rectangle. Again, fold the left third of the rectangle over the center third and the right third over the center third. No additional butter will be added as it is already in the dough. The second turn has now been completed. Refrigerate the dough for 30 minutes.
- Roll out, turn, and refrigerate the dough two more times, for a total of four single turns. Make sure you are keeping track of your turns. Refrigerate the dough after the final turn for at least 5 hours or overnight. The Danish dough is now ready to be used. If you will not be using the dough within 24 hours, freeze it. To do this, roll the dough out to about 1 inch in thickness, wrap tightly in plastic wrap, and freeze. Defrost the dough slowly in the refrigerator for easiest handling. Danish dough will keep in the freezer for up to 1 month.
- Apple FillingToss all ingredients except butter in a large bowl. Melt the butter in a sauté pan over medium heat until slightly nutty in color, about 6 – 8 minutes. Then add the apple mixture and sauté until apples are softened and caramelized, 10 to 15 minutes. If you’ve chosen Fujis, the apples will be caramelized, but have still retained their shape. Pour the cooked apples onto a baking sheet to cool completely before forming the braid. (If making ahead, cool to room temperature, seal, and refrigerate.) They will cool faster when spread in a thin layer over the surface of the sheet. After they have cooled, the filling can be stored in the refrigerator for up to 3 days. Left over filling can be used as an ice cream topping, for muffins, cheesecake, or other pastries.
- Danish BraidLine a baking sheet with a silicone mat or parchment paper.
- Divide the dough in half. On a lightly floured surface, roll the Danish Dough into a 15 x 20-inch rectangle, ¼ inch thick. If the dough seems elastic and shrinks back when rolled, let it rest for a few minutes, then roll again. Place the dough on the baking sheet.
- Along one long side of the pastry make parallel, 5-inch-long cuts with a knife or rolling pastry wheel, each about 1 inch apart. Repeat on the opposite side, making sure to line up the cuts with those you’ve already made.
- Spoon the apple filling down the center of the rectangle. Starting with the top and bottom flaps, fold the top flap down over the filling to cover. Next, fold the bottom flap up to cover filling. This helps keep the braid neat and helps to hold in the filling. Now begin folding the cut side strips of dough over the filling, alternating first left, then right, left, right, until finished. Trim any excess dough and tuck in the ends.
- Egg WashWhisk together the whole egg and yolk in a bowl and with a pastry brush, lightly coat the braid.
- Proofing and Baking:Spray cooking oil (Pam) onto a piece of plastic wrap, and place over the braid. Proof at room temperature or, if possible, in a controlled 90 degree F environment for about 2 hours, or until doubled in volume and light to the touch.
- Near the end of proofing, preheat the oven to 400 degrees F. Position a rack in the center of the oven.
- Bake for 10 minutes, then rotate the pan so that the side of the braid previously in the back of the oven is now in the front. Lower the oven temperature to 350 degrees F, and bake about 15-20 minutes more, or until golden brown. Cool and serve the braid either still warm from the oven or at room temperature. The cooled braid can be wrapped airtight and stored in the refrigerator for up to 2 days, or freeze for 1 month.
Nutrition

Sera Lee
At what point in this process do you divide the dough in half to have 2 braids???
Barbara Schieving
Hi Sera – this post is definitely in need of an update. I have more information and step by step photos of an easier way of doing laminated dough https://www.barbarabakes.com/kouign-amann/ You’ll divide the dough in half before rolling it out and filling it when you start the Danish Braid section.
My Crazy Family
Oh yummy!! I am going to have to make this.
Medhaa
love the glaze ot it. I did not even bother to see if I had layers.