


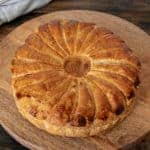
This easy pithivier recipe makes a luscious puff pastry pie with a creamy almond filling. It’s also know as a Galette De Rois or a King Cake. No matter what you called it, it’s irresistibly delicious, and you’ll be surprised just how easy it is to make.

WANT TO SAVE THIS RECIPE?
Enter your email below and we’ll send it straight to your inbox. Plus you’ll get great new recipes from us every week!
Jump to:
- What Is a Pithivier?
- Why You’ll Love This Pithivier Recipe
- Recipe Ingredients
- How to Make a Pithivier
- Making the Almond Cream
- Creating a Spiral Design on Top
- Assembling the Pithivier
- Baking the Pithivier
- Expert Tips
- Other Puff Pastry Recipes You’ll Love
- More Delicious Pastry Recipes to Consider
- Pithivier Recipe (Galette De Rois or King Cake)
What Is a Pithivier?
The pithivier is a kind of pie, said to have originated in Pithiviers, France, a town south of Paris. According to Wikipedia, a pithivier “is a round, enclosed pie usually made by baking two disks of puff pastry, with filling stuffed in between. It has the appearance of a hump and is traditionally decorated with spiral lines drawn from the top outwards with the point of a knife, and scalloping on the edge.”
Pithivier is pronounced pee-tee-vee-YAY or P T V A. A pithivier is also known as a Galettes des Rois, or King Cake, and served in celebration of Epiphany. (Not to be confused with the yeasted King Cake that’s more often served at Mardi Gras celebrations!)
The Pithivier is a spectacular looking dessert, and it tastes as good as it looks! But don’t be intimidated to make this gorgeous dessert. I’ve simplified the recipe so it’s easy to make, and I have made a template to help you decorate the top. Your friends and family are going to be so impressed with your baking skills!

Why You’ll Love This Pithivier Recipe
- Fancy But Easy: Since this recipe uses puff pastry, it really isn’t a hard pastry to make! But it’s just so pretty and looks quite impressive that it will show well at any occasion.
- Yummy Flavor: While I adore the flavor of puff pastry on its own, add in the almond filling and it’s impossible for me to resist. It’s just such an amazing flavor combo!
- Homemade Pastry: I love having an easy homemade pastry recipe on hand for special occasions — I’ve served this pastry at wedding showers, Mother’s Day brunches, and as a dessert with coffee when we’ve had guests over!
🥮 I keep puff pastry in my freezer for a super easy way to make amazing homemade pastry recipes!
Recipe Ingredients
- Puff pastry
- Egg
- Heavy cream
- Unsalted butter
- Sugar
- Almond flour
- All-purpose flour
- Lemon paste — I use Nielsen-Massey’s Pure Lemon Paste
- Almond extract — I use Nielsen-Massey’s Pure Almond Extract
- Salt
How to Make a Pithivier
While it might seem like a lot of steps, they’re all easy, and this dessert comes together quickly.
Step 1: The first thing you need to make a Pithivier is puff pastry. You can buy good frozen puff pastry in the frozen food section of most grocery stores. However, if you want you can make puff pastry from scratch, visit my Kouign Amann Recipe for great step-by-step photos and a puff pastry/laminated dough recipe.

Before you use the puff pastry dough, you need to thaw it. You can thaw the puff pastry on the counter for 40 minutes, but I prefer to thaw it in the refrigerator overnight. When you thaw it in the refrigerator, it’s less likely to crack when you unfold it.
There are two puff pastry sheets in a package. You’ll use both of them to make two rounds—one for the bottom and one for the top of the pastry. The pastry is usually 9-inches wide, so you shouldn’t need to roll it out, other than to smooth the top if necessary.
Use a 9-inch round cake pan as a template to cut the top and bottom pastry rounds. Once you have the top and bottom cut, put them in the refrigerator to chill while you make the almond cream filling.
Pro Tip: You want to keep your puff pastry well chilled in order to maintain the flaky layers in the baked product. The chilled butter between the layers of dough explode in the oven; if the butter melts, there’s no explosion and no flaky layers!
Making the Almond Cream
The first time I had a pithivier was at a local bakery, and it was love at first bite. The pastry is light and flaky, and the filling is rich and creamy. The pastry chef told me she added lemon to the filling to add a little brightness.

Almond cream, frangipane, is a traditional French filling used for celebrations. My almond cream filling is made from scratch with the finest ingredients: finely ground almond flour, butter, sugar, eggs, and pure almond extract and lemon paste.

Step 2: In a mixing bowl, cream together the butter and sugar on medium speed until light and fluffy, about 3 minutes. Add the almond flour and beat on medium speed until thoroughly blended, about 1 minute. Add the egg and mix on low speed until blended. Add the all-purpose flour, lemon paste, almond extract, and salt, and beat just until combined. Refrigerate until ready to use.
Creating a Spiral Design on Top
Now that you have your two puff pastry rounds and your almond cream filling made, it’s time to create the design on the top pastry round.
I am not very good at cutting evenly spaced lines. So instead of free hand cutting the lines, I created a template that I printed on my home printer on 8.5 x 11-inch paper.
Step 3: All you need to do is print the template and use a ball point pen to trace the lines onto your pastry round. Then take a sharp knife and lightly score the top of the pastry. Don’t cut it all the way through, since you’re just creating a pretty design on top.
I used a piping tip to cut a hole in the middle of the top pastry round to allow steam to escape while baking.

Assembling the Pithivier
Once you have your design cut in the top round, it’s time to assemble the pastry.
Step 4: Place the bottom round on a sheet of parchment or baking mat on a baking tray. Brush a 1-inch border on the bottom round with egg wash, being careful not to drip egg wash down the sides.

Add the filling to the center of the bottom pastry round. Spread the filling, keeping it 1 inch from the edges.
Next, center the decorated top pastry round on top of the filling. Press the edges of the puff pastry together to seal in the filling. Then use the back of a small paring knife to create a pretty scalloped edge as shown above.
Finally, when the pastry is assembled, you want to brush the remaining egg wash over the entire top of the pastry. Be careful not to let the egg wash drip down the sides of the pastry, which could prevent the puff pastry from rising on the edges.

Baking the Pithivier
Once assembled, just pop it in the oven. It’s fun to watch it while it’s baking. My grandson loves watching puff pastry as it rises in the oven!
Step 5: You’re going to bake if for 45 to 50 minutes. You may be tempted to remove it from the oven sooner if it’s puffed up and browned. DON’T DO IT! If you take if out of the oven too soon, it will deflate as it rests on the counter. You want to give all those layers time to crisp up.
It’s going to smell amazing in your kitchen while this is baking, and you’ll be tempted to cut it and serve it as soon as it’s out of the oven. But, for the best results, you should wait until it’s completely cool – about an hour.

Expert Tips
- Thawing Dough: Thaw puff pastry sheets overnight in the refrigerator, or at room temperature for 40 minutes or until easy to handle.
- Leftover Puff Pastry: Refrigerate leftover scraps of puff pastry. Later top the scraps with some melted butter and cinnamon sugar and bake until puffed and golden brown.
- Special Occasions: This is a perfect holiday pastry. You can serve it any time of day. It’s great with a cup of coffee in the morning, or the perfect end to a holiday meal.
- Keep It Cold: You want to keep your puff pastry well chilled in order to maintain the flaky layers in the baked product.

Other Puff Pastry Recipes You’ll Love
I have a handful of go-to recipes that use puff pastry, and they’re all very easy, very yummy, and very impressive!
- Rhubarb puff pastry turnovers that I make every Spring with the first rhubarb from the garden. What a lovely way to celebrate the new season!
- Fancy-made-easy is what I consider this Bananas Foster Pastry recipe — a great substitution for banana pudding (although that’s a lovely dessert, too!)
- And an ongoing pastry made each Fall at our house because maple-flavored pastries are a Fall must-have.
")
More Delicious Pastry Recipes to Consider


Did you try this recipe? Leave a ⭐️ rating below and share it on Instagram.
WANT TO SAVE THIS RECIPE?
Enter your email below and we will send it straight to your inbox. Plus you will get great new recipes from us every week!
Pithivier Recipe (Galette De Rois or King Cake)
Ingredients
- 2 sheets frozen puff pastry thawed*
- 1 egg yolk
- 1 tablespoon heavy cream
Frangipane Filling:
- ¼ cup / 55 g unsalted butter room temperature
- ¼ cup/50 g granulated sugar
- 1 cup / 75 g almond flour
- 1 large egg room temperature
- 2 teaspoons all-purpose flour
- 1 ½ teaspoons lemon paste *I use Nielsen-Massey’s Pure Lemon Paste.
- ½ teaspoon almond extract *I use Nielsen-Massey’s Pure Almond Extract.
- Pinch of salt
Instructions
- Line a baking sheet with parchment or a Silpat.
- Unfold pastry sheet on a lightly floured surface or Silpat. If pastry cracks when unfolding, sprinkle the crack with water and press the edges together to seal. If necessary, use a rolling pin to roll the pastry sheet to 9 inches wide.
- Cut pastry sheets into two 9-inch circles. (Use a round 9-inch cake pan as a guide.) Place one puff pastry round on the parchment lined baking sheet and place a sheet of parchment on top. Place the second pastry round on top of the parchment. Put the baking sheet in the refrigerator while you make the frangipane.
Make the frangipane:
- In a mixing bowl, cream together the butter and sugar on medium speed until light and fluffy, about 3 minutes. Add the almond flour and beat on medium speed until thoroughly blended, about 1 minute. Add the egg and mix on low speed until blended. Add the all-purpose flour, lemon paste, almond extract, and salt, and beat just until combined. Refrigerate until ready to use.
- Remove one pastry round from the refrigerator. On a lightly floured surface or Silpat, cut a 1 inch circle / hole in the center of the round. (You can use a piping tip to cut the hole.)
Creating the decorated top:
- Using a small paring knife, starting from the center of the hole, score a sun-ray decorative pattern on the top of round. You only want to cut through the top layers of the pastry. Don’t cut it all the way through the pastry (I’ve created a template to make this easy). Return pastry to the refrigerator while oven preheats.
- Preheat oven to 375°F (190°C).
- Remove both pastry rounds from the refrigerator. Place the bottom round on parchment paper or Silpat in the center of the baking tray.
- In a small bowl, whisk together the egg yolk and the heavy cream to create an egg wash. Brush a 1-inch border on the bottom round with the egg wash. Be careful not to let the egg wash drip down the sides, which could interfere with the puff pastry rising during baking.
- Place the frangipane in the center of the bottom round. Carefully center the top round on top of the frangipane. Use your fingers to gently seal the edges of the top round to the bottom round.
- With the back of a knife, score the outer edge of the pastry at regular intervals to create a scalloped edge.
- Using a pastry brush, brush the entire top of the pastry with the remaining egg wash. Be careful not to let the egg wash drip down the sides, which could interfere with the puff pastry rising during baking.
- Bake until puffed and golden brown, about 45 to 50 minutes.
- Transfer Pithivier to a wire rack, and let cool at least at least 1 hour before serving.
- Pithiviers are best served the day they are baked. However you can keep it in an airtight container on the counter for up to 2 days. To refresh it, bake it at 300°F (140°C) for 5 to 8 minutes before serving.
Notes
- Thaw puff pastry sheets overnight in the refrigerator, or at room temperature for 40 minutes or until easy to handle.
- Refrigerate leftover scraps of puff pastry. Later top the scraps with some melted butter and cinnamon sugar and bake until puffed and golden brown.
- This is a perfect holiday pastry. You can serve it any time of day. It’s great with a cup of coffee in the morning, or the perfect end to a holiday meal.
- You want to keep your puff pastry well chilled in order to maintain the flaky layers in the baked product.

Clara Louise
You forgot the most important ingredient in a King Cake – the “bean”!!
Every shop-bought one sold in January is sold with a cardboard gold crown and the person who finds the little statuette – called a “fève” (bean) in their piece of cake, is king for the day. It’s somewhat similar in tradition to finding a sixpence in your Christmas pudding – but much more common.
Barbara Schieving
Thanks for sharing Clara – just a fun tradition. I knew about the baby in the Mardi Gras King Cake https://www.barbarabakes.com/mardi-gras-king-cake/
Karol
Cannot find the lemon paste in my local stores. Can I leave it out?
Barbara Schieving
Hi Karol – you can omit the lemon paste, substitute lemon extract, or 1/8 teaspoon lemon oil. Enjoy!
Ruth Ramkissoon
Nice easy recipe.came out great on first try thanks to your simple step by step instructions!
Dayana
Hi. Do you sometimes get a large air pocket between the filling and the pastry top even with the center hole? What can I do to avoid that?
Thank you!
Barbara Schieving
Hi Dayana – I haven’t had an air pocket yet, but I did notice Martha Stewart posted a picture of her pithivier with a big air pocket. https://www.marthastewart.com/349965/pithiviers To avoid it, I would make sure the pastry doesn’t get glued down to the filling with egg wash. Also, you can try not sealing the outer edges tightly so air can escape there as well.
Jeri Bitney
Thank you! I’m going to serve this alongside the traditional pumpkin pie for Thanksgiving. I’ll try making my own lemon paste, just to see how that goes. If that’s a flop, I’ll purchase some through your link. I smile each time an email from you arrives, and my smile upon seeing this recipe was even broader.
Barbara Schieving
Thank so much Jeri – your comment put a big smile on my face. It will be the perfect addition to your Thanksgiving dessert.
Liren | Kitchen Confidante
I’m so intrigued by this gorgeous dessert and want to tackle baking it with my daughter – thank you!!
Barbara Schieving
Thanks Liren – have fun baking with your daughter!
2 Sisters Recipes
What a lovely pastry cake! I think it’s adorable your grandson loves to bake with grandma. My grandchildren love baking cookies with me as well! So precious! Have a wonderful week!
Barbara Schieving
Thanks! Happy holidays to you too.
Dorothy @ Crazy for Crust
I have always wanted to try a king cake! This is absolutely gorgeous.
Barbara Schieving
Thanks Dorothy – definitely give it a try.
Taylor @ Food Faith Fitness
This is just SO pretty! I wish I had a slice right now!
Barbara Schieving
Thanks Taylor – wish I could send you one.
Toni
Such a gorgeous recipe! I’m fascinated with the background (this was a first introduction to Pithivier for me) and your step-by-step instruction makes it so easy.
Barbara Schieving
Thanks Toni – it really is easy to make.
Genene Abraham
Thank you so much for sharing this. I absolutely love anything made with a light and flaky pastry crust. What a nifty idea to use the template. LOve the tips that you share.
Genene
Oh, this looks wonderful. I can not wait to try it. I love things made with a pastry that is light and flaky. Thank you so much for sharing this with us Barbara. And using your idea for the template is GENIUS. As you know some of us need help in getting our dish to look pretty in the end. I’m talking about myself. 🙂
Barbara Schieving
Thanks Genene! The template really did make decorating the top so easy. Happy holidays!
Foodiewife
What a lovely tutorial, and thank you for the template that you made. You had me at “almond”. This is a stunning dessert, and you made it look very doable.
Barbara Schieving
It’s definitely very doable. I hope you’ll give it a try Deb.
Baby Bleu
This is beautiful! Great work and love the history of this…might be a Thanksgiving break treat for the family.
Barbara Schieving
Thanks! It was fun researching the history.
Carol
What a beautiful dessert….and thank you SO much for breaking it down into steps. When I saw that first photo I thought NO WAY can I do this. After reading through the post, I think I can! It sounds heavenly. And what fun to have a little helper in the kitchen…that makes it even more special. Good thing you “sounded out” the pronunciation of the cake-oh boy I wasn’t even close to getting it right. 🙂
Barbara Schieving
Thanks so much Carol! You definitely can do it.