

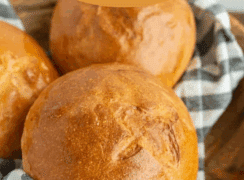
These Homemade Bread Bowls will completely change how you serve soup, stew, and chili in your kitchen. Breaking into that perfectly golden, crusty exterior to reveal the soft, pillowy interior makes the perfect foundation for your favorite comfort foods.

WANT TO SAVE THIS RECIPE?
Enter your email below and we’ll send it straight to your inbox. Plus you’ll get great new recipes from us every week!
🍞 Nothing says homemade with love quite like serving dinner alongside fresh-baked bread. Your family and guests will definitely love it!
My 2 Best Tips For Making Homemade Bread Bowls
Proper Hydration: The key to achieving the perfect texture is getting the dough consistency just right – it should be barely tacky but not sticky. Too much flour will result in dense, heavy bowls that lack the desired soft interior. I always tell people to add flour gradually because you can always add more, but you can’t take it away once it’s mixed in!
Scoring Technique: Make your X-cut about ¼ inch deep using a sharp knife or razor blade in one swift motion. This allows the bread to expand properly during baking and creates that beautiful rustic appearance. I learned this technique from watching professional bakers, and the confidence in your cuts really shows in the final result.

I’m not sure why serving soup in a bread bowl feels fancier than serving bread along side soup, but it does! It’s a different meal presentation, and the kids always think it’s so fun.
For even baking, I rotate my pans halfway while baking. This ensures all bread bowls develop the same golden color and crispy crust. Position your racks in the upper and lower thirds of the oven for optimal heat circulation. I set a timer for 15 minutes to remind myself to rotate the pans, as it’s easy to forget when you’re busy with other dinner prep.
🩷 Melissa
WANT TO SAVE THIS RECIPE?
Enter your email below and we will send it straight to your inbox. Plus you will get great new recipes from us every week!

Easy Homemade Bread Bowl
Ingredients
- 3 cups warm water
- 1 tablespoon + 1 teaspoon instant yeast (or 2 packages)
- 2 tablespoons granulated sugar
- 3 tablespoon olive oil
- 1 tablespoons kosher salt
- 7 to 8 cups all purpose or bread flour
- 1 tablespoon milk
- 1 egg white
Instructions
- In a large mixing bowl add the water, yeast, and sugar. Let the mixture rest for 5 minutes.
- Add the olive oil, salt, and 4 cups of flour to the bowl and stir to combine. Using your stand mixer or a wooden spoon, mix the dough for 5 minutes.
- After you’ve mixed the dough for 5 minute, gradually add more flour, ⅓ cup at a time until the dough starts to come clean from the sides of the bowl. The dough will be just a little bit sticky at this point. Knead for another 3 minutes.
- Remove the dough from the bowl and place it on a lightly floured surface and knead by hand until the dough is just barely tacky, adding just a little flour at a time as needed.
- Form the dough into a smooth ball and return it to the bowl.
- Cover the bowl with a damp dish towel, a beeswax wrap, or a piece of plastic wrap and allow the dough to rest for 30-45 minutes.
- Add a baking mat or parchment paper to two large baking sheets.
- Remove the dough from the bowl and divide into 8 even pieces.
- Shape each piece into a smooth ball and place on the baking sheet, 4 ball doughs per sheet, so that they aren’t touching each other and are spaced out evenly.
- Cover the dough balls with a clean dishtowel and allow to rise an additional 30 to 45 minutes.
- Preheat the oven to 400°F.
- In a small bowl add the 1 tablespoon of milk and the egg white and use a fork to combine well.
- Cut a small X in the top of each bread ball.
- Brush each dough ball with the milk mixture, being sure to cover all of the dough (not just the top).
- Bake the bread bowls on two separate racks for 30 minutes, rotating the pans from the upper rack to the lower rack half way through baking.
- Allow the bread bowls to cool for 15 minutes before cutting open to serve.
Notes
Nutrition
How To Make Bread Bowls

Step 1: In a large mixing bowl add the water, yeast, and sugar. Let the mixture rest for 5 minutes. Add the olive oil, salt, and 4 cups of flour to the bowl and stir to combine.
Step 2: Using your stand mixer or a wooden spoon, mix the dough for 5 minutes. After you’ve mixed the dough for 5 minutes, gradually add more flour, ⅓ cup at a time until the dough starts to come clean from the sides of the bowl. The dough will be just a little bit sticky at this point. Knead for another 3 minutes.
Step 3: Remove the dough from the bowl and place it on a lightly floured surface and knead by hand until the dough is just barely tacky, adding just a little flour at a time as needed. Form the dough into a smooth ball and return it to the bowl.
Step 4: Cover the bowl with a damp dish towel, a beeswax wrap, or a piece of plastic wrap and allow the dough to rest for 30-45 minutes. During this time, add a baking mat or parchment paper to two large baking sheets.
Step 5: Remove the dough from the bowl and divide into 8 even pieces. Shape each piece into a smooth ball and place on the baking sheet, 4 ball doughs per sheet, so that they aren’t touching each other and are spaced out evenly. Cover the dough balls with a clean dishtowel and allow to rise an additional 30 to 45 minutes.
Step 6: Preheat the oven to 400 degrees F. In a small bowl add the 1 tablespoon of milk and the egg white and use a fork to combine well.
Step 7: Cut a small X in the top of each bread ball. Brush each dough ball with the milk mixture, being sure to cover all of the dough (not just the top).
Step 8: Bake the bread bowls on two separate racks for 30 minutes, rotating the pans from the upper rack to the lower rack half way through baking. Allow the bread bowls to cool for 15 minutes before cutting open to serve.
Recipe FAQs
Check that your yeast is fresh and active, and ensure your kitchen isn’t too cold. If needed, place the covered bowl in a slightly warm oven (turned off) or near a warm spot to encourage rising.
While this specific recipe uses regular flour, you can substitute with a 1:1 gluten-free flour blend. The texture will be slightly different, but they’ll still be delicious and functional as serving bowls.
After cooling, use a sharp serrated knife to cut around the top, then gently pull out the interior bread, leaving about ½ inch of bread on the sides and bottom to maintain structural integrity.
More Delicious Bread Recipes to Consider


Did you try this recipe? Leave a ⭐️ rating below and share it on Instagram.

Rehoboth
Nice bread bowl
Thanks