
Learn how to make a layer cake like a pro baker with essential tips for perfectly even layers, smooth frosting techniques, and simple decorating tricks that transform ordinary cake layers into spectacular desserts anyone can create at home.
WANT TO SAVE THIS RECIPE?
Enter your email below and we’ll send it straight to your inbox. Plus you’ll get great new recipes from us every week!
This guide will share foolproof baking tips and techniques for creating stunning layer cakes at home!
From properly preparing pans and achieving perfectly even layers to mastering smooth frosting application and decorating like a pro, this comprehensive guide shares professional secrets for baking, assembling, and serving beautiful layer cakes that taste as amazing as they look.
Jump to:
My Favorite Layer Cakes
Here are my very favorite layer cakes, complete with recipes for the cakes and frosting. Grab one of the recipes (or all 3!) and keep reading for the tips that will make your cake just as beautiful!
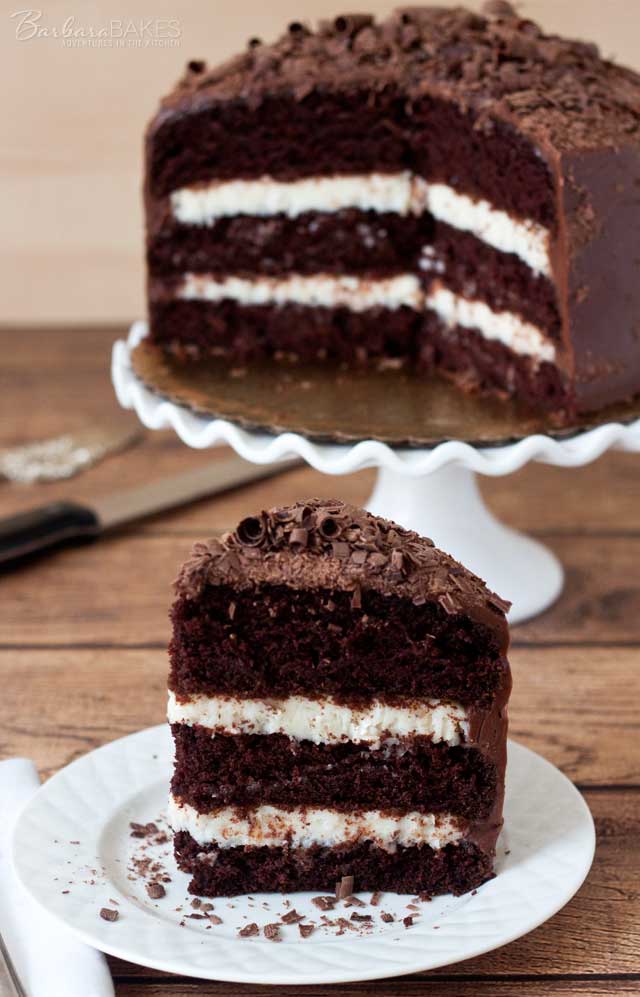
- Triple Layer Chocolate Cake with a Coconut Cream Cheese Filling
- Strawberry Cake
- Chocolate Cheesecake Cake
Foolproof Guide For How To Make A Layer Cake
Whether you’re baking for a birthday, celebration, or just because you’re craving something sweet, these tips will help you create a bakery-worthy cake that tastes as good as it looks!
Preparation Essentials
Before you dive into mixing your batter, proper preparation will set you up for success:
Get your ingredients ready: Make sure everything is at room temperature before you begin. This helps ingredients incorporate more evenly and creates a better texture in your finished cake.
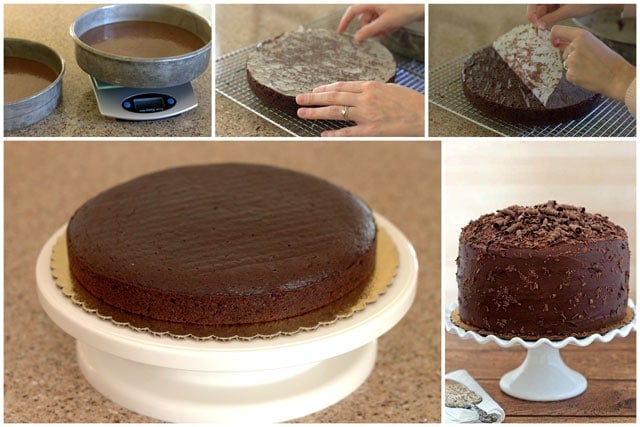
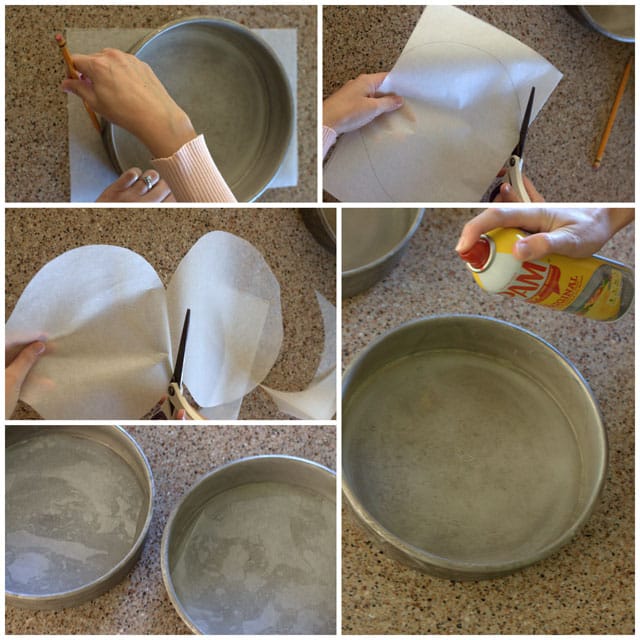
Prepare your pans properly: This might seem like a small detail, but it makes a world of difference! Use your cake pans to trace circles onto parchment paper, then cut them out to fit perfectly in the bottom of each pan. Spray both the bottom and sides of your pans with nonstick spray, then place the parchment inside. This two-step process ensures your cakes will release cleanly every time.
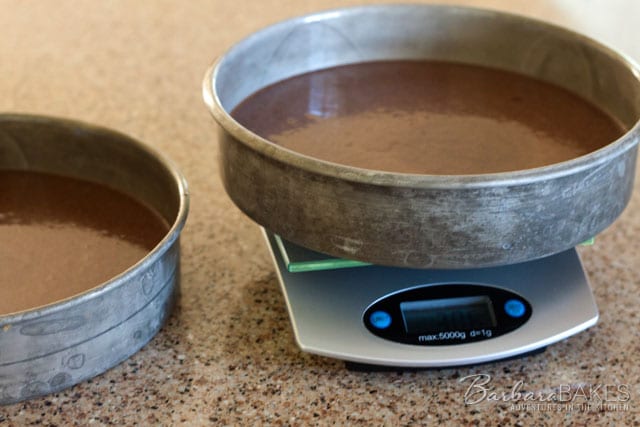
Weigh your batter: For perfectly even layers, use a digital kitchen scale to divide your batter equally between pans. No more guessing and ending up with one thick layer and one thin one!
The Baking Process
Knowing when your cake is done takes a bit of practice, but there are clear signs to watch for:
- The cake will begin to pull away from the sides of the pan when it’s done. When you gently touch the middle, it should feel firm but bounce back slightly under your finger.
- A pro tip I’ve learned over the years: stay in the kitchen while your cakes are baking. With practice, you’ll actually be able to smell when they’re perfectly done! It’s one of those baking secrets that isn’t in any recipe.
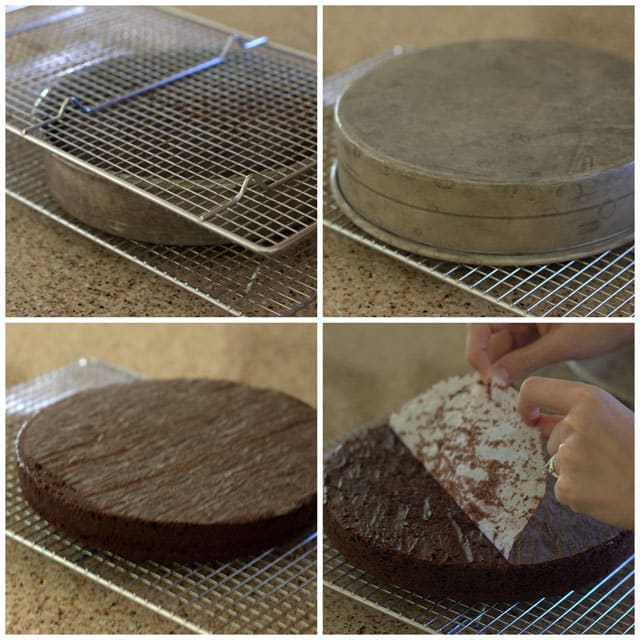
Cooling and Removing From Pans
This is where many beginners run into trouble, but with the right technique, you’ll never leave half your cake stuck in the pan again:
- Let your cakes cool on a wire rack for about 10 minutes after taking them out of the oven.
- If the edges haven’t already pulled away, gently loosen them with a butter knife or thin spatula.
- Place a cooling rack upside down on top of the cake pan, then using two hot pads, grab both the rack and pan together and flip them over in one smooth motion. Your cake should fall right onto the rack.
- If your cake is stubborn and doesn’t release, flip everything back over and use your thin spatula to gently lift any stuck areas.
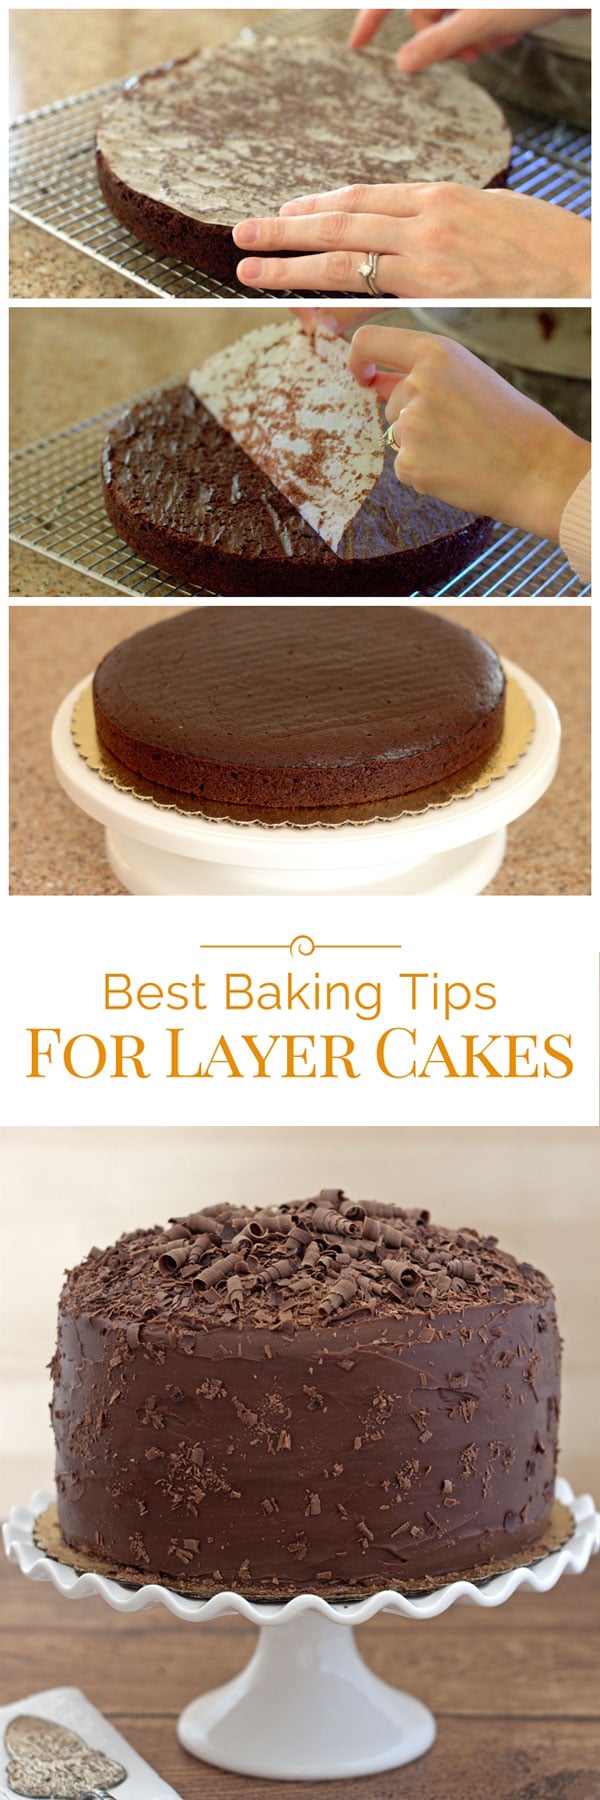
- Your cake will now be upside down. Carefully peel off the parchment paper, place another cooling rack on top, and gently flip it right-side up.
Make-Ahead Options
One of my favorite tricks is freezing cake layers before decorating them. They’re firmer and much easier to work with, plus you can make them 2-3 weeks in advance—perfect for planning ahead for special occasions!
To freeze properly:
- Cool your cakes completely on the rack.
- I like to put the removed parchment paper back on top of the cake and flip it again so it doesn’t stick to the wire rack.
- Freeze the layers uncovered on the wire rack until solid.
- Once frozen, wrap tightly in plastic wrap to store.
When you’re ready to decorate, you don’t need to thaw the layers first — they’re actually easier to work with while still frozen and will thaw quickly as you decorate.
However, if you’re using buttercream frosting, you should thaw the layers first. As a professional baker once told me, “If you frost frozen cakes with buttercream, the icing will crack as the cake thaws and expands.”

Frosting Techniques
For that perfectly smooth, professional-looking frosting:
Start with a crumb coat: Apply a quick, thin layer of frosting to lock in any loose crumbs. This creates a clean canvas for your final frosting layer. After applying the crumb coat, refrigerate the cake for about 30 minutes until the frosting feels set to the touch.
Perfect your technique: When applying the final coat, start on top with a generous blob of frosting. Gently push the frosting in a circle in one direction (not back and forth), smoothing as you go. Then add more frosting and push it over the sides.
Keep it clean: Work with a clean spatula by wiping it off with a paper towel regularly. An offset spatula and a revolving cake stand make this process much easier!
Prevent oozing fillings: Make sure your filling is thick enough so it won’t squeeze out. Spread it almost to the edge, then gently press the next layer on top. If any filling escapes, use a dry spatula to remove the excess or gently push it back where it belongs.

Decorating Your Masterpiece
Timing is everything when adding decorations to your cake. Apply them while the frosting is still wet so they’ll stick properly. If your frosting starts to dry before you finish decorating, you can usually wipe away a little frosting to make it sticky again.
Storing Your Creation
Whether your finished cake needs refrigeration depends on your filling:
- Cakes with cream cheese fillings, puddings, or other perishable fillings should be refrigerated until about 30 minutes before serving.
- Cakes with shelf-stable fillings can be stored at room temperature under a cake dome.
Serving Your Layer Cake
For beautiful, clean slices:
- Always clean your knife between cuts.
- Warm the knife under hot water before each slice.
- Dry the knife, cut, then rinse and repeat for each slice.
These simple steps prevent frosting and cake from building up on the knife and give you picture-perfect portions every time.
Cake Baking Tools
These are the tools I use over and over again, every single time I make cake — be it multiple layers or just one!
- Round Cake Pans: 8-inch and 9-inch are the ones I use the most.
- Offset Spatulas: Get a small one and a larger one for different frosting needs.
- Revolving Cake Stand: A luxury that makes frosting round cakes much easier!
- Cake Rounds: Coated cardboard bases that make transferring cake layers less stressful. (Ask me how I know!)
- Wire Cooling Racks: Quicken cake cooling with these multipurpose racks.
- Digital Food Scale: This makes it so much easier to get the same amount of batter in each cake pan.
- Parchment Paper: Use the uncut multipurpose rolls to cut your own rounds or get the conveniently pre-sized and cut rounds for your pan sizes — 8-inch and 9-inch.
Happy Baking!
Layer cakes might seem intimidating at first, but with these tips and a little practice, you’ll be creating stunning, delicious cakes that would make any professional baker proud.
Like any worthwhile kitchen skill, each cake you make will be better than the last as you develop your own tricks and techniques.
Whether you’re baking a chocolate layer cake with coconut cream cheese filling, a special birthday cake for someone you love, or experimenting with new flavor combinations, these foundational techniques will help you create a cake that’s as beautiful as it is delicious.

Maria pinzon
What a wonderful recipe! I absolutely loved the level of detail and the passion you put into every bake; it’s clear that for you, just like for us, quality, safety, and your privacy come first in everything we create.
Amber
Our cakes broke when trying to layer and then when frosting the tops rolled.The cake while still delicious was a huge mess!
Barbara Schieving
Hi Amber – that is frustrating. Do you think they were overbaked or underbaked?
Maxine Goodwin
Great advice. But I have a question also. When your icing the sides and you want to put something on extra, how do u tilt it so it doesn’t all fall off the plate to get the product on the sides? I find myself either trying to keep the cake from sliding off or not getting the product even or balanced. Its usually something like chocolate shavings or crushed nuts things of this nature.
Beth
Use a cooling wet strip around the pan for a perfect Even ” flat” top surface every time. The middle will rise more evenly with the hotter edges. You can find a set in the baking aisle at most stores. Also try to “dip out” a little batter in the middle which will allow it to bake more evenly overall helping to prevent over baking and browning of the edges.
Barbara Schieving
Thanks for sharing your tips Beth.
jessica
hi barbara, can you share the recipe you used for this cake? thank you
Barbara Schieving
Hi Jessica – it’s this triple layer cake https://www.barbarabakes.com/triple-layer-chocolate-cake-coconut-cream-cheese-filling/ Enjoy!
Cindy
I worked in a bakery and the cakes came in frozen. If I frosted them before they had thawed, the icing would crack as the cake thawed.
The cake expands as it thaws causing the buttercream to crack.
Barbara Schieving
Thanks for sharing that Cindy – I rarely use buttercream so I haven’t had a problem. I’ll make a note of it.
Ruth
Hi Barbara,
can I cover this cake and the frosting with a fondant icing? I am trying to make a cake for a family friend and want to create it to look like a paint palete…I know very far fetched but was looking for the perfect 3/4 layer cake and yours came up tops
Chelsey Graff
Hi Ruth! You can use any almost any kind of frosting underneath fondant, the important thing is the consistency of the frosting (too thin and it will squish out from under the weight of three fondant, and too thick you won’t be able to smooth it properly), getting the icing as smooth as possible with very few air bubbles and making sure that the outside layer of frosting isn’t too thick.
I crumb coat my cake, freeze it and then put a very thin layer of frosting on the cake. Then I immediately cover with fondant before your buttercream crusts (if the buttercream is American). If the buttercream does crust before you get the fondant on the cake just brush it with a little bit of water so the fondant will stick.
If you want the smoothest results, buttercream or chocolate ganache are the best options for underneath fondant!
Barbara Schieving
Thanks Chelsey! Ruth – I asked my friend and neighbor, Chelsey to give you advice since I haven’t worked with fondant before. You can see Chelsey’s beautiful creations on Instagram https://www.instagram.com/chelseyscakesncookies/
Andrea
Do you have any tips for actually layering the cake? I’ve been told to put some of the layers upside down to make it lay more evenly or flat, is that true?
Barbara Schieving
Hi Andrea – Since the bottom of the cake is the flattest, you always put the cake right side up on the bottom. The top layer you can put upside down so the flattest part of the cake is on top. But if your layers bake up relatively flat, it doesn’t make too much if you flip the top one over or not.
Toni
Thanks for the great tips. My cakes always are very moist and taste great – but always look as if I put on cake plate with a spoon!
Barbara Schieving
Glad they with helpful – thanks Toni!
Brenda Goerler
Should your German chocolate cake be refrigerate? Also, how does the buttermilk affect the German chocolate cake as compared to the regular box mix?
Barbara Schieving
Hi Brenda – I’ve always stored it covered on the counter and not in the refrigerator. The buttermilk is acidic and helps to tenderize the cake.
Gail Buckley
Do you bake 3 cake layers on top or middle shelf? Thanks!
Barbara Schieving
Hi Gail – on the middle shelf if they’ll fit.
Niharika
Hey, your tips are very useful. I want to know why my cake sides get a bit dry n hard when i keep it in fridge after layering the cake even after I soak them with sugar syrup ( I make naked cakes) and freezing the cake layers won’t make them hard..? Will the cake remain moist and soft even after freezing and thawing??
Barbara Schieving
Are you overbaking your cakes perhaps? Freezing will keep them from drying out better than putting them in the fridge I’ve found.
Lex
I was wondering how big of a thing you should store a 3 layer cake in… Also I was wondering how do you cute your cake perfectly even and flat for stacking or if there is any other techniques I could use? -Thanks
Barbara Schieving
Hi Lex – generally cake stand covers aren’t tall enough for three-layer cakes. So I’ll typically put it on my cake stand before decorating. Then after decorating, I’ll put toothpicks in the top (maybe three so the wrap doesn’t touch the cake) and cover it with plastic wrap. To level the top of a cake if it’s domed, I’ll use a long serrated knife making sure to keep the knife flat and just cut off the dome.
Lex
Thanks
Maria Paz
Hi! What can I do so my cake doesn’t rise unevenly in the over like a dome and then crack? How does your cake look so even? A friend told me that she ties a wet rack around the pan but my cake still raises like a dome. Thanks for your advice
Barbara Schieving
Hi Maria – are you using boxed cake mixes or from scratch recipes? Often, just changing to a different recipe will help. Are you baking at altitude? If it’s cracking, you may need to reduce your cook time. Many people use these cake strips https://amzn.to/2VSB1DN to help keep cakes from doming.
Meghana
Hi, I have a question. Would freezing and then thawing the cake alter its texture in any way? Because I’m going to try and bake a cake for my brother’s birthday (my first time baking a layer cake- send help!) in a few days and I don’t have much time to experiment with different techniques.
Barbara Schieving
Hi Meghana – no, freezing and thawing doesn’t change the texture of the cake. It’s a great way to make baking a layer cake easier because you split up the work into several days. I’m sure you’ll do great!
Meghana
Thank you 🙂
Callie
Wow. These are really great and useful tips. I am so glad I found your post as I will be making a layer cake for my daughter’s birthday tomorrow. I especially found weighing the cake batter to be a great nifty tip as I was worried about getting even layers.
Thanks a lot and keep up the great work.
Denise Kellum
I would like to know what to do when you have 3 layers of cake…you start putting icing on and the layers 2 and 3 start slipping and sliding. What can I do for it to come out being a pretty cake instead of a lopsided one.
Barbara Schieving
Hi Denise – sounds like you need to thicken up the icing between the layers or use less icing between the layers. You can add more powdered sugar to the icing. You can put the iced layers in the fridge to firm up before icing the outside so you can adjust the layers and they won’t move around. On wedding cakes they’ll use dowels to secure the layers, but on a typically 2 or 3 layer that shouldn’t be necessary.
SR
Pan and oven racks all ok. Could it be because i lined can tin one inch above the rim and when i cooked cake caused sides to become uneven. Cake almost looked like it collapsed on sides. Thank for you help
Barbara Schieving
It is possible that as the cake tried to rise, the paper caused a problem. Try it without the paper on the sides and see if you get a better result.
SR
Made this cake, lined the base of cake tin and around the sides with baking paper, can you tell me why did cake come out with uneven sides, almost wavey. I did line sides one inch above cake tin. Thanks for your help.
Barbara Schieving
Are your oven racks even, or the pan dented perhaps?