
Audax Artifex was our January 2012 Daring Bakers’ host. Aud worked tirelessly to master light and fluffy scones (a/k/a biscuits) to help us create delicious and perfect batches in our own kitchens!
Until this challenge I didn’t realize that an Australian scone is a baking powder biscuit.
Scones in North American are nearly always triangular in shape have a slightly crisp crust usually covered in sugar and have a soft interior crumb and sometimes are laced with dried fruit (these baked goods in Australia and England are called “rock cakes” since they are usually made to look like “rocky” cakes not wedges), meanwhile biscuits in North American are a round shaped buttery slightly flaky baked good usually eaten with meals (these items in Australia and England are called “scones” and are eaten with butter and jam usually with cups of tea or coffee as a sweet snack).
Hopefully that helps straightens it all out. Scones/biscuits are made from a few simple ingredients they are inexpensive and quick to make, but can be difficult to master.

WANT TO SAVE THIS RECIPE?
Enter your email below and we’ll send it straight to your inbox. Plus you’ll get great new recipes from us every week!
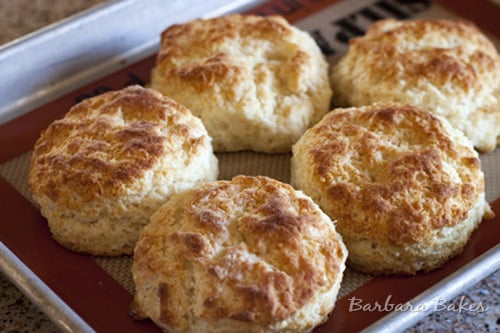
Last year I posted a Breakfast Biscuit Sandwich and I used my sweet friend Edna’s Cafe Biscuits delicious recipe. This time around I used the wonderful buttermilk version of the challenge recipe. Audax posted lots of great tips on creating tender, flaky biscuits, including using frozen grated butter, the wetter the dough the lighter the scones, not overworking or underworking the dough, not twisting the cutter, and letting the dough rest before cutting so that it’s easier to handle.
I’ve only made biscuits a couple of times and I have a long way to go before I’ve master biscuits. I had hoped to make several batches of biscuits but ran out of time. Visit the Daring Kitchen to see a slideshow of all the creative scones/biscuits the Daring Bakers created for this challenge and the original challenge recipe with all of the helpful tips on how to make fabulous biscuits.
Do you have a great tip for making biscuits?
WANT TO SAVE THIS RECIPE?
Enter your email below and we will send it straight to your inbox. Plus you will get great new recipes from us every week!
Buttermilk Biscuits aka Australian Scones
Ingredients
- 1 cup all-purpose flour
- 2 ¼ teaspoons baking powder
- ¼ teaspoon salt
- 4 tablespoons frozen grated butter
- ¼ cup buttermilk approximately
- 1 tablespoon milk for glazing the tops of the scones, optional
Instructions
- Preheat oven to very hot 475°F.
- Triple sift the dry ingredients into a large bowl. (If your room temperature is very hot refrigerate the sifted ingredients until cold.)
- Rub the frozen grated butter into the dry ingredients until it resembles very coarse bread crumbs with some pea-sized pieces if you want flaky scones or until it resembles coarse beach sand if you want tender scones.
- Add nearly all of the liquid at once into the rubbed-in flour/fat mixture and mix until it just forms a sticky dough (add the remaining liquid if needed). The wetter the dough the lighter the scones (biscuits) will be!
- Turn the dough out onto a lightly floured board, lightly flour the top of the dough. To achieve an even homogeneous crumb to your scones knead very gently about 4 or 5 times (do not press too firmly) the dough until it is smooth. To achieve a layered effect in your scones knead very gently once (do not press too firmly) then fold and turn the kneaded dough about 3 or 4 times until the dough has formed a smooth texture. (Use a floured plastic scraper to help you knead and/or fold and turn the dough if you wish.)
- Pat or roll out the dough into a 6 inch by 4 inch rectangle by about ¾ inch thick (15¼ cm by 10 cm by 2 cm thick). Using a well-floured 2-inch (5 cm) scone cutter (biscuit cutter), stamp out without twisting six 2-inch (5 cm) rounds, gently reform the scraps into another ¾ inch (2 cm) layer and cut two more scones (these two scones will not raise as well as the others since the extra handling will slightly toughen the dough). Or use a well-floured sharp knife to form squares or wedges as you desire.
- Place the rounds just touching on a baking dish if you wish to have soft-sided scones or place the rounds spaced widely apart on the baking dish if you wish to have crisp-sided scones. Glaze the tops with milk if you want a golden colour on your scones or lightly flour if you want a more traditional look to your scones.
- Bake in the preheated very hot oven for about 10 minutes (check at 8 minutes since home ovens at these high temperatures are very unreliable) until the scones are well risen and are lightly coloured on the tops. The scones are ready when the sides are set.
- Immediately place onto cooling rack to stop the cooking process, serve while still warm.
Thanks Audax for all of the hard work you did on this challenge, as well as all the help you so generously give on all of the Daring Bakers and Daring Cooks challenges!

Pru @ Perfecting Pru
These look good Barbara! I love scones with jam and clotted cream, but they look great with marmalade. I made cheese scones with a hint of mustard.
Valérie ( France )
Une bonne spécialité
Je te souhaite un excellent week-end
Valérie
Lorraine @ Not Quite Nigella
YAYYY mum! An Australian challenge! I wish I had the time to do this month’s as I love scones and Audax always does so well to do the challenges so quickly 🙂 Hehe yes we do call them scones here and we call cookies biscuits! 😛 xxx
Deb
I enjoy making both biscuits and scones and was delighted to read about the differences in the meanings of the words. I recently learned that scones can also have eggs as an ingredient. Thanks for sharing such an informative post about the delectable “biscuit”.
diane petty
They are also called scones in the UK and served traditionally with jam and cream/clotted cream.
Rock cakes are very different stemming from the 2nd World War when butter was rationed. Rock cakes contain no fat, but do have dried fruits,usually currants/sultanas and sugar. Very different from scones or biscuits in taste and texture. Rock cake, the name being realtive to the texture…….
Sanjeeta KK
I like the rugged look of the scone crust..lovely!
Ashley @ Kitchen Meets Girl
It looks like you’ve mastered these to me! I’m still trying to get it down. My husband LOVES biscuits and gravy, and fortunately for me, he’s not too picky–but maybe these are the answer to my biscuit woes! They look great.
marcellina
I too, didn’t realise the same name meant two different things! Isn’t that the best about Daring Bakers – learning from each other! I love your golden scones. They look so tasty!
Rocky Mountain Woman
Bisquick!
Just kidding….
I’ve also been trying to master buttermilk biscuits because my kids love them for Thanksgiving….
sandie
your pictures are great Barbara, they really make your biscuits look mouth- watering. Oh, and yes, I do live in Canada! My husband has an uncle (and cousins) who live in Ottowa. Such a beautiful city with great outdoor markets when the weather permits!
Best, Sandie
Mercedes
I just posted my DBC too! Your biscuits look so tender, flakey and delicious! Good work!
Katrina @ Warm Vanilla Sugar
These scones sound so yummy!
Deborah
I’ve tried several different biscuit recipes, and do have a few that are favorites. These do look delicious, though!
Vrinda
Beautifully baked scones..gr8 recipe…
zazacook
Your biscuits look so perfect !!!!! Lovely work on this challenge.
Kalyn
I’ve never made biscuits, but they are definitely one of my favorite things when I feel like indulging! This version looks especially good.
Kathia
It is such a delight to come to your blog, so many delicious treats. I love this recipe, I actually have some buttermilk at home that I need to use. Perfect timing.
Jenni
Beautiful job! Your biscuits look great, I think you have mastered them for sure! 🙂
Rosa
Those look wonderful and so soft!
Cheers,
Rosa
Eliana
Wish I was enjoying this biscuit right now as part of a hearty breakfast sandwich. With some scrambled eggs and some thick slab bacon. YUM!