
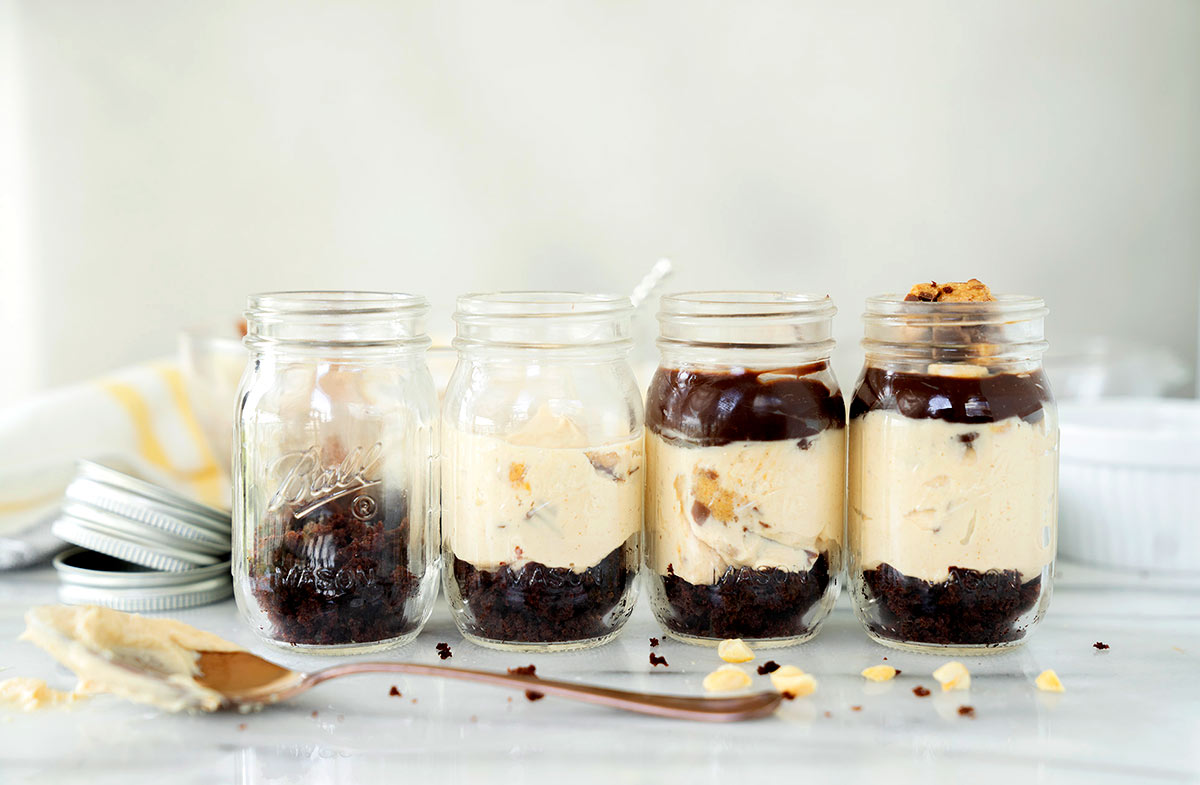
Chocolate Peanut Butter Cheesecake in a jar is a cute, creamy, and easy treat made for chocolate lovers. The no-bake cheesecake is smooth and creamy, with crunchy texture from chopped peanuts and Reese’s Peanut Butter Cups.
WANT TO SAVE THIS RECIPE?
Enter your email below and we’ll send it straight to your inbox. Plus you’ll get great new recipes from us every week!
Who doesn’t love cheesecake? Everyone in my family, from young to old, is always thrilled to hear that I’m serving cheesecake. They’re a fun twist on the expected cake for a birthday, or really any occasion.
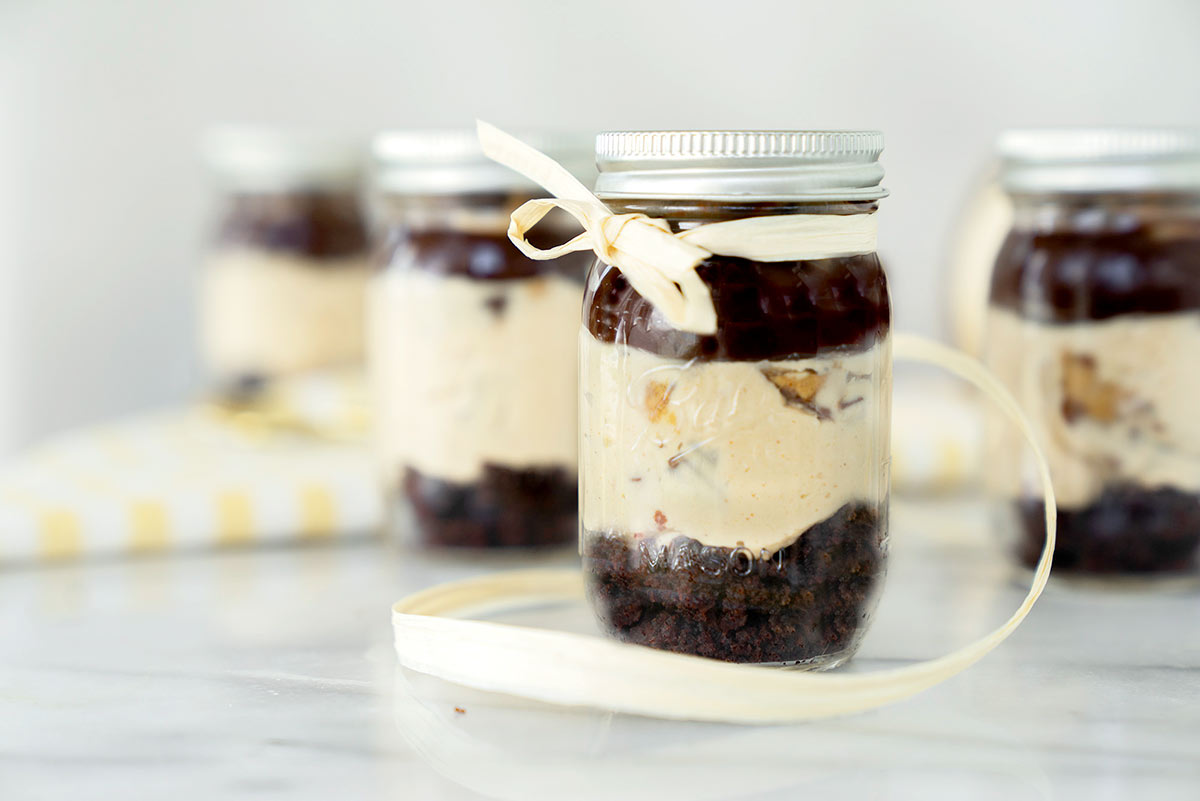
Add a mason jar, and you have not only a creamy dessert but also an adorable, easy to pack sweet treat that travels. I’ve been making cheesecakes in jars for a while because they’re so pretty to look at and fun to eat. My first mason jar cheesecake recipe is the crowd-favorite Strawberry Cheesecake in a Jar.
How To Make Peanut Butter Cheesecake in a Jar
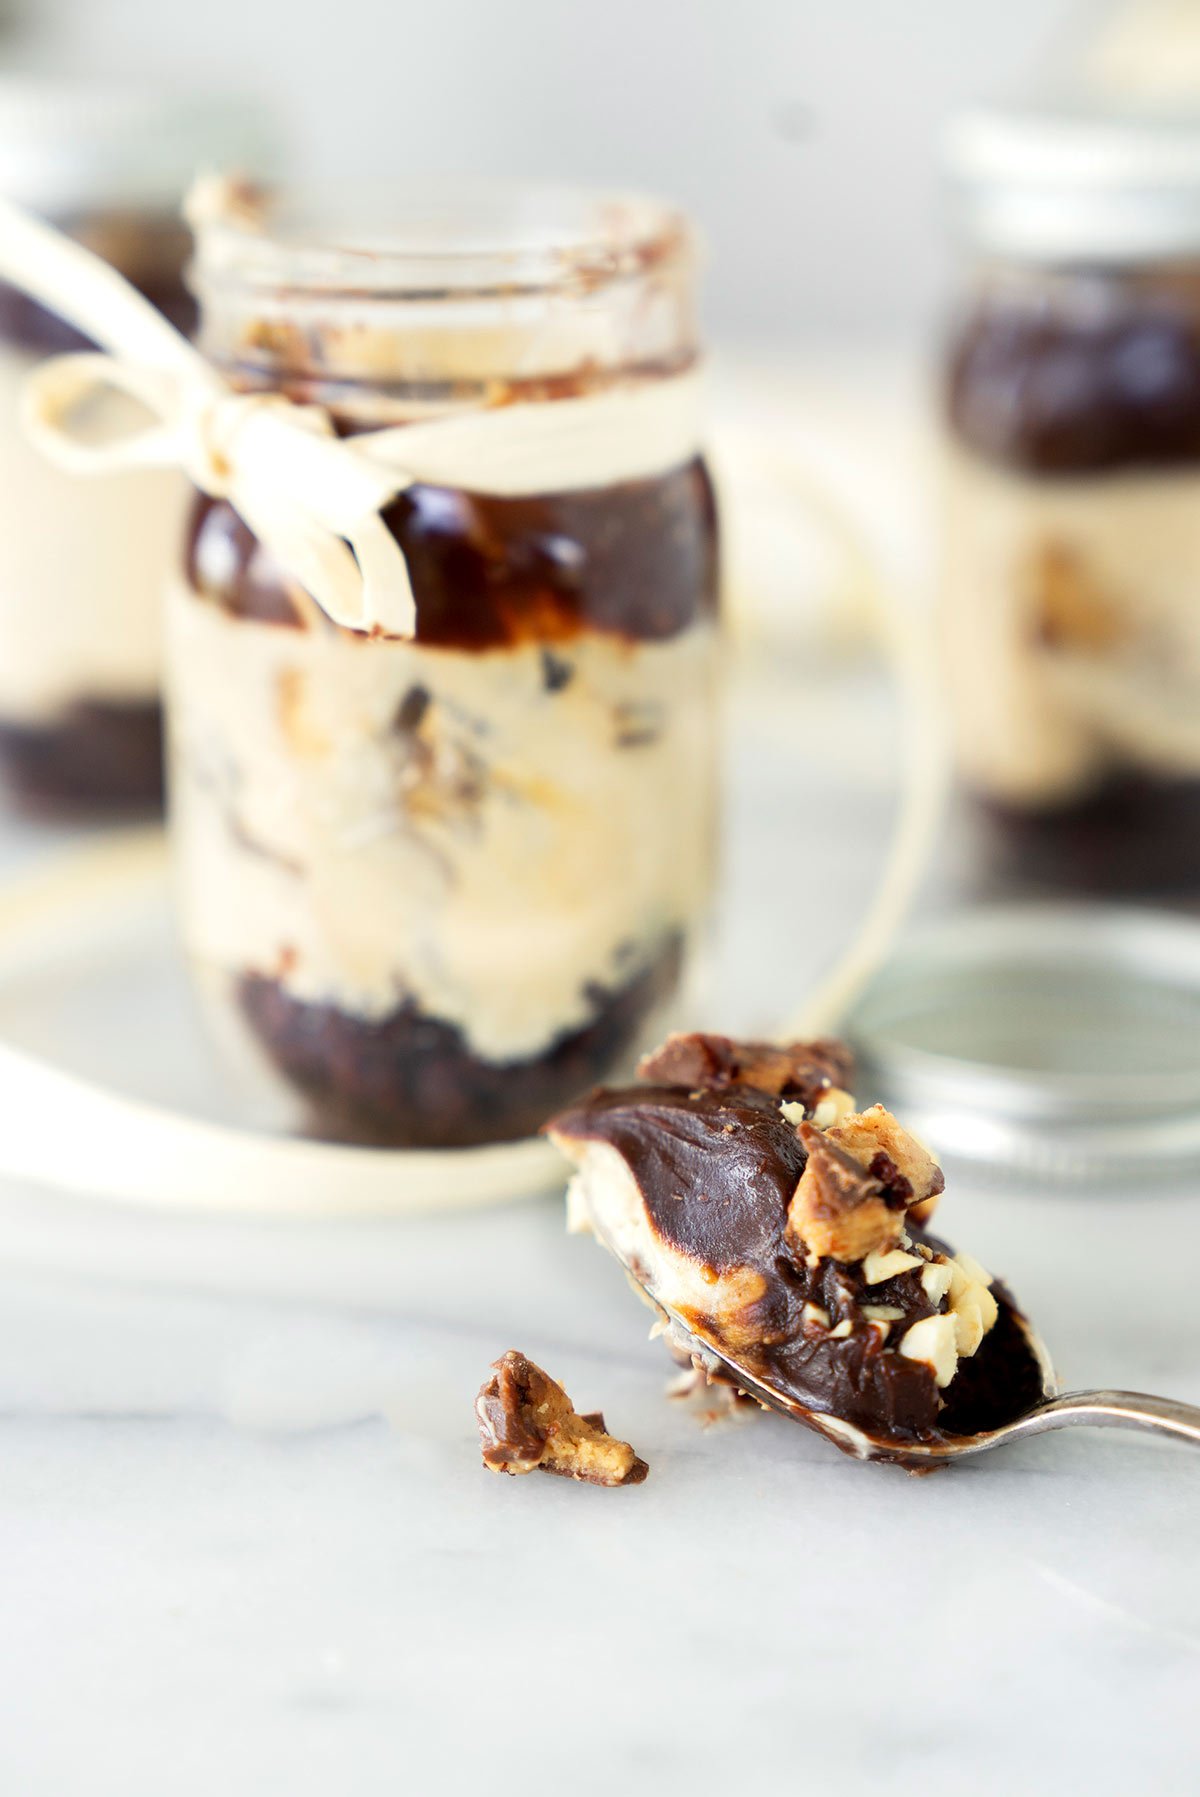
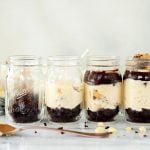
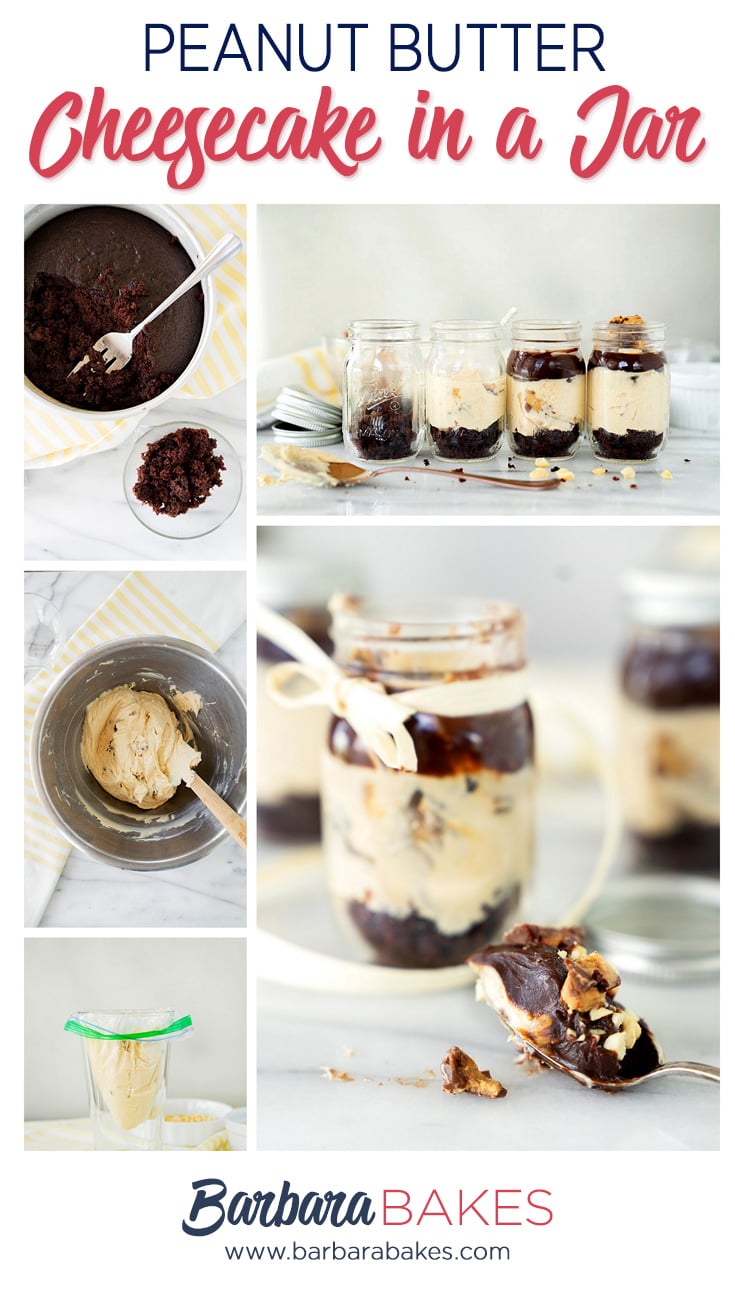
The key to a beautiful chocolate peanut butter cheesecake in a jar is layering. This recipe has three homemade layers plus crushed peanuts and Reese’s Peanut Butter Cups for added texture.
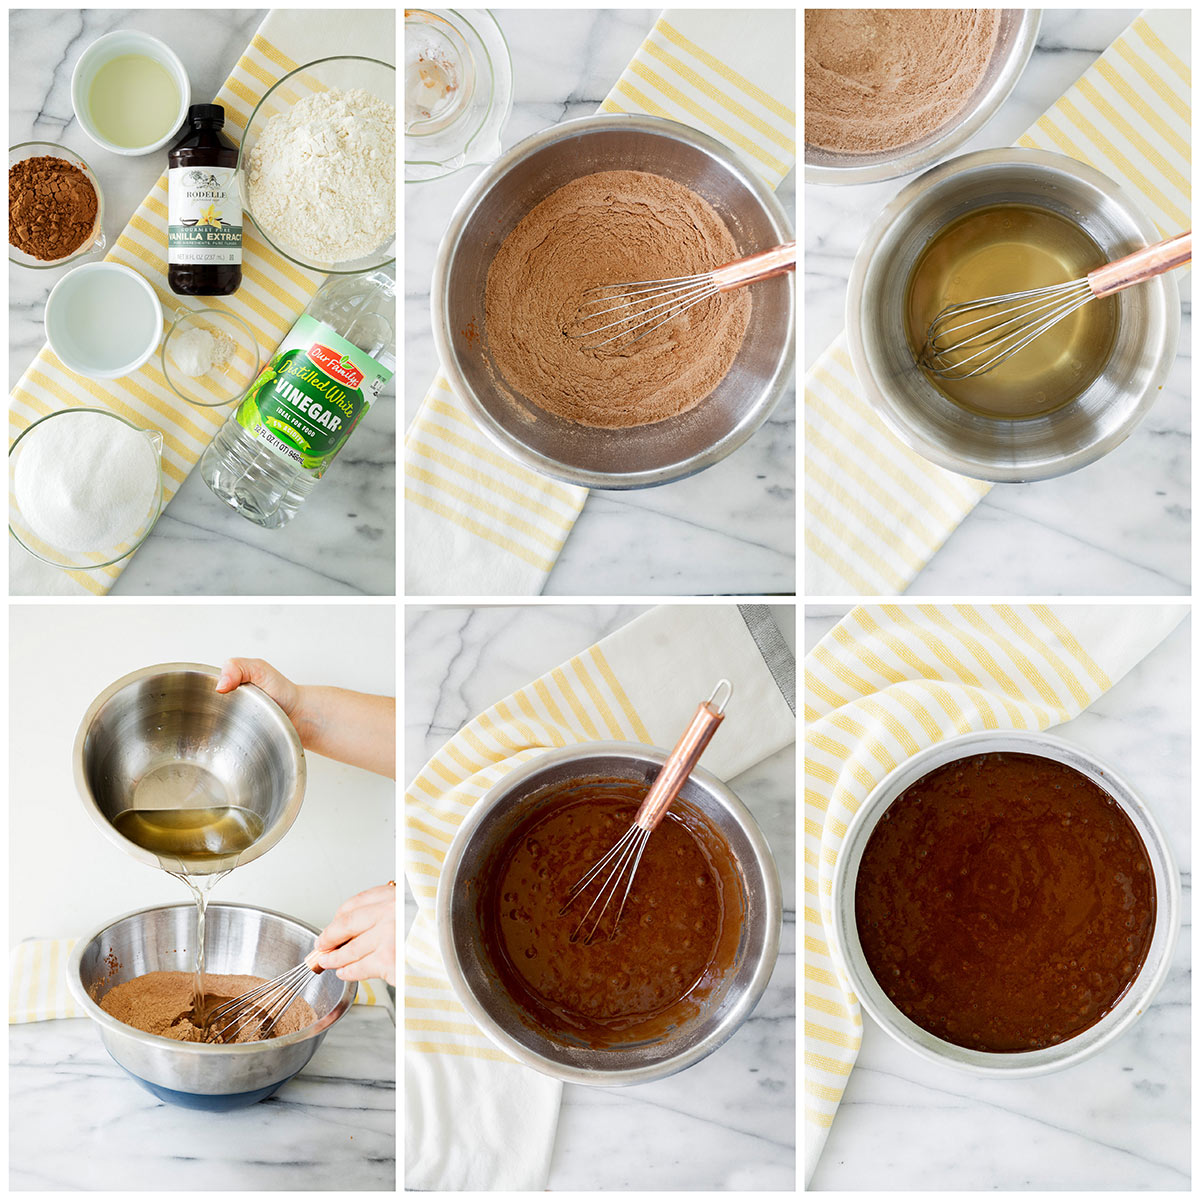
The first layer is a dense, chocolatey cake. Bake the cake in an 8- or 9-inch round cake pan. When it cools, crumble the cake up into crumbs with your hands or a fork.
If you have kids, this is a fun (and tasty) kitchen task that they’ll love to help with. You’ll loosely pack the cake crumbs into the bottom of the mason jars.
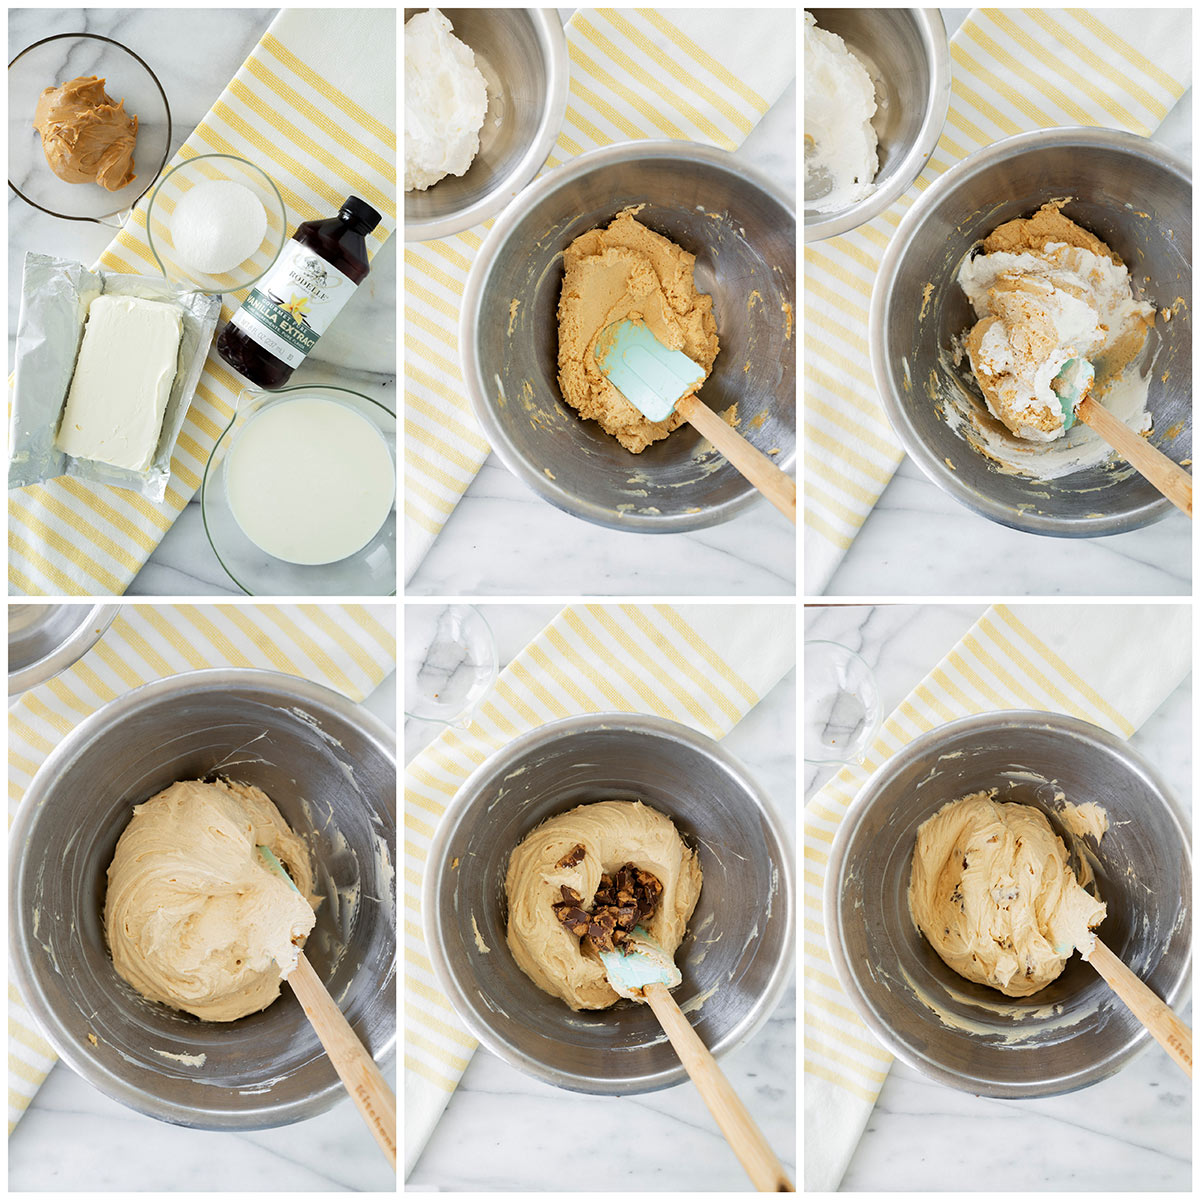
Next comes the no-bake peanut butter cheesecake. This cheesecake recipe is made with softened cream cheese, creamy peanut butter, and fluffy homemade whipped cream. It’s best to use well-chilled cream for the whipped cream.
Fold chopped Reese’s Peanut Butter Cups into the cheesecake filling, and there you have it: velvety no-bake peanut butter cheesecake filling to layer on top of the chocolate cake.
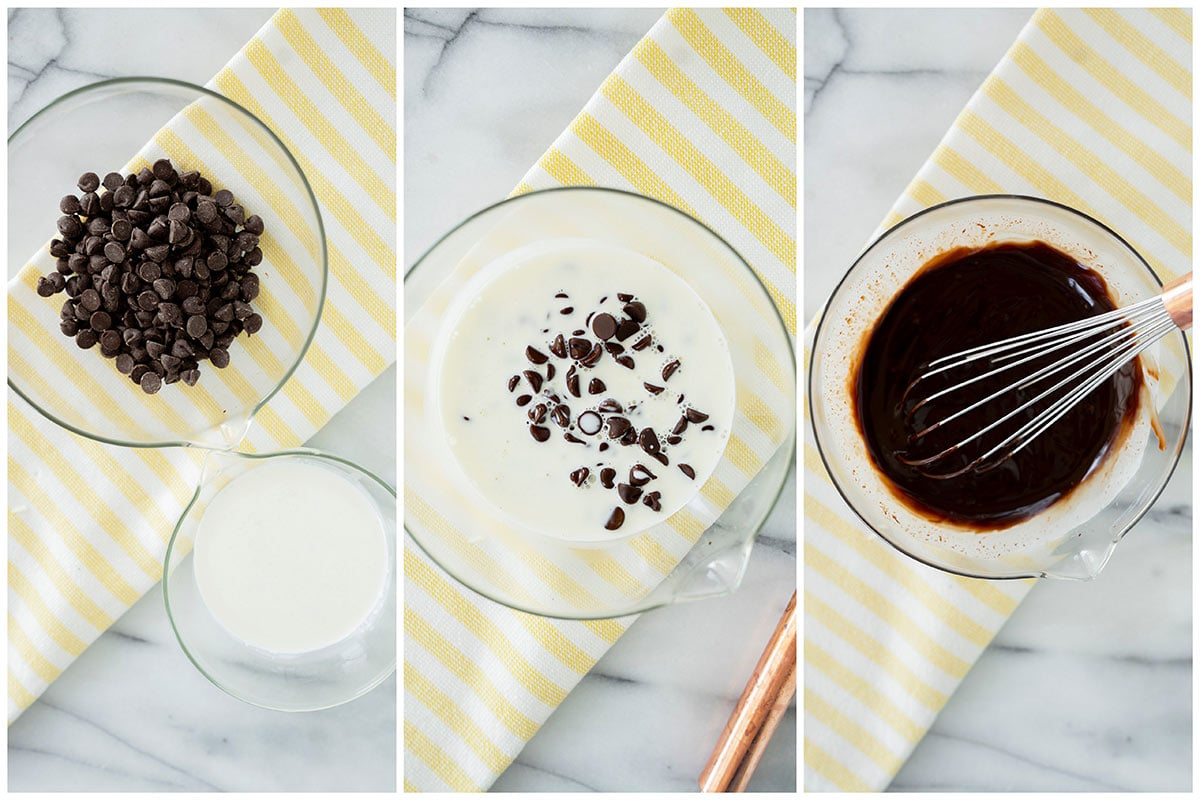
Finally, make a quick and easy homemade ganache to top off the cheesecake. This classic chocolate ganache recipe is made with semi-sweet chocolate chips and scalded heavy cream. After mixing, it thickens up in just a few minutes to become a shiny, pourable chocolate sauce.
And last but not least, a sprinkle of chopped peanuts and a few more chopped Reese’s Peanut Butter Cups for good measure make these peanut butter cheesecakes in jars a winning treat.
Of course if you prefer Reese’s pieces or have another favorite peanut butter candy, feel free to substitute.
Tricks for Neat Layering in a Mason Jar
Layering these eye-catching cheesecakes only looks like it takes a professional hand. It’s quite easy especially if you use a few useful tools you probably already have around the house.
It’s best to start with all of your layers at the ready. Assemble your chocolate cake crumbles, light and fluffy cheesecake filling, and pourable chocolate ganache, along with your mason jars.
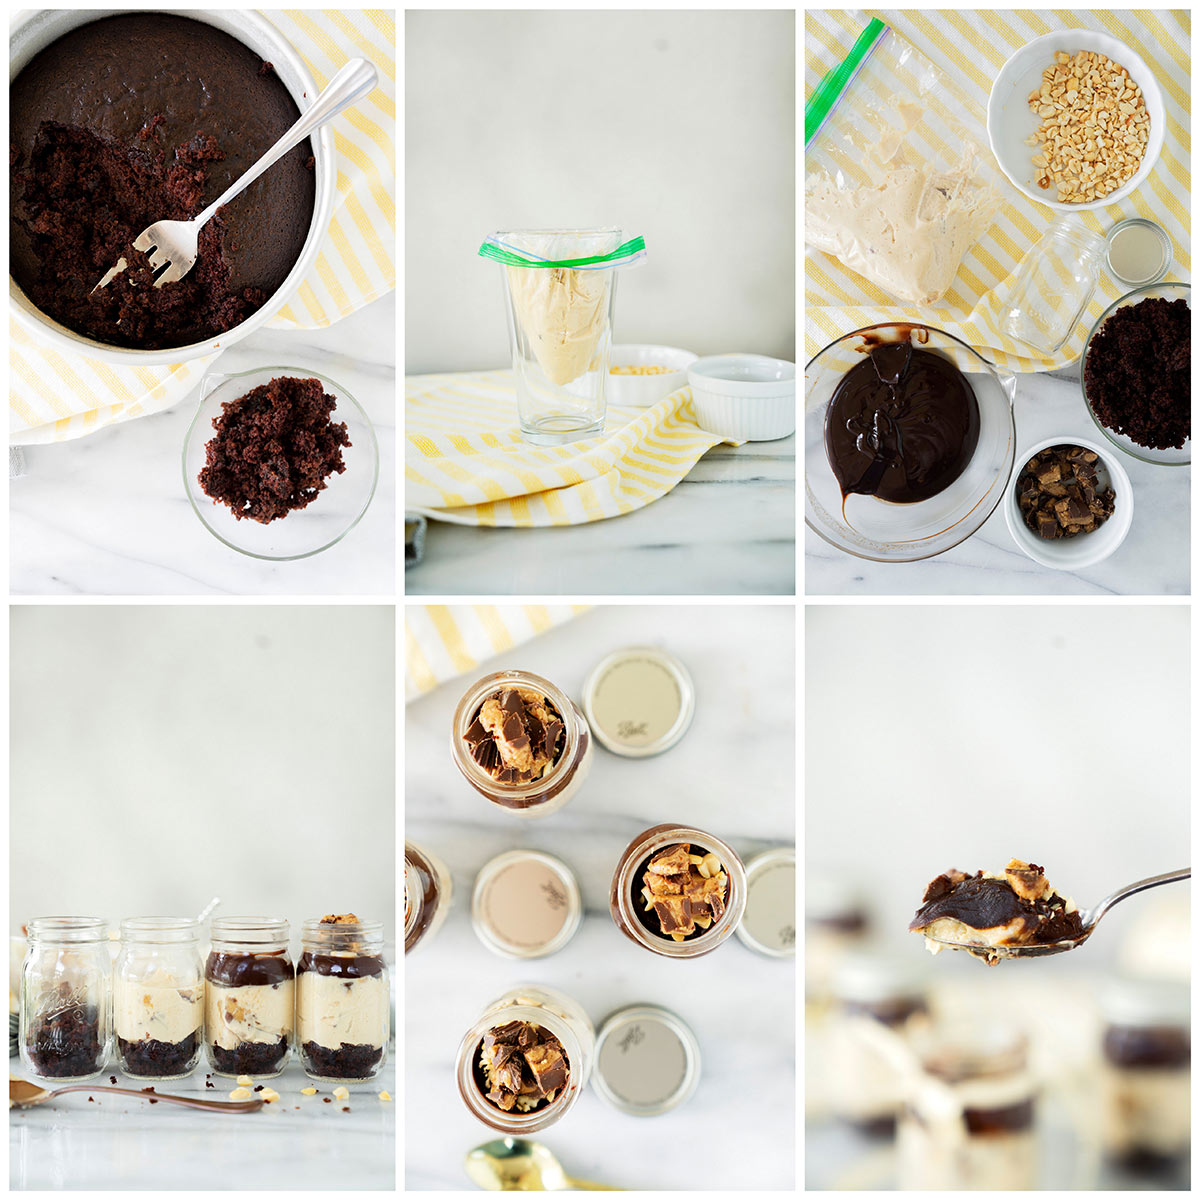
Start by filling the bottom of each jar with cake crumbles. Press them down a bit to form a cake layer on the bottom.
Next, make a simple pastry bag by filling a large Ziploc bag with the peanut butter cheesecake filling. Snip off one corner and carefully squeeze out the cheesecake filling to cover the cake in each jar. If necessary, use a small spoon to smooth the cheesecake flat.
If you get a few smudges on the sides of your jar, don’t worry. No one will notice, especially because they’ll be so thrilled to be digging into homemade cheesecake! But if you’re feeling especially neat, simply dampen a paper towel and use one corner to wipe off any smudges inside the jar.
The final layer is chocolate ganache. Use a small spoon to add a top layer of spoonable ganache to the cheesecake. Be sure to leave enough room at the top of the jar to fit your favorite peanut butter candies on top before screwing the lid on.
Making Cheesecakes in a Jar Ahead of Time
You can easily make these peanut butter cheesecakes ahead of time. If you’ll be enjoying the desserts the next day, simply layer each jar, tighten the lids on, and store in the fridge.
Any longer than a day or two, I would keep the layers separate until you’re ready to serve. Things might get soggy if left for too long in the jars. Store the cheesecake filling and ganache in the fridge for up to 3 days. You can keep the chocolate cake (whole or in crumbles) in an airtight container on the counter for up to 3 days.
If the ganache is kept in the fridge, you’ll want it to come to room temperature before you fill the jars. It can get too stiff to spoon when cold.
What Size Jar Should I Use for Cheesecake?
For these peanut butter cheesecakes, I use 8-ounce Ball mason jars. I filled 12 jars with this recipe, with a little leftover cake crumbles. You can easily use smaller or larger jars to feed more or fewer people.
How to Serve Peanut Butter Cheesecake in a Jar
Try to keep the jars in the fridge until just before serving. If you want to display them, then I would arrange the filled jars on a rimmed serving tray with ice.
These are a perfect dessert to make for a party. They’re easy to eat with just a spoon, no plate, or even table required! For big crowds, you can also make slightly smaller layered cheesecakes in smaller clear cups or jars.
Peanut Butter Cheesecake Jars are also kid favorites and fun for kids to help make, so be prepared for requests for more mason jar cheesecakes once your family tries these.
More Individual No-Bake Cheesecake Recipes
If you and your family are delighted by these creamy peanut butter cheesecakes in jars, then you’ll have to try these other cute and easy no-bake cheesecake recipes:
- Robin’s Egg Mini Cheesecakes feature favorite Easter candies as a topping, much like these peanut butter cheesecakes get their crunch from Reese’s.
- No-Bake Mini Lemon Cheesecake Bites are a finger food dessert that always bring a smile at celebrations with their sweet-tart lemon filling.
- Twix Cheesecake Bars from That Skinny Chick Can Bake are another dessert made for the candy, chocolate, and cheesecake lover.
- No-Bake Strawberry Margarita Cheesecake Bites are the ideal summer dessert: fruity, creamy, tangy, and refreshing.
WANT TO SAVE THIS RECIPE?
Enter your email below and we will send it straight to your inbox. Plus you will get great new recipes from us every week!
Peanut Butter Chocolate Cheesecake in a Jar
Equipment
Ingredients
Cake
- 1 ½ cups all-purpose flour
- 1 cup sugar
- ¼ cup unsweetened cocoa powder
- 1 teaspoon baking soda
- ½ teaspoon salt
- 1 cup hot water
- ⅓ cup vegetable oil
- 1 tablespoon distilled white vinegar
- ½ tablespoon vanilla extract
Cheesecake Filling
- 1 ½ cups heavy cream chilled
- 1 package 8-oz cream cheese, softened
- ¾ cup creamy peanut butter
- ¼ cup sugar
- 1 teaspoon vanilla extract
- 5 standard size Reese’s Peanut Butter Cups finely chopped
Ganache
- 1 cup semi-sweet chocolate chips
- ½ cup heavy cream
- Garnish
- 5 standard size Reese’s Peanut Butter Cups finely chopped
- handful of chopped peanuts for garnish
Instructions
CAKE:
- Preheat the oven to 350°F. Grease and flour an 8- or 9-inch cake pan.
- In large mixing bowl, whisk together flour, sugar, cocoa powder, baking soda, and salt.
- In medium bowl, whisk together hot water, oil, vinegar, and vanilla.
- Pour the liquid mixture into the dry ingredients and whisk together until well blended.
- Pour the batter into the cake pan and bake until a toothpick inserted in the center comes out clean, about 30-35 minutes.
- Let the cake cool completely on a wire rack.
- Once completely cooled, crumble the cake with your fingers or a fork and place in a bowl for assembly.
PEANUT BUTTER CHEESECAKE FILLING:
- In the bowl of a stand mixer, beat heavy cream until soft peaks form.
- In a large mixing bowl, combine the cream cheese, peanut butter, sugar, and vanilla until blended and smooth.
- Gently fold the whipped cream into the peanut butter mixture until no white streaks remain and your mixture is fully combined and a uniform light brown color.
- Gently fold in the chopped Reese’s Peanut Butter Cups. (The rest will be for sprinkling on top when assembling)
GANACHE:
- Place the chocolate in a small bowl. Heat the cream in a small saucepan to just about boiling, but not boiling.
- Pour the hot cream over the chocolate and let it sit for 1 minute undisturbed.
- Begin stirring the mixture with a spatula, starting in the center and making small circular motions. Continue stirring towards the outer edges of the bowl. Stir until a thick ganache forms and the mixture is fully combined. Cool until ganache is thickened and pourable/spoonable.
ASSEMBLY:
- Line up your jars (or cups).
- Have all your ingredients ready to go.
- Layer jars as follows: cake crumbles, peanut butter cheesecake filling, ganache, crushed peanuts, and chopped Reeses’s peanut butter candies.
- Start by adding the cake crumbles to the bottom of each jar.
- Next, add peanut butter cheesecake filling. Fill a Ziploc sandwich bag with the peanut butter filling and cut one corner off. Squeeze in the filling on top of the cake crumbles then use a spoon to press the mixture down as evenly as possible.
- If the inside sides of the jar get a little messy, this is fine. However, if it bothers you, dampen a very small piece of paper towel, wrap it around your finger, and wipe the inside of the jar as best you can.
- Next, add the ganache with a small narrow spoon. The ganache should stay below the narrower top of the jar. This will ensure you have room for crushed peanuts and candies before twisting the lids on.
- Sprinkle on your crushed peanuts and chopped Reeses’s candies.
- Twist on the lids. Refrigerate until ready to serve.
Pin It:

Eileen Kiess
Can I use store bought whipped topping like dream whip instead of making whipped cream from scratch?
Barbara Schieving
Hi Eileen – no, I wouldn’t recommend it. Store bought whipped toppings often deflate when stirred, is already sweetened, and has other ingredients in it.
Darlene
Can you freeze these by any chance?
Barbara Schieving
Hi Darlene – I haven’t tried it, but they should freeze well up to 3 months. Thaw in the refrigerator overnight before serving.
Carol
Ohhhhh Barbara, this could get me into a WHOLE lot of trouble. Peanut butter and chocolate is a favorite combo around here. I love these little cheesecakes in a jar…I call them “portion control”. : )