
Learn how to make a layer cake like a pro baker with essential tips for perfectly even layers, smooth frosting techniques, and simple decorating tricks that transform ordinary cake layers into spectacular desserts anyone can create at home.
WANT TO SAVE THIS RECIPE?
Enter your email below and we’ll send it straight to your inbox. Plus you’ll get great new recipes from us every week!
This guide will share foolproof baking tips and techniques for creating stunning layer cakes at home!
From properly preparing pans and achieving perfectly even layers to mastering smooth frosting application and decorating like a pro, this comprehensive guide shares professional secrets for baking, assembling, and serving beautiful layer cakes that taste as amazing as they look.
Jump to:
My Favorite Layer Cakes
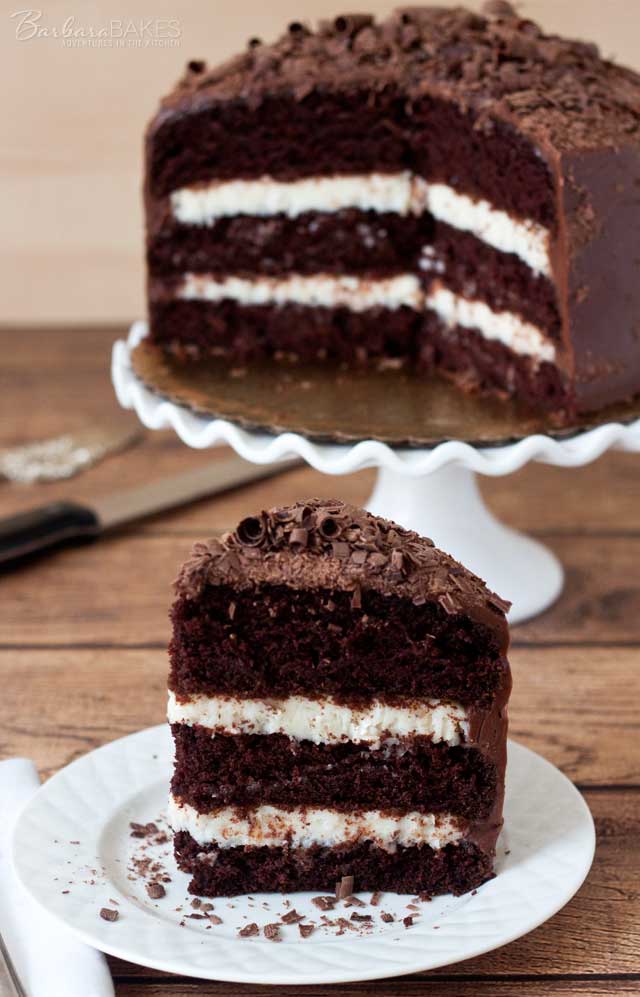
Here are my very favorite layer cakes, complete with recipes for the cakes and frosting. Grab one of the recipes (or all 3!) and keep reading for the tips that will make your cake just as beautiful!
- Triple Layer Chocolate Cake with a Coconut Cream Cheese Filling
- Strawberry Cake
- Chocolate Cheesecake Cake
Foolproof Guide For How To Make A Layer Cake
Whether you’re baking for a birthday, celebration, or just because you’re craving something sweet, these tips will help you create a bakery-worthy cake that tastes as good as it looks!
Preparation Essentials
Before you dive into mixing your batter, proper preparation will set you up for success:
Get your ingredients ready: Make sure everything is at room temperature before you begin. This helps ingredients incorporate more evenly and creates a better texture in your finished cake.
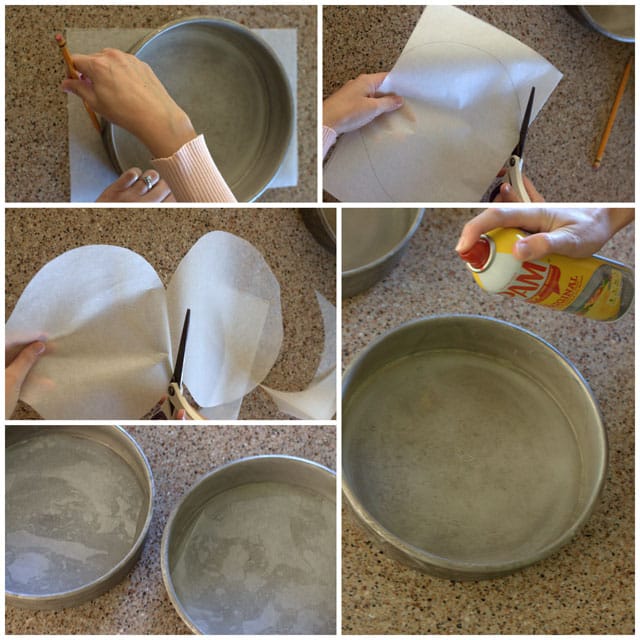
Prepare your pans properly: This might seem like a small detail, but it makes a world of difference! Use your cake pans to trace circles onto parchment paper, then cut them out to fit perfectly in the bottom of each pan. Spray both the bottom and sides of your pans with nonstick spray, then place the parchment inside. This two-step process ensures your cakes will release cleanly every time.
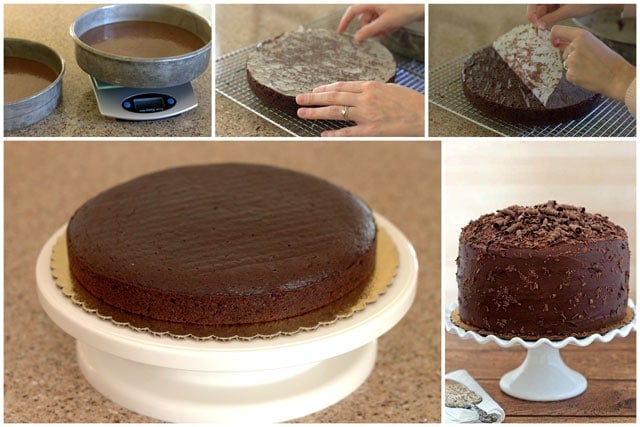
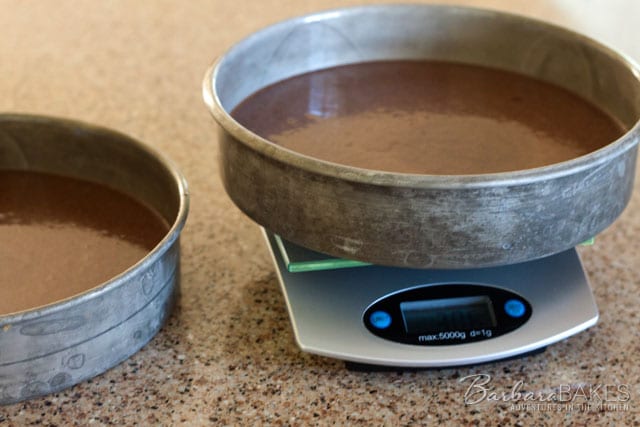
Weigh your batter: For perfectly even layers, use a digital kitchen scale to divide your batter equally between pans. No more guessing and ending up with one thick layer and one thin one!
The Baking Process
Knowing when your cake is done takes a bit of practice, but there are clear signs to watch for:
- The cake will begin to pull away from the sides of the pan when it’s done. When you gently touch the middle, it should feel firm but bounce back slightly under your finger.
- A pro tip I’ve learned over the years: stay in the kitchen while your cakes are baking. With practice, you’ll actually be able to smell when they’re perfectly done! It’s one of those baking secrets that isn’t in any recipe.
Cooling and Removing From Pans
This is where many beginners run into trouble, but with the right technique, you’ll never leave half your cake stuck in the pan again:
- Let your cakes cool on a wire rack for about 10 minutes after taking them out of the oven.
- If the edges haven’t already pulled away, gently loosen them with a butter knife or thin spatula.
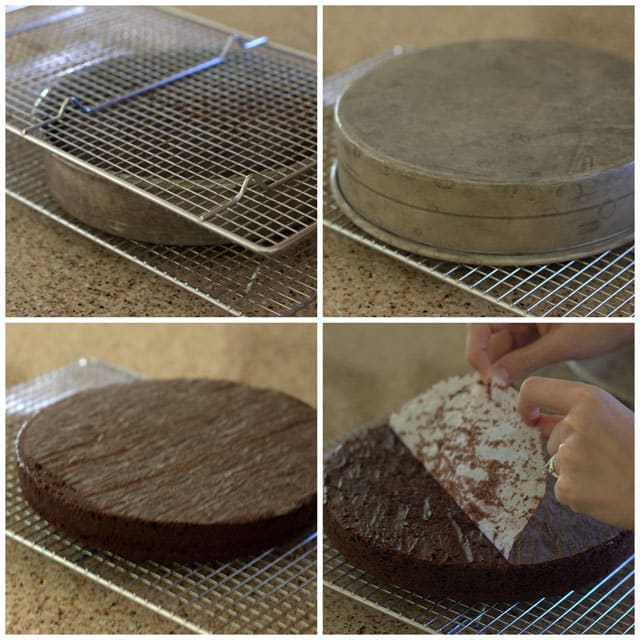
- Place a cooling rack upside down on top of the cake pan, then using two hot pads, grab both the rack and pan together and flip them over in one smooth motion. Your cake should fall right onto the rack.
- If your cake is stubborn and doesn’t release, flip everything back over and use your thin spatula to gently lift any stuck areas.
- Your cake will now be upside down. Carefully peel off the parchment paper, place another cooling rack on top, and gently flip it right-side up.
Make-Ahead Options
One of my favorite tricks is freezing cake layers before decorating them. They’re firmer and much easier to work with, plus you can make them 2-3 weeks in advance—perfect for planning ahead for special occasions!
To freeze properly:
- Cool your cakes completely on the rack.
- I like to put the removed parchment paper back on top of the cake and flip it again so it doesn’t stick to the wire rack.
- Freeze the layers uncovered on the wire rack until solid.
- Once frozen, wrap tightly in plastic wrap to store.
When you’re ready to decorate, you don’t need to thaw the layers first — they’re actually easier to work with while still frozen and will thaw quickly as you decorate.
However, if you’re using buttercream frosting, you should thaw the layers first. As a professional baker once told me, “If you frost frozen cakes with buttercream, the icing will crack as the cake thaws and expands.”

Frosting Techniques
For that perfectly smooth, professional-looking frosting:
Start with a crumb coat: Apply a quick, thin layer of frosting to lock in any loose crumbs. This creates a clean canvas for your final frosting layer. After applying the crumb coat, refrigerate the cake for about 30 minutes until the frosting feels set to the touch.
Perfect your technique: When applying the final coat, start on top with a generous blob of frosting. Gently push the frosting in a circle in one direction (not back and forth), smoothing as you go. Then add more frosting and push it over the sides.
Keep it clean: Work with a clean spatula by wiping it off with a paper towel regularly. An offset spatula and a revolving cake stand make this process much easier!
Prevent oozing fillings: Make sure your filling is thick enough so it won’t squeeze out. Spread it almost to the edge, then gently press the next layer on top. If any filling escapes, use a dry spatula to remove the excess or gently push it back where it belongs.
Decorating Your Masterpiece
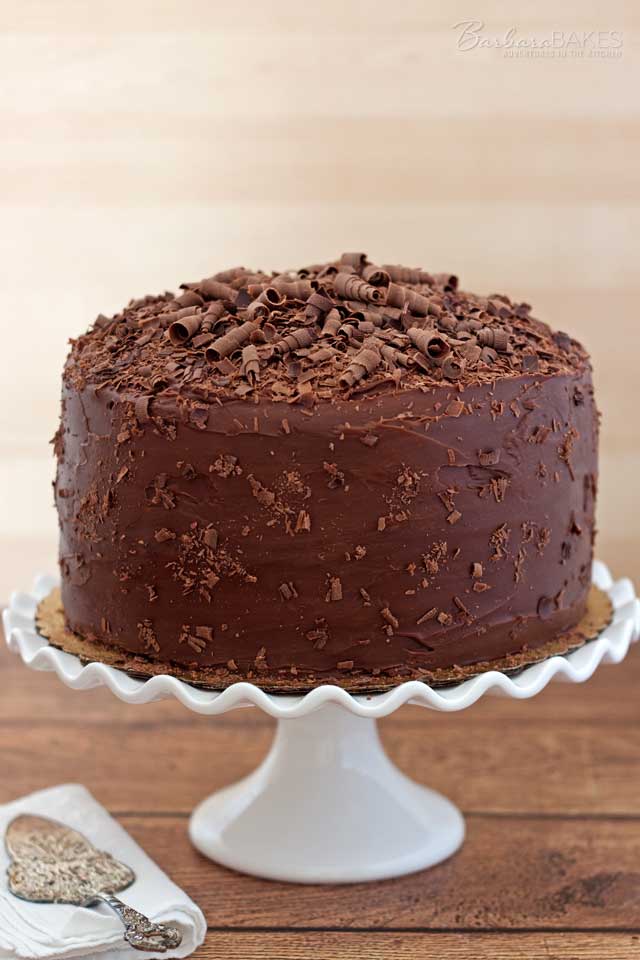
Timing is everything when adding decorations to your cake. Apply them while the frosting is still wet so they’ll stick properly. If your frosting starts to dry before you finish decorating, you can usually wipe away a little frosting to make it sticky again.
Storing Your Creation
Whether your finished cake needs refrigeration depends on your filling:
- Cakes with cream cheese fillings, puddings, or other perishable fillings should be refrigerated until about 30 minutes before serving.
- Cakes with shelf-stable fillings can be stored at room temperature under a cake dome.
Serving Your Layer Cake
For beautiful, clean slices:
- Always clean your knife between cuts.
- Warm the knife under hot water before each slice.
- Dry the knife, cut, then rinse and repeat for each slice.
These simple steps prevent frosting and cake from building up on the knife and give you picture-perfect portions every time.
Cake Baking Tools
These are the tools I use over and over again, every single time I make cake — be it multiple layers or just one!
- Round Cake Pans: 8-inch and 9-inch are the ones I use the most.
- Offset Spatulas: Get a small one and a larger one for different frosting needs.
- Revolving Cake Stand: A luxury that makes frosting round cakes much easier!
- Cake Rounds: Coated cardboard bases that make transferring cake layers less stressful. (Ask me how I know!)
- Wire Cooling Racks: Quicken cake cooling with these multipurpose racks.
- Digital Food Scale: This makes it so much easier to get the same amount of batter in each cake pan.
- Parchment Paper: Use the uncut multipurpose rolls to cut your own rounds or get the conveniently pre-sized and cut rounds for your pan sizes — 8-inch and 9-inch.
Happy Baking!
Layer cakes might seem intimidating at first, but with these tips and a little practice, you’ll be creating stunning, delicious cakes that would make any professional baker proud.
Like any worthwhile kitchen skill, each cake you make will be better than the last as you develop your own tricks and techniques.
Whether you’re baking a chocolate layer cake with coconut cream cheese filling, a special birthday cake for someone you love, or experimenting with new flavor combinations, these foundational techniques will help you create a cake that’s as beautiful as it is delicious.

mariam
Thanx a lot for such valuable experiences. I really admire them. They would help me a lot.
Valeria
Hi I have a question. Is the cake dry after freezing It?
Barbara Schieving
Hi Valeria – no, as long as you don’t over cook it, it won’t be dry.
Bee Gianni
Love your name, love your cakes and thanks for the tips. I’m sure I’ll use them often.
Shelley
Thank you for the tips especially on the frosting part that’s where I was having the most trouble
Barbara Schieving
Thanks Shelly for taking the time to let me know the post was helpful! 🙂
Assunta
Very helpful tips but I was wondering if you could give me any tips on how to make the cakes rise level, so that they are flat and not domed? Thanks in advance.
Pam S
I use a product called Magic Cake Strips. They are strips that you soak in water and then wrap around your cake pans before baking. They work by slowing the baking process around the edges of the cake so that it bakes more evenly and rises evenly as well. Alternatively, you can always use a long serrated knife to trim off the dome, but I always hate doing that because the crumbs make frosting the cake harder. I’ve been using the cake strips for about 40 years and strongly recommend them for best results. You can find them at most stores that sell cake decorating supplies.
Irma Calderon
Do you freezze the decorated layer cake for transportation?
Do you have any tips for that?
Barbara Schieving
Hi Irma – I’ve never frozen the decorated layer cake for transportation. If I’m going to transport it, I’ll buy a bakery box so it fits perfectly and is easy to carry. How far do you have to transport it?
Sarah Anderson
The parchment paper is a really smart idea. This way your cake doesn’t get stuck to the pan on the bottom, so if it gets stuck at all, it’s only on the sides where you can cut it away without ruining it.
Barbara Schieving
Thanks Sarah – I really does make it easier 🙂
Kathleen Richardson
Going to add this post to my Pinterest Board on cakes. Good suggestions. I always make my layers a week or two ahead and freeze. Cuts down on work at the last minute. Thought I was through making cakes for the grandsons and turned it over to my daughter two years ago. Somehow I’ve ended up in charge again this year. Today was the younger’s 9th birthday and his cake was five layers of varying sizes, each cut in half horizontally for ten layers total. One thing I learned was that when putting buttercream icing and preserves (or jam/jelly) between layers, it’s best to put the buttercream on first. Seems to spread better.
Barbara Schieving
Thanks Kathleen – 10 layers, that’s impressive. Thanks for sharing your tips.
Savannah
I’m going to attempt to make my kids’ birthday cakes this year. I’m seriously having anxiety about it! I’ve never baked a cake that mattered what it looked like before! I’ve been reading TONS of baking blogs to help teach myself how to do this. In all of my reading, I have to say that I found this post to be the most helpful of all of the stuff that I’ve read! It’s complete and, most importantly, helpful!! Thank you so much for the incite!
Barbara Schieving
Thanks so much Savannah! The more you do it, the easier it gets. You got this 🙂
Trinaka
This is so great, thank you!! I’m making my daughter a birthday cake again this year and usually I make them the night before the party and I always feel a little stressed trying to get the cake and cupcakes done. I really like the idea of being able to freeze the cakes ahead of time so all of my time the night before can be put towards decorating it. This might be a silly question, but will the moistness of the cake be the same, even if I freeze it a couple weeks ahead of time? Thank you so much!! 🙂
Barbara Schieving
Thanks Trinaka – I haven’t noticed any change in the moistness of the cakes.
Letty / Letty's Kitchen
What a helpful post of important tips. You and your daughter put in a lot of effort and it shows!
Barbara Schieving
Thanks so much Letty – that’s a great compliment coming from a former pastry chef 🙂
Foodiewife
Those are all great tips, Barbara. My little tip that is a big help: I buy pre-cut round parchment liners (King Arthur Flour). It’s so worth it! I’ve love baking cakes, but I need to wait until I have company– or I’d eat the whole thing by myself!
Barbara Schieving
Thanks Debby – You’re right – I need to buy some of those pre-cut rounds.
Lorraine @ Not Quite Nigella
Great tips mum!! 😀 I love layer cakes so much and you’ve given me a great tip about freezing them to make them easier to place and move! 😀 xxx
Nagi@RecipeTinEats
Thank you for the tips you’ve given, Barbara! Your cake looks amazing! I wish mine would look this good too!
Rocky Mountain Woman
I needed this one! My cakes never look “quite” right. Thanks, Barbara!
Blue
As I’m a bit of a senior, I knew a fair bit about cakes and cake decorating before I read this post, but delighted that I kept reading as I picked up some very helpful tips. Thanks for sharing your amazing knowledge.
Barbara Schieving
Thanks Blue – that’s so nice.
Annalise @ Completely Delicious
Great tips! I have always thought you shouldn’t frost a frozen cake because it will make the frosting weep as it thaws. But I think freezing the cakes first before wrapping must prevent that somehow. (I always wrap then freeze) Anyway, glad to have learned something! Thanks Barbara!
Melissa @ My Recent Favorite books
Thanks for the tips!
Kristin Bergthold
These are really great tips! Thank you for taking the time to put this together.
Carol
What a fantastic post, Barbara. I’ll confess, I don’t make many cakes…probably because I don’t have great success with them. I shouldn’t have a reason not to try again after this post.
Thanks so much to you and to your daughter too! 🙂