
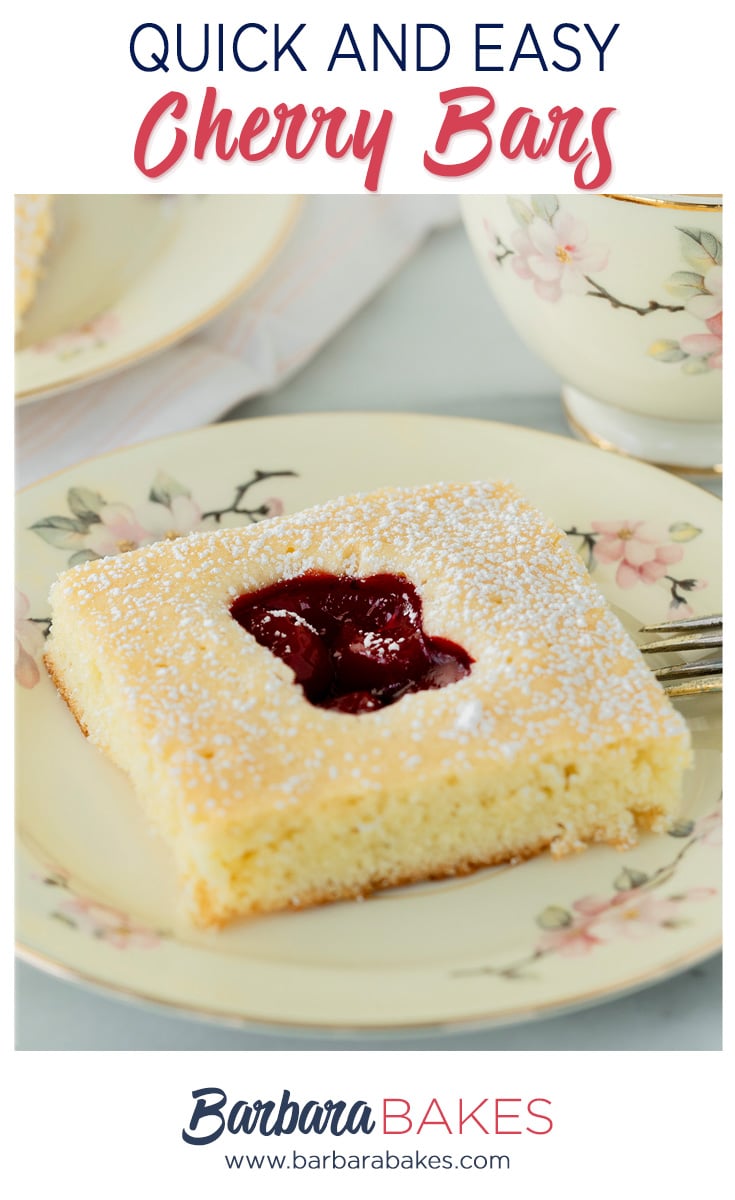
Make delicious Cherry Pie Bars with canned pie filling in under an hour! These easy fruit squares deliver all the flavor of homemade pie without rolling dough. Perfect for potlucks and dessert trays!

WANT TO SAVE THIS RECIPE?
Enter your email below and we’ll send it straight to your inbox. Plus you’ll get great new recipes from us every week!
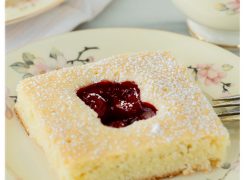
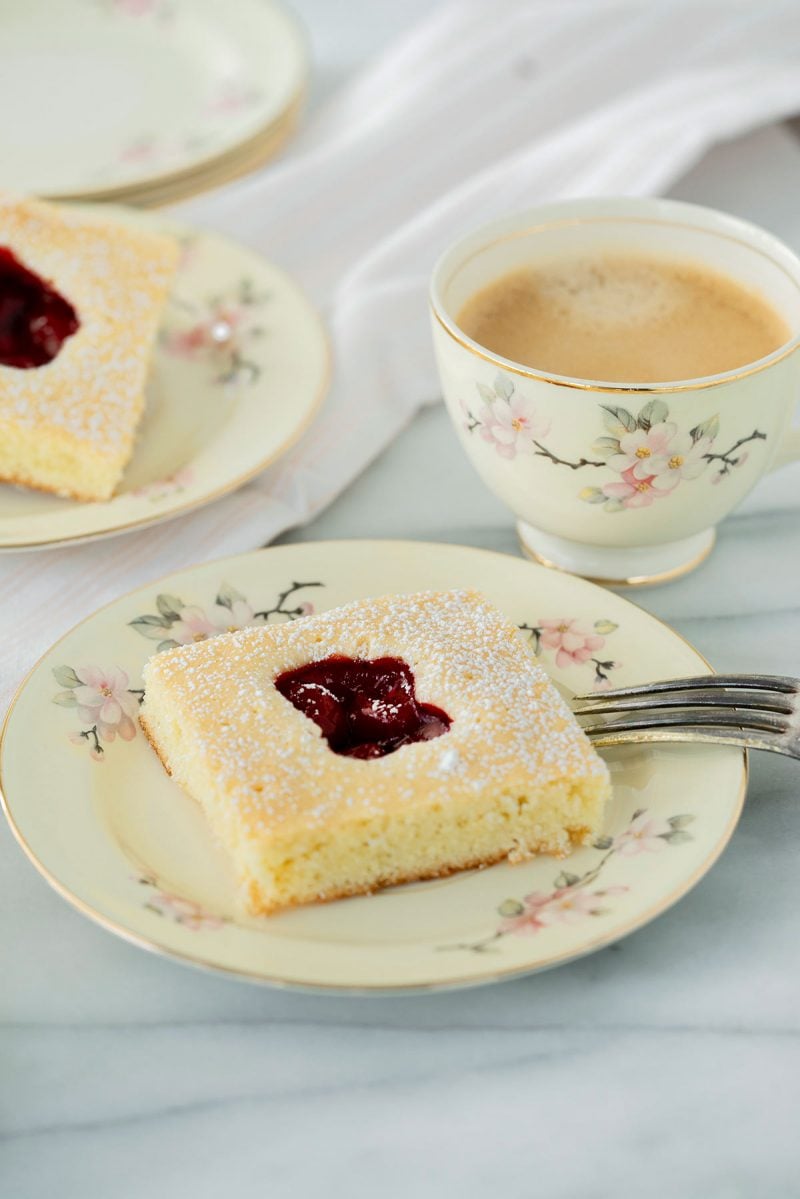
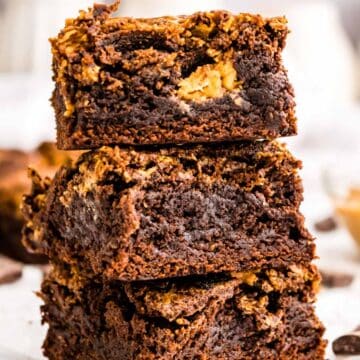
This is a fantastic dessert recipe. It’s a not-too-sweet bar cookie that is incredibly easy to make. The cookie batter puffs up around the pie filling during baking for a beautiful almost stained-glass look.
Why You’ll Love This Cherry Pie Bars Recipe
Sheet Pan Easy: Bake an entire batch at once in a single pan, making these fruit squares ideal for feeding a crowd without the fuss of individual portions.
Minimal Ingredients: Just seven simple ingredients create these impressive cherry bars—no specialty items or complicated techniques required.
Make-Ahead Friendly: These bars taste even better the next day, making them perfect for busy schedules and advance party prep.
Versatile Dessert: Serve them for breakfast, brunch, dessert, or pack them in lunchboxes—these fruit squares work for any occasion.
Crowd-Pleaser Guaranteed: The classic combination of buttery vanilla dough and sweet cherry filling appeals to kids and adults alike.
Recipe Ingredients
- Butter
- Granulated sugar
- Eggs
- Vanilla extract
- All-purpose flour
- Salt
- Cherry pie filling (I used Lucky Leaf Premium Cherry)
See the recipe card below for full information on ingredients and quantities.
WANT TO SAVE THIS RECIPE?
Enter your email below and we will send it straight to your inbox. Plus you will get great new recipes from us every week!
Homemade Cherry Pie Bars Recipe
Equipment
- Stainless Steel Measuring Spoons
- Stainless-Steel Mixing Bowl Set, White
Ingredients
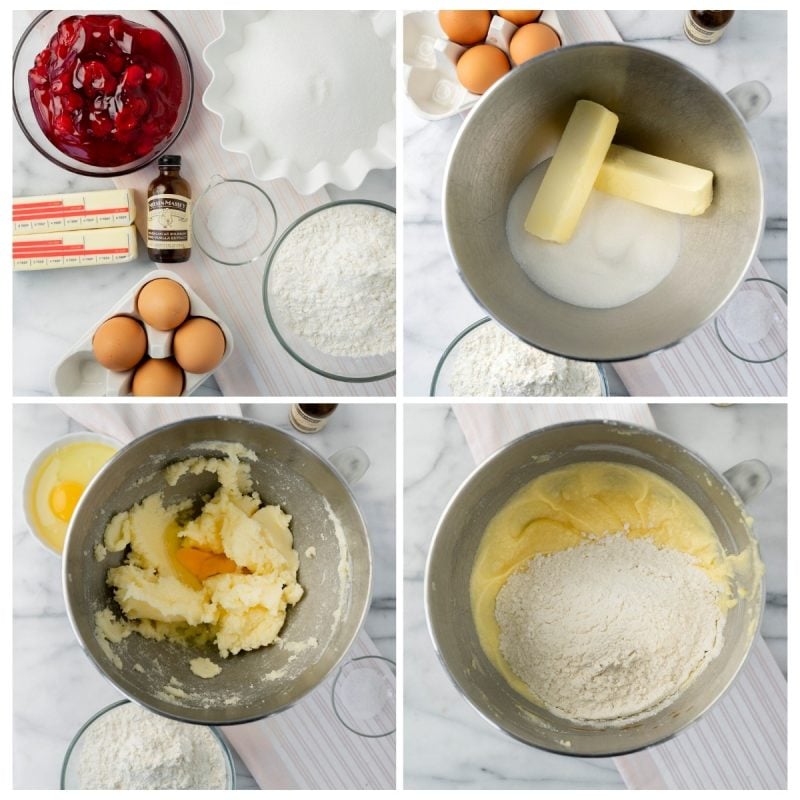
- 8 ounces butter room temperature
- 1 ½ cups granulated sugar
- 4 large eggs
- 2 teaspoons vanilla extract
- 2 cups all-purpose flour
- 1 teaspoon salt
- 1 can cherry pie filling (I used Lucky Leaf Premium Cherry.)
Instructions
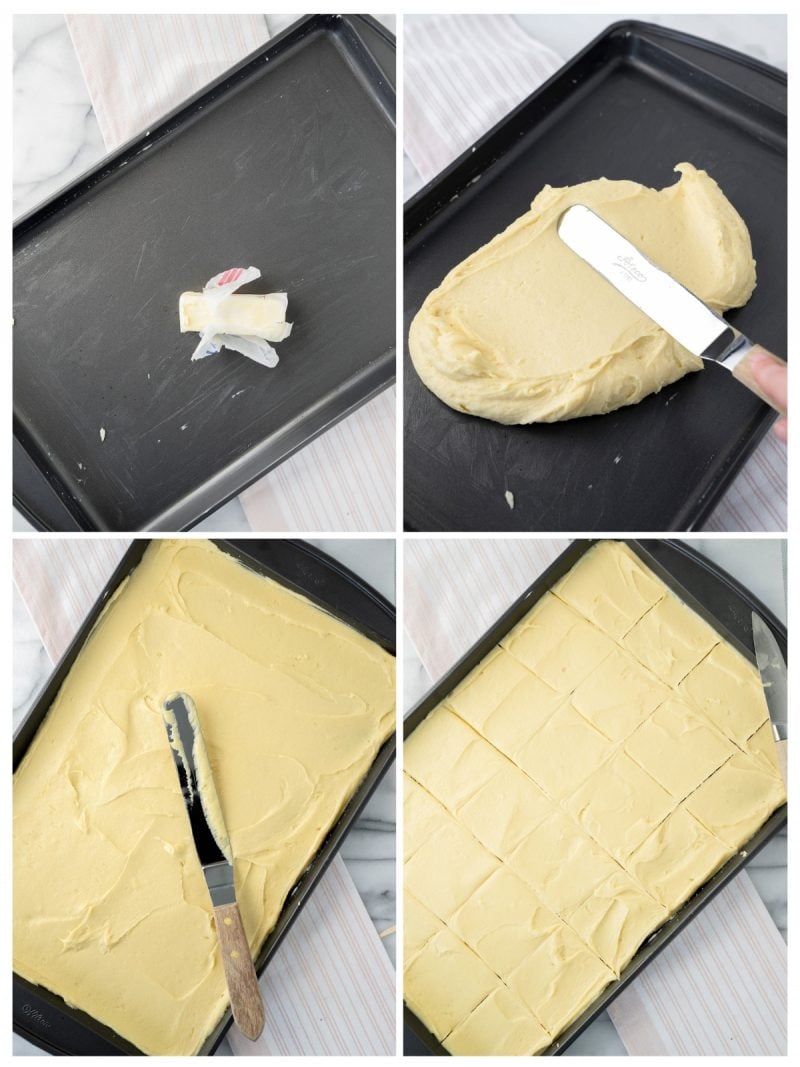
- Preheat the oven to 350º F. Butter a 17"x12"x1" sheet cake pan.
- In an electric mixer, cream the butter and sugar until light and fluffy. Add the eggs one at a time and mix just until blended. Add the vanilla.8 ounces butter, 1 ½ cups granulated sugar, 4 large eggs, 2 teaspoons vanilla extract
- In a separate bowl, whisk the flour and salt together. Stir the dry ingredients into the creamed mixture just until blended. Spread the batter into the prepared pan.2 cups all-purpose flour, 1 teaspoon salt
- Mark the batter into 24 squares by pressing lightly with a sharp knife. Spoon 1 tablespoon of fruit filling into the center of each square. Do not press the filling into the batter (the batter will puff up around the filling as it bakes).1 can cherry pie filling
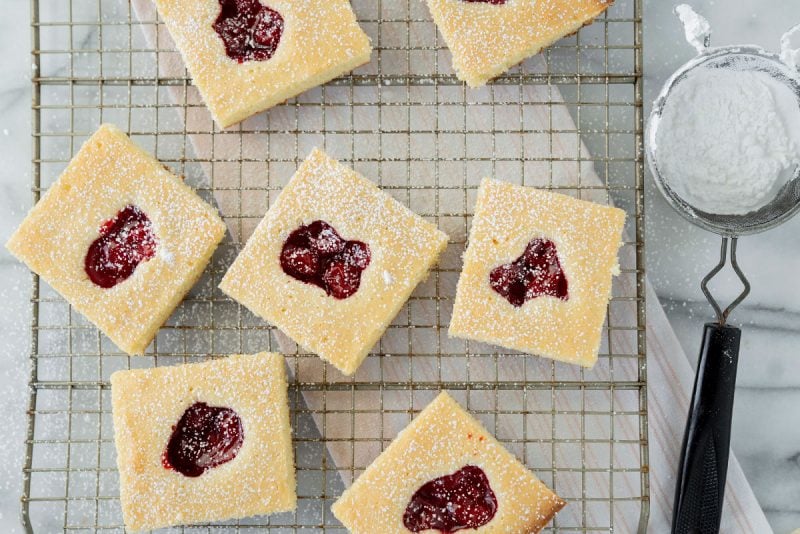
- Bake for 20-30 minutes or until golden brown and a toothpick inserted into the center comes out clean. Cool on a wire rack.
- Cut into bars and sprinkle with powdered sugar.
Notes
Nutrition
How to Make Cherry Pie Bars
Step 1: Preheat your oven to 350°F and butter a 17″x12″x1″ sheet cake pan. In an electric mixer, cream the butter and sugar until light and fluffy, then add the eggs one at a time, mixing just until blended. Stir in the vanilla extract.
Step 2: In a separate bowl, whisk together the flour and salt. Stir the dry ingredients into the creamed mixture just until blended—don’t overmix. Spread the batter evenly into your prepared pan, making sure to reach all the corners.
Step 3: Using a sharp knife, lightly press marks into the batter to divide it into 24 squares. Spoon 1 tablespoon of cherry pie filling into the center of each marked square, being careful not to press the filling down into the batter—it will naturally settle as it bakes.
Step 4: Bake for 20-30 minutes or until the bars are golden brown and a toothpick inserted into the center comes out clean. Let the bars cool completely on a wire rack, then cut along the marked lines and dust with powdered sugar before serving.
Filling Homemade Cherry Pie Bars
To ensure that you divide the cherry filling evenly among the bars, I recommend scoring the batter in the cake pan. Use a knife to make shallow lines in the cookie dough sketching out 24 equal squares. These lines will disappear during baking.
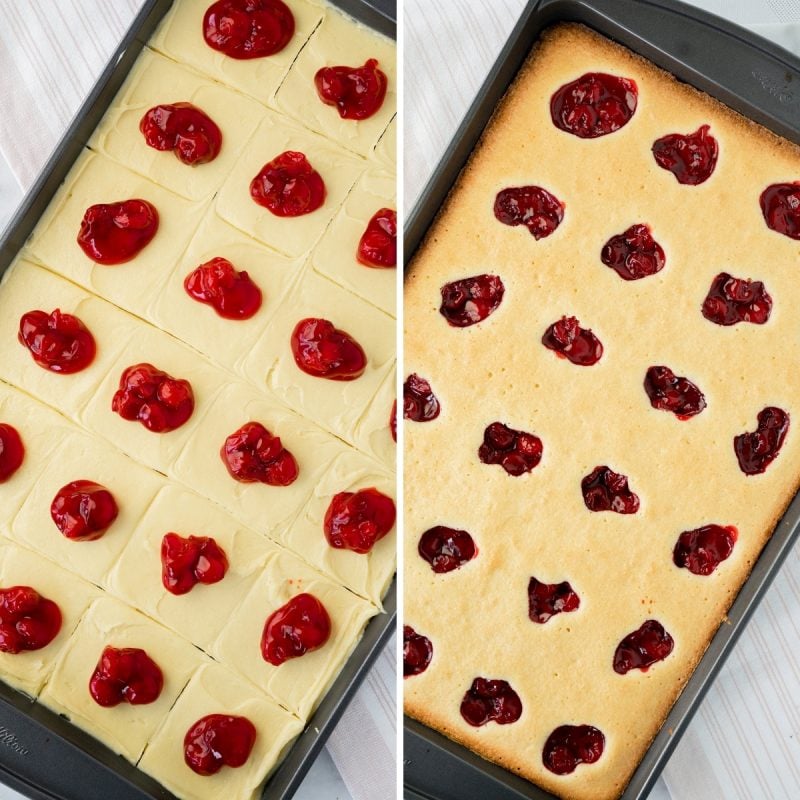
Then, spoon the cherry filling into each square. I find it helpful to make sure each square has 2-3 whole cherries as well as the filling. Then, do not push the cherries into the batter, they will sink on their own as the batter bakes.
To serve, let the bars cool to room temperature and sprinkle with powdered sugar before slicing.
Recipe FAQs
Yes, homemade cherry pie filling works beautifully in this recipe. Just make sure it’s thickened properly so it doesn’t make the bars soggy.
Yes, blueberry, apple, or strawberry pie filling all work wonderfully. Any canned pie filling can be swapped in based on your preference.
This usually happens from overmixing the batter or using too much flour. Mix just until combined and measure flour by spooning it into the measuring cup rather than scooping directly.
Expert Tips
- Room Temperature Ingredients: Let your butter and eggs sit at room temperature for 30-60 minutes before starting. This ensures even mixing and proper baking throughout the bars.
- Butter the Pan: Evenly coat your cake pan with butter, including corners and sides, by unwrapping one end of a butter stick and using it like a crayon to wipe it all around the pan.
- Use an Offset Spatula: The batter is stiffer than typical cookie dough but still spreadable. An offset spatula works best for even distribution, though a rubber spatula or large spoon works too.
- Spread to Corners: Make sure to push the batter all the way into the corners of the pan so they don’t overbrown while the center finishes baking.
Storing Cherry Bars
Store leftovers in an airtight container on the counter for up to four days. You can also freeze the bars for up to three months.
More Bar Recipes to Try
If you love easy cherry bars, give these other treats a try next:
- Key Lime Coconut Cashew Bars are zesty, bright and just sweet enough with a creamy, nutting filling.
- Fall Millionaire Magic Bars have a shortbread crust and decadence from toffee, coconut and M&Ms.
More Delicious Bars Recipes to Consider


Did you try this recipe? Leave a ⭐️ rating below and share it on Instagram.

Claire @ Claire K Creations
These look so pretty and seem deceptively easy to make! I love a biscuit that doesn’t require rolling and balling and all that hard work.
Thanks!
marla {family fresh cooking}
Your cookie bars are very festive and beautiful! Those red cherries would be so pretty on a Christmas table. Thanks for telling us about that Lucky Leaf filling, I always like to learn about new products. xo
pigpigscorner
They all puffed up so nicely!
rebecca
oh these look so pretty and perfect for the season
Alison @ Ingredients, Inc
These look amazing! Can’t wait to meet you next week!
Lorraine Not Quite Nigella
These look so good mum! I like chery with lots of fruit and citrus too-we think alike! Xxx
Barbara
I love this recipe, Barbara! I would have put more cherries in too. 🙂 I can’t wait to try these and watch how they puff up!
Nutmeg Nanny
How delicious do these look! I could totally eat 1, 2, 3…… 🙂
Asha@FSK
Ohhh!! these look so good! Barbara, I am loving your creations for this years 12 weeks!!
Crustabakes
i dont think i would have minded the extra filling!
Lora
Wow. These are beautiful!
megan
Those are so cool! I imagine you could use any thick type of filling – I say that because I have a container of strawberry cherry preserves in the freezer that is begging to be used.
And besides, that looks to me like it’s a faster way to make a pie! 🙂
Katie Rose
At first glace I thought these were puff pasty, they look delicious! I love cherries and this looks like a marvelous way to showcase them. I personally would also go with a large-ish dollop of cherries because I’d want cherries in every bite!
Bonnie
I’m so glad you liked the cherry bars. I think it’s wonderful that we can adapt and change things to suit our tastes. I like the bigger amount of filling. In fact, we have been putting more of the filling in our bars lately. Yours look beautiful Barbara.
Tracy
What gorgeous cookies! And they look so easy to make.
Lisa
What lovely cookies. They look so fluffy.
Steph@stephsbitebybite
These are beautiful!! What a great job! I gotta try these out!
Sue
These look so pretty, Barbara! My cherry-lovin’ daughter would love these, and with the almond too;) Have a great weekend! Sue:)
Rosa
Delicious looking! Great bars.
Cheers,
Rosa
Erin @ Making Memories
Yours look pretty darn good, though!!!