
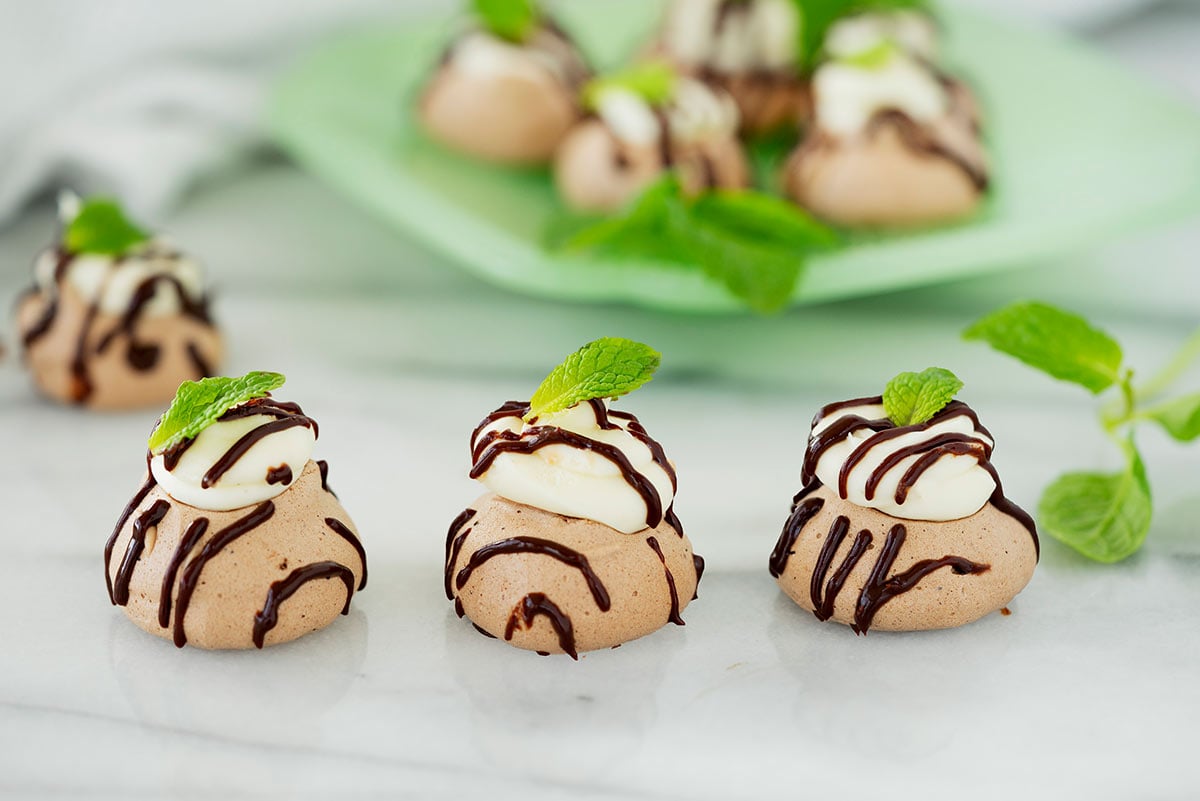
Chocolate Mini Pavlovas are bite-sized treats with a crispy on the outside but soft and marshmallowy on the inside chocolate pavlova topped with a creamy whipped mascarpone filling and a decadent chocolate ganache drizzle.
WANT TO SAVE THIS RECIPE?
Enter your email below and we’ll send it straight to your inbox. Plus you’ll get great new recipes from us every week!
Homemade chocolate pavlovas might seem like a decadent treat. And they certainly taste that way. But these hand-held desserts are easier to make than you might think. And it’s so rewarding to indulge in the crisp, cream, delicious treats that you’ve made yourself.
This recipe is perfect for Valentine’s Day, but the classic pairing of chocolate and mint means this dessert is welcome all year long.
Update: I’ve updated and simplified my chocolate pavlova recipe and added new step-by-step photos to give you a hand in the kitchen. Enjoy!
How to Make Perfect Chocolate Pavlovas
The best pavlovas are crisp on the outside and marshmallowy soft on the inside.
Here are a few of my tips to make the perfect meringue for pavlovas:
- Be sure to whip your eggs whites all the way to the soft peak stage. You’ll know they’re there when the peaks stand up on their own.
- Don’t be afraid to whip the whites at a higher speed than you’re used to (up to 8 or 9 on an electric stand mixer). You really want to incorporate all of the sugar into the whites and beat plenty of air in there. Otherwise, you risk lumpy or deflated pavlovas.
- When you have smooth and glossy stiff peaks, fold the mixture and see if the meringue underneath is stiff as well. If not, keep mixing, then when you think it’s ready again, keep mixing even longer 🙂

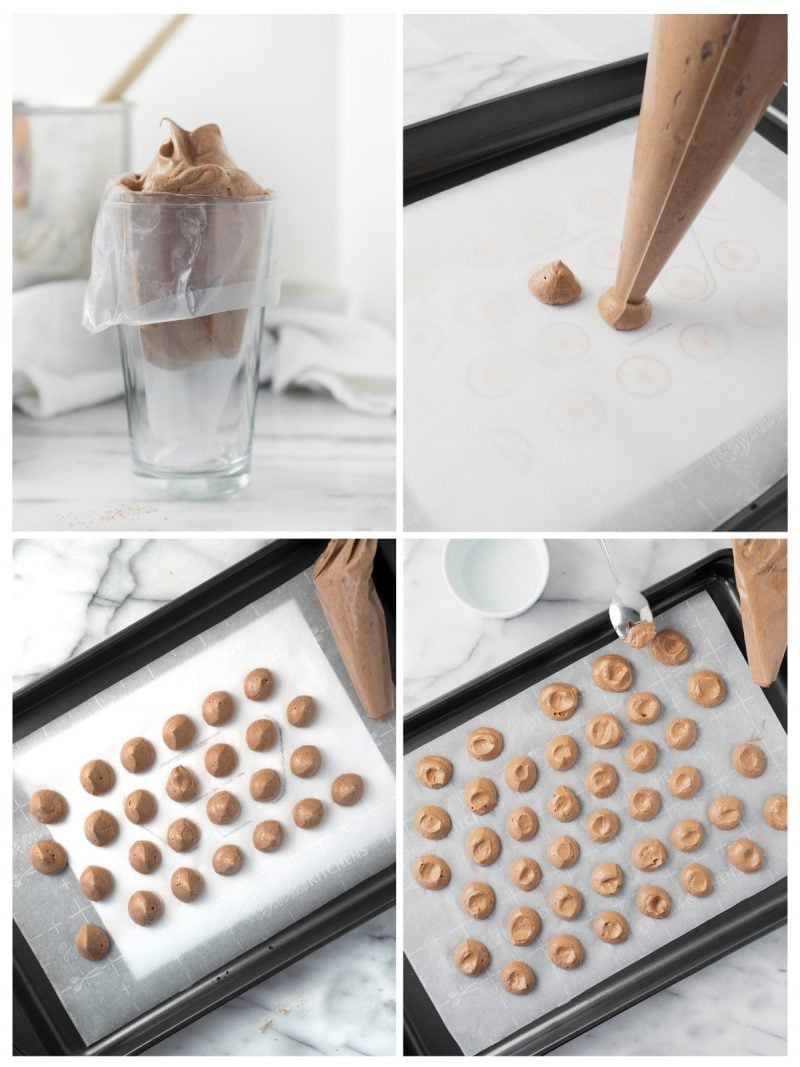
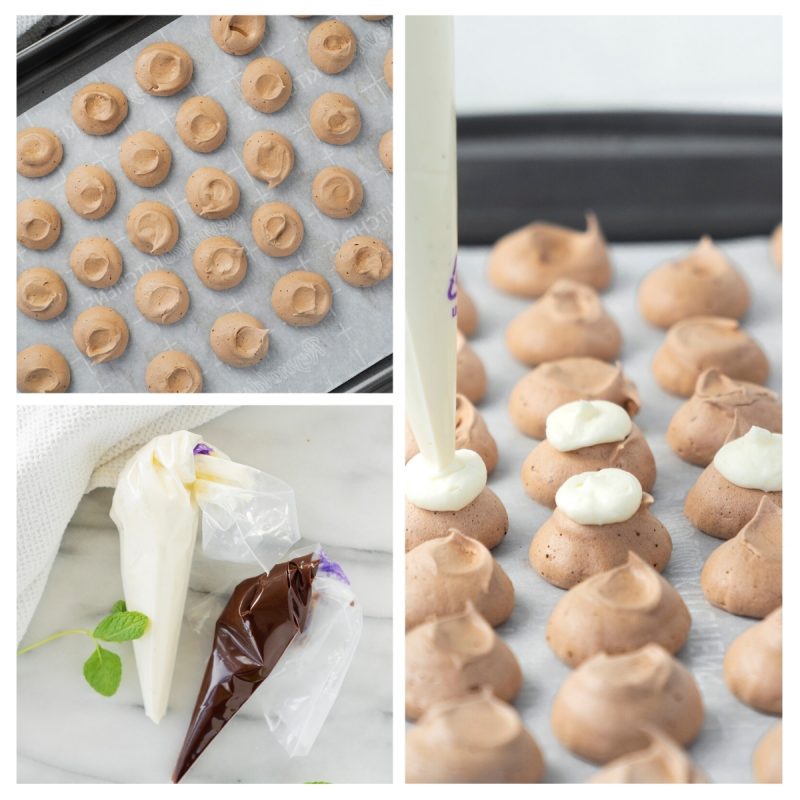
Making & Piping Individual Pavlovas
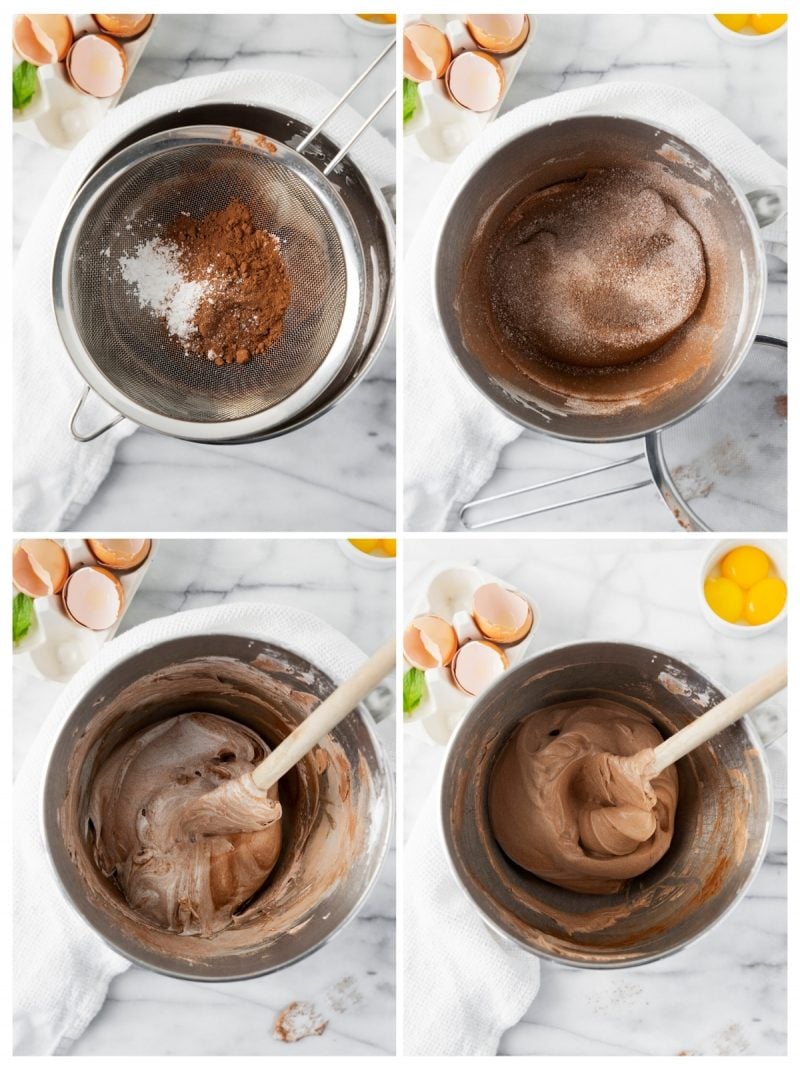
When folding the powdered sugar and cocoa into the meringue, it will clump as the powdered mixture starts to make its way through. Keep folding, and slowly but surely it will start to fully combine. You’re done when the mixture is a fully uniform color (no white or chocolate streaks). It should still be smooth and glossy.
To pipe and bake your chocolate meringue cookies, fill a piping bag with the chocolate egg white mixture. Cut the tip to match the size of pavlovas you want. For the template I used, I cut the tip to about ¾ inch in diameter.
Pipe the pavlovas in even circles to match your template. If you have a few with peaks on top, dip your finger in cold water and gently tap the peak down.
Before baking, make a small well for the filling by lightly pressing the top of each cookie with the back of a spoon. Then bake the pavlovas in a low oven (200°F) for 45-60 minutes. Pavlovas are done when the outside is no longer tacky and they easily detach from the parchment.
Mascarpone Mousse Filling
This mascarpone mousse filling is dreamy, creamy, and light as air. It’s the perfect topping for crisp and airy chocolate pavlovas.
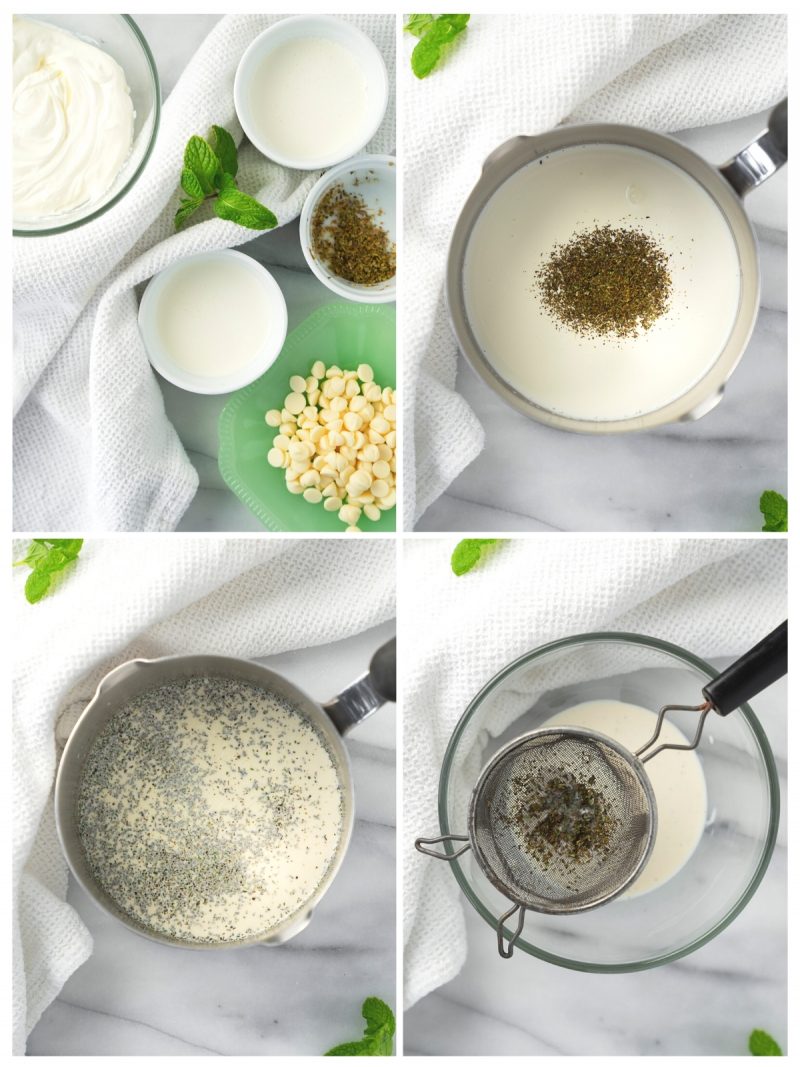
I like to add herby brightness with fresh or dried mint. If you use fresh mint, you will need around a ¼ cup chopped.
When straining the mint leaves out of your cream, you may need to strain a few times depending on how fine the pieces are. It’s possible you may have a few stragglers in your mixture, which is fine as long as they are tiny.
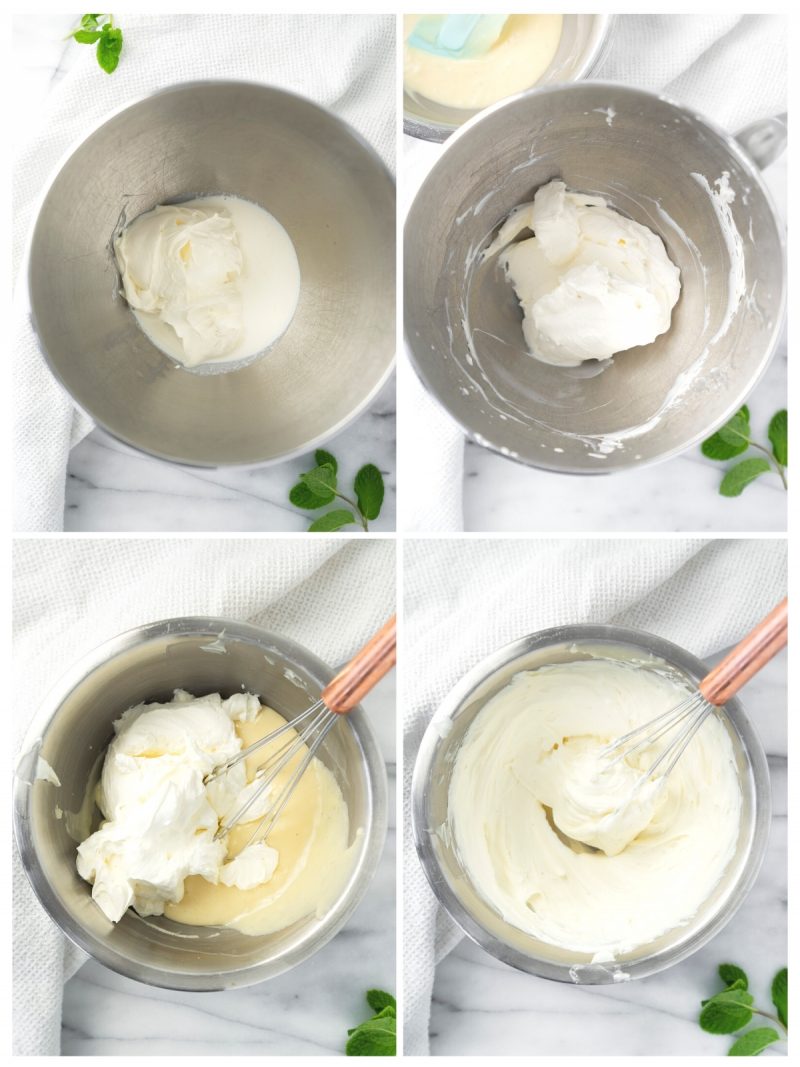
When whipping mascarpone with the heavy cream, mix until creamy, fully combined and holds soft peaks. However, be careful not to over whip, which will cause the mascarpone to break.
Tip: Be sure to refrigerate your white chocolate filling before assembling the mini pavlovas.
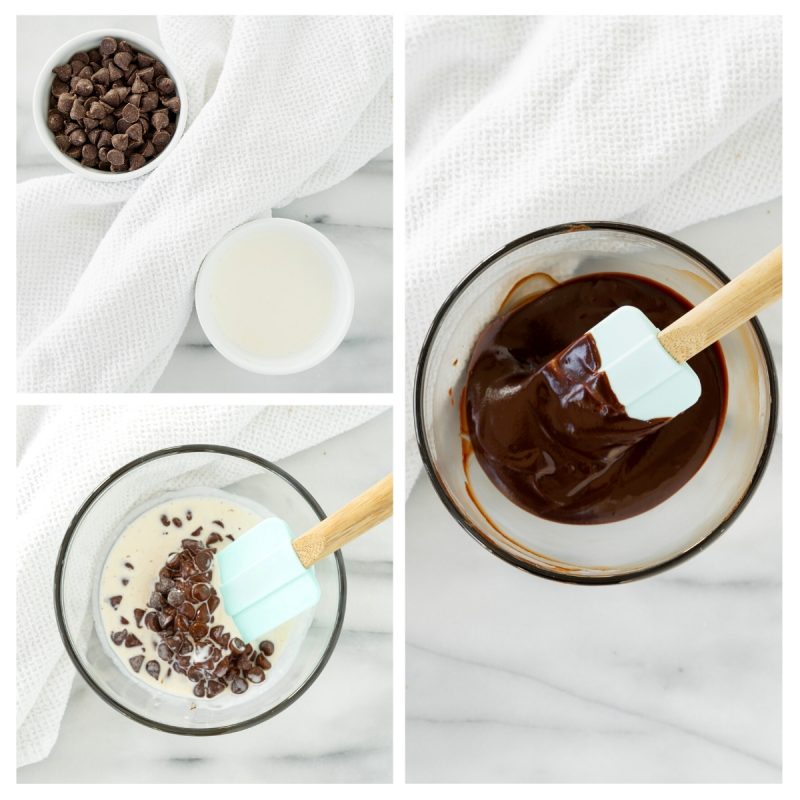
Chocolate Ganache Drizzle
I top these mini pavlovas with a simple two-ingredient chocolate ganache. It’s easy to make by simply pouring heated cream over chopped dark chocolate and stirring until it’s melted.
Cool the ganache but don’t refrigerate it. It should be room temperature for easy drizzling.
Assembling Mini Pavlovas
For best results, assemble your pavlovas just before serving. First, place the cookies on a serving platter. Then pipe mousse onto the top of each pavlova, enough so that each bite of pavlova has a bite of mousse with it. Finally, drizzle ganache over the top. I do this with a piping bag with as small a tip as possible for delicate drizzles.
Garnish with fresh mint leaves. For these mini pavlovas, you will want to use the smaller inner leaves of the fresh mint plants.
Storage
When it comes to serving your chocolate mini pavlovas, the sooner the better. You can store leftovers in an airtight container but note that the moisture in the mousse will start to soften the cookies.
Keep baked, unfilled pavlovas in an airtight container until ready to assemble. Pavlovas will dry quickly depending on the humidity in the air or lack thereof. If your cookies become sticky again before you assemble, dry them out in a 200°F oven until no longer tacky.

More Chocolate Desserts for Valentine’s Day
Whether you’re on the hunt for the perfect treat to surprise your Valentine, or just need to satisfy your sweet tooth, these are the recipes to try next:
- Black Forest Chocolate Tart with sweet fresh cherries and fluffy chocolate mousse is a show-stopping dessert.
- Pressure Cooker Cheesecake Bites are dipped in a crunchy chocolate shell and served on a stick for a perfect shareable sweet.
- Chocolate Cake with Oreo Cheesecake Filling because there’s nothing better than adding more chocolate and cream to everyone’s favorite cookie!
WANT TO SAVE THIS RECIPE?
Enter your email below and we will send it straight to your inbox. Plus you will get great new recipes from us every week!

Chocolate Pavlovas with White Chocolate Mint Mousse
Equipment
Ingredients
Meringue
- 3 large egg whites
- ½ cup plus 1 tbsp 110 grams white granulated sugar
- ¼ cup 30 grams confectioner’s (icing) sugar
- ⅓ cup 30 grams cocoa powder
Mascarpone Filling
- ½ cup heavy cream divided
- ½ teaspoon dried mint leaves
- 4 ounces white chocolate chips
- 1 cup mascarpone
- 1 recipe chocolate crème anglaise I only made half the amount
- ¼ cup mascarpone
- ¼ cup heavy cream
Chocolate Ganache Drizzle:
- ½ cup semisweet chocolate chips
- ¼ cup heavy cream
Instructions
Chocolate Meringue (for the chocolate Pavlova)
- Place a rack in the center of the oven and preheat to 200º F (95º C) degrees. Line two baking sheets with silpat or parchment and set aside.
- Put the egg whites in a bowl and whip until soft peaks form. Increase speed to high and gradually add granulated sugar about 1 tbsp at a time until stiff peaks form. (The whites should be firm but moist.) Sift the confectioner’s sugar and cocoa powder over the egg whites and fold the dry ingredients into the white. (This looks like it will not happen. Fold gently and it will eventually come together.)
- Fill a pastry bag with the meringue. Pipe the meringue into whatever shapes you desire. Alternatively, you could just free form your shapes and level them a bit with the back of a spoon. (I used a macaron template to make bite sized pavlovas.)
- Bake for 2-3 hours until the meringues become dry and crisp. Cool and store in an airtight container for up to 3 days. (I baked my bite sized meringues 1 hour.)
White Chocolate Mint Mascarpone Mousse (for the top of the Pavlova base)
- Put ¼ cup of the heavy cream and the dried mint leaves in a saucepan over medium high heat. Cook over low heat for 2 minutes. Remove from heat. (Or heat in microwave on 50% power until warm.) Cover and steep 15 minutes.
- Strain the cream and discard the mint leaves.
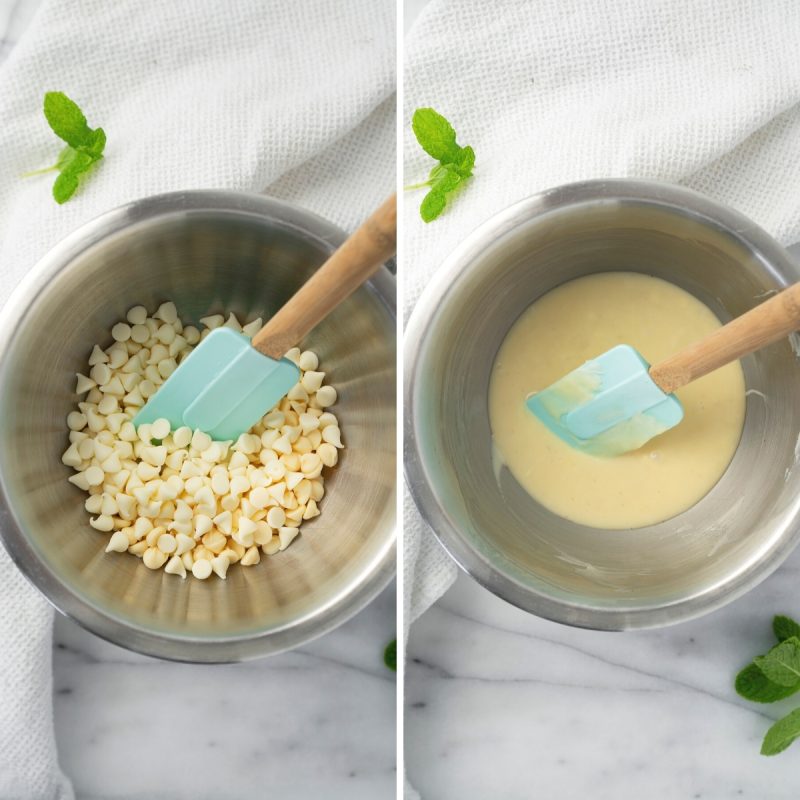
- In a double boiler over hot water, melt the chocolate, stirring occasionally. Add the mint infused cream to the chocolate and stir until smooth. (Or combined chocolate and mint infused cream and heat in microwave on 50% power until chips start to melt, stir until the chocolate is smooth and creamy.) Set aside to cool completely.
- Place the mascarpone and the remaining ¼ cup of cream in a bowl. Whip on low for one minute until the mascarpone is loose. Whip on medium speed until it holds soft peaks. (DO NOT OVERBEAT AS THE MASCARPONE WILL BREAK.) Mix the mascarpone mixture into the chocolate until well incorporated. Chill.
Chocolate Mascarpone Cream (for drizzling)
- Gently stir in the mascarpone. Put the cream in a separate bowl and beat with electric mixer until very soft peaks are formed.
- Fold the cream into the mascarpone mixture.
Assembly:
- Pipe the mousse onto the pavlovas and drizzle the mascarpone cream over the top. Garnish with a fresh mint leaf. (Note: I would pipe the mousse onto the pavlovas and drizzle the mascarpone cream just before serving so that the meringues stay crisp and chewy.)
Visit the Daring Kitchen Recipe Achieve for additional recipes, instructions and step by step photographs. Visit the Daring Bakers Blogroll to see the creative pavlovas the other Daring Bakers created.

bake in paris
Love the mini version of the pavlovas. Mint leaf is a beautiful accent to the majority of chocolate components.
One word to sum up ….. delicious!!
Sawadee from Bangkok,
Kris
Stephanie Savors the Moment
Wow – those Pavlovas look delicious and what great photos too! Fabulous job:)
Asha @ FSK
Very cute mini creations and great flavor combinations!!
The Waspy Redhead
Yum! I always miss the Daring Bakers challenges – I need to make a goal for myself to play along sometime soon.
Nachiketa
awesome looking dessert….the mint is such a cool idea :)cheers,The Variable, Crazy Over Desserts – NachiketaCatch me on facebook @ Crazy Over Desserts
colehillkitchen
oooh these look lovely!! great flavours and they look so dainty!!
Becca 🙂
Juliana
Oh! So beautiful…love the small size, they are so cute. Awesome!
Laura
Lovely! So darling, and I love the flavor combination.
elra
Beautiful challenge, they look delicious Barbara!
Cathy
Beautiful! I've never made chocolate meringues and can't wait to try this.
Barbara
These look marvelous, Barbara. Meringues do not do well in Florida's humidity, but I do love them. You just have to eat them right away. Which I don't think would be a problem with these!
chef_d
Your mini mint pavlovas look divine! Excellent job as always! I love your chocolate and mint combination 🙂
Audax
Perfect execution of this challenge just love that photo of the plate of pavs so classy and using real mint is inspired. Cheers from Audax in Sydney Australia. Super effort on this challenge wonderful flavour combiantion.
Bridgett
I love the individual pavlovas as I usually just make one big one. I will try it your way next. These look fabulous.
Deeba PAB
Pretty and most perfect Barbara. Love them. I love the marshmallow interiors and the ides of crushed dried mint in the mousse. Must have been a wonderful addition to the bloggers party! WOW!!
PS Feel like I've got my nose stuck to the glass of a patisserie shop looking at the first picture!
Sue Sparks
They look so beautiful, Barbara! Sounds like your recipe stretched a long way, and got rave reviews from all! Bravo! Can't wait to do this recipe!
Dragon
Love chocolate and mint together. Mmmm… Great job on this month's challenge.
SLCFoodie
I didn't get a chance to tell you but these were absolutely amazing!! They really melted in my mouth! I will have to try making them myself and they were the perfect party food.
faithy, the baker
Looks wonderful and i love bite size desserts!
Memória
Gracias a ti, ¡he hecho un mousse con menta como tú! I sincerely admire you for always completing the DB and DC challenges. I don't know how you do it, but you are awesome, and this one is definitely no exception. They all look beautiful! I'm glad everyone liked them. I posted my challenge result that was partly inspired by you!