
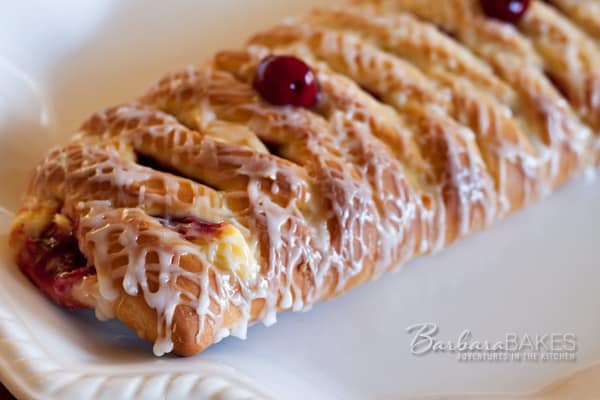
This is a perfect Cheese and Cherry Danish recipe with tender yeast dough, creamy cheese filling, and sweet cherry topping. This bakery-style pastry brings professional results to your home kitchen with easy step-by-step instructions.
WANT TO SAVE THIS RECIPE?
Enter your email below and we’ll send it straight to your inbox. Plus you’ll get great new recipes from us every week!
🥐 Cranberry cream cheese danish is a delicious way to enjoy seasonal cranberries. They add a bright, tart flavor that pairs perfectly with rich cream cheese and buttery pastry.
My 2 Best Tips For Making Cheese and Cherry Danish
Master the Braided Pattern: When creating the signature lattice design, cut your side strips uniformly at exactly 1 inch wide and 2 inches long. Work systematically, alternating sides as you fold each strip over the filling at a slight angle. Keep gentle, consistent tension to ensure even spacing and a professional bakery appearance that will impress everyone.
Don’t Overfill Your Danish: Resist the temptation to add extra filling. Too much will cause leakage during baking and prevent proper sealing of the braided strips. Use about half the cheese mixture and half the cherry filling for each danish, reserving some cherries for final decoration.

This cheese and cherry danish recipe delivers the same flaky, buttery pastry you’d find at your favorite bakery. The combination of enriched yeast dough with sour cream creates an incredibly tender texture that rivals any professional kitchen.
The creamy cheese filling provides a delightful contrast to the sweet cherry pie filling, while the vanilla-scented dough adds depth to every bite. This harmony of flavors makes each piece absolutely irresistible!
🩷 Melissa
WANT TO SAVE THIS RECIPE?
Enter your email below and we will send it straight to your inbox. Plus you will get great new recipes from us every week!

Easy Cream Cheese and Cherry Danish
Ingredients
Dough
- 3 cups bread flour
- 1 ½ teaspoons salt
- 3 tablespoons sugar
- 2 ¼ teaspoons active dry yeast* (1 package)
- ¼ cup water
- ½ cup sour cream
- 3 tablespoons butter
- 2 eggs
- 1 teaspoon vanilla
Filling
- 6 oz. cream cheese, room temperature (two 3 oz. packages)
- 1 egg
- 1 tablespoon sugar
- ⅛ teaspoon salt
- 1 can 1 lb. 5 oz. cherry pie filling
Icing
- 2 to 3 tablespoons water
- 1 ¼ cup powdered sugar
Instructions
- In a mixing bowl, combine yeast, 1 cup flour, salt and sugar.
- Heat water, sour cream and butter to 120º to 130º F; add to dry ingredients. With mixer, beat 2 to 3 minutes on medium speed.
- Add eggs and vanilla; beat 1 minute.
- Gradually add remaining flour by hand or with a mixer that has dough hook(s); knead for 5 to 7 minutes until smooth and elastic.
- Place dough in lightly oiled bowl and turn to grease top. Cover; let rise until dough tests ripe, approximately 30 to 40 minutes.
- To prepare filling, cream together cream cheese, egg, sugar, and salt. Set aside
- Punch down dough and divide in half. On a lightly floured surface, roll each half to a 12 x 17-inch rectangle.
- Spread half of filling lengthwise over center third of dough. Top with approximately half of pie filling. (Save a few cherries from filling to decorate danish after it is baked.)
- On each long side, cut 1-inch wide strips, 2 inches long. Starting at one end, fold strips at an angle across filling, alternately from side to side.
- Place dough on greased baking sheet. Cover; let rise until indentation remains after lightly touching the side of the dough, approximately 30 minutes.
- Preheat oven to 350º. Bake in preheated oven 30 to 35 minutes. Cool on wire rack. Drizzle with icing; place a few cherries on small lattice openings to decorate. Cut into individual danishes, if desired.
Notes
- Store cooled danish in an airtight container at room temperature for up to 2 days.
- Or refrigerate for up to 5 days.
- For longer storage, wrap individual pieces and freeze for up to 2 months. Reheat gently in a 300°F oven for best texture.
Nutrition
How To Make Cheese and Cherry Danish

Step 1: In mixing bowl, combine yeast, 1 cup flour, salt and sugar. Heat water, sour cream and butter to 120º to 130º F; add to dry ingredients. With mixer, beat 2 to 3 minutes on medium speed. Add eggs and vanilla; beat 1 minute. Gradually add remaining flour by hand or with a mixer that has dough hook(s); knead for 5 to 7 minutes until smooth and elastic. Place dough in lightly oiled bowl and turn to grease top. Cover; let rise until dough tests ripe, approximately 30 to 40 minutes.
Step 2: To prepare filling, cream together cream cheese, egg, sugar, and salt. Set aside
Step 3: Punch down dough and divide in half. On a lightly floured surface, roll each half to a 12 x 17-inch rectangle.
Step 4: Spread half of filling lengthwise over center third of dough. Top with approximately half of pie filling. (Save a few cherries from filling to decorate coffeecake after it is baked.) On each long side, cut 1-inch wide strips, 2 inches long. Starting at one end, fold strips at an angle across filling, alternately from side to side. Place coffeecake on greased baking sheet. Cover; let rise until indentation remains after lightly touching the side of the coffeecake, approximately 30 minutes.
Step 5: Preheat oven to 350º. Bake in preheated over 30 to 35 minutes. Cool on wire rack. Drizzle with icing; place a few cherries on small lattice openings to decorate coffeecake.
Recipe FAQs
The dough is ready when it has doubled in size and passes the “poke test.” Gently press two fingers into the dough – if the indentation remains and doesn’t spring back, your dough has risen sufficiently and is ready for shaping.
If your dough is excessively sticky, add flour. One tablespoon at a time during kneading. However, slightly sticky dough is normal and preferable to overly dry dough, which can result in tough pastry. Use lightly floured surfaces when rolling.
Absolutely! You can prepare the shaped danish, cover tightly, and refrigerate overnight. Allow extra rising time (45-60 minutes) the next morning before baking, as cold dough takes longer to rise.
More Delicious Sweet Rolls Recipes to Consider

Did you try this recipe? Leave a ⭐️ rating below and share it on Instagram.

conjeannieal
This was a very pretty and tasty coffeecake. For our tastes I cut the salt to 1 tsp. and added a little more sugar to the cream cheese filling. I was a little surprised that the dough DID make plenty for two coffeecakes, so I made one with brown sugar and cinnamon instead of cherries. One recommendation is to either roll your dough on a piece of parchment paper that you can transfer to your baking pan or shape your dough in your pan. It can be difficult to transfer to the baking pan once it’s filled. Thanks for a great recipe! Will use again. : )
marcelle jordan
I see in the delay baking link that another option is to shape the dough and then refrigerate overnight. Is there any particular reason why you choose to refrigerate after kneading? It seems like the rise would take less time and I would be more prepared if I shaped and then refrigerated.
Barbara Schieving
Hi Marcelle – you could definitely give it a try that way. Sometimes the dough will rise too much in the fridge if the yeast is really active, but I haven’t tried it with this recipe. Let me know how it goes if you try it.
Maggie
Can this dough be made in the bread machine? Thanks.
Barbara Schieving
Hi Maggie – the bread machine directions for this recipe are on the Red Star website http://redstaryeast.com/cherry-n-cheese-lattice-coffeecake/ Enjoy!
Christine
I’m making this beauty right now… Why am I dividing the dough in half??? After rising. Is this for two? Thank you!!
Barbara Schieving
Yes, it makes two. Enjoy!
Christine
Ok I made it! What a wonderful recipe. Very easy to follow and turned out amazing! Thank you. You are the best!
Barbara Schieving
Thanks Christine! It really is easy. So glad you tried it and loved it. Thanks for taking the time to let me know.
Kelly
Holy yumminess! This looks amazing. Pinning for the day I’m brave enough to give it a try! xo
Brenda @ a farmgirl's dabbles
That is gorgeous! I love cherries and cream cheese together, reminds me of a recipe Mom used to make!
Coz
Have the dough in the fridge now, waiting to bake it fresh in the morning. Wish me luck, especially with the “plaiting”.
Barbara Schieving
Good luck! You’ll do great. I think a loose braid, with lots of gaps where you see the filling, bakes up prettier.
Maureen | Orgasmic Chef
Talk about a winner of a breakfast!
Barbara
I LOVE that website! This is such a gorgeous coffeecake, Barbara. And a combo of two of my favorite fillings inside, too!
Rosie @ Blueberry Kitchen
This look gorgeous, I love the lattice style top! I love the sound of the cherry pie filling and cream cheese combination too!
Nutmeg Nanny
Oh goodness, this looks so beautiful, I’d be hesitant to slice into it! I bet it tastes heavenly 🙂
Pam
Oh my! It looks amazing and so pretty. Wish I was eating this for breakfast right now!
ashley - baker by nature
This is just beautiful, Barbara!
Kitchen Belleicious
how absolutely beautiful is this! I love the lattice work and the flavor of cherry with cheesecake is amazing!
Liz
Gosh, this is one stunning coffeecake! And the filling sounds scrumptious, too! I’m certain I could eat more than my fair share 🙂
Lora
This is just beautiful. Reminds me of family gatherings.
Lana @ Never Enough Thyme
Oh my gosh, that looks so delicious! Could you send over a couple of slices to go with my coffee this morning? 🙂
Maria
Beautiful!!
Jersey Girl Cooks
I would love to have a piece of this for breakfast. It reminds me of the Danish we would get from a bakery when I was younger.
Asha@FSK
You know, I have yet to make lattice pastries. this is so beautiful. I would love a slice of it!